This article dives into 4 ways to customize WooCommerce emails so you can make the most of these transactional emails that get 80-85% open rate.
Default WooCommerce order emails can leave a lackluster impression of your brand, potentially induce buyer’s remorse, and result in missed opportunities for further customer engagement.
With an open rate of 80-85%, compared to the 20-25% average for marketing emails, transactional or order emails offer a significant opportunity for brands to engage with their customers. These emails provide prime real estate for showcasing your brand identity and creating a post-sales experience that customers enjoy.
Which WooCommerce Order Email Templates Can You Customize?
In WooCommerce, you have the ability to customize a variety of order-related emails that are sent out to customers throughout the purchasing process. Here are the key types of order emails you can customize:
- New Order Email: Sent to the store admin when a new order is placed.
- Canceled Order Email: Sent to the store admin if an order is canceled.
- Failed Order Email: Sent to the store admin when an order fails.
- Order On-Hold Email: Sent to the customer when an order is on hold.
- Order Processing Email: Sent to the customer when their order is being processed.
- Order Completed Email: Sent to the customer when their order is completed.
- Order Refunded Email: Sent to the customer if their order is refunded.
- Customer Invoice Email: Sent to the customer containing order information and payment links.
- Customer Note Email: Sent to the customer when you add a note to their order.
- Password Reset Email: Sent to the customer when they request to reset their account password.
- New Account Email: Sent to the customer when they create a new account.
Each of these emails serves a specific purpose in the customer journey, from the moment an order is placed to when it is fulfilled. When you customize WooCommerce emails, it allows you to provide a consistent brand experience, offer relevant information, and potentially promote other products or services.
So, how to customize WooCommerce emails? Well, here are 4 ways to do that.
- Using a plugin like Easy Mail Customizer by Xfinity Soft
- Using WooCommerce Email Settings
- Editing Email Template Files Directly
- Using WooCommerce Hooks and Editing Functions.php file
Using Easy Mail Customizer to Customize WooCommerce Emails
Easy Mail Customizer for WooCommerce is a powerful WooCommerce email plugin that allows you to customize WooCommerce emails with ease. This plugin provides a user-friendly interface to personalize every aspect of your WooCommerce order emails, from the header and footer to the body content.
With its intuitive drag-and-drop builder, you can edit WooCommerce email templates to include your brand’s unique style and messaging without any need for coding. The best part about Easy Mail Customizer is its Dynamic design blocks, which allow you to insert dynamic content like Product Recommendations for upsells.
Here is how to use Easy Mail Customizer to customize WooCommerce emails:
Step 1: Install and Activate the Easy Mail Customizer Plugin by XfinitySoft
The first step is to buy the Easy Mail Customizer plugin and install it on your WooCommerce store.
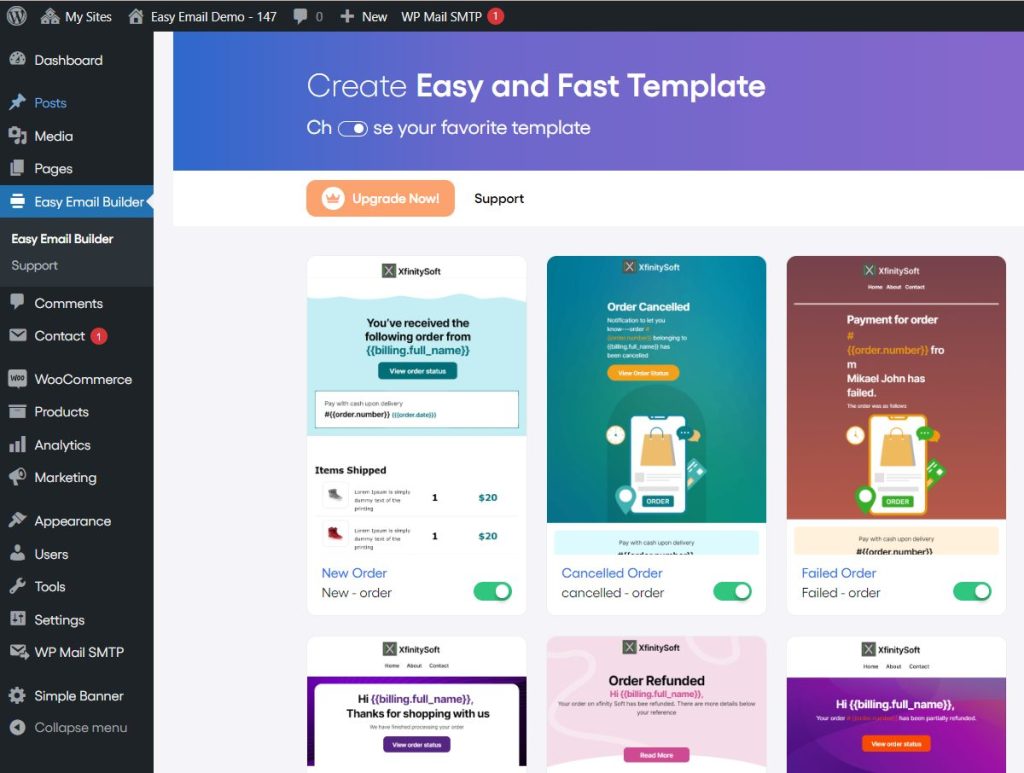
Once installed, a tab called ‘Easy Mail Builder’ will appear on the WordPress dashboard. Click and go to Easy Mail Builder option from the dropdown.
Step 2: Choose the WooCommerce Email Template You Want to Edit
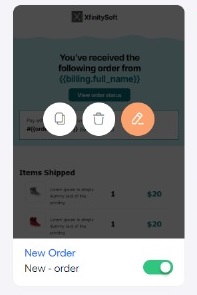
On the screen that appears, you’ll see all the different templates of transactional emails that are automatically sent during the order process in WooCommerce. You can choose to edit any one of these templates by hovering over the template and clicking the pencil icon.
Step 3: Design Your Layout
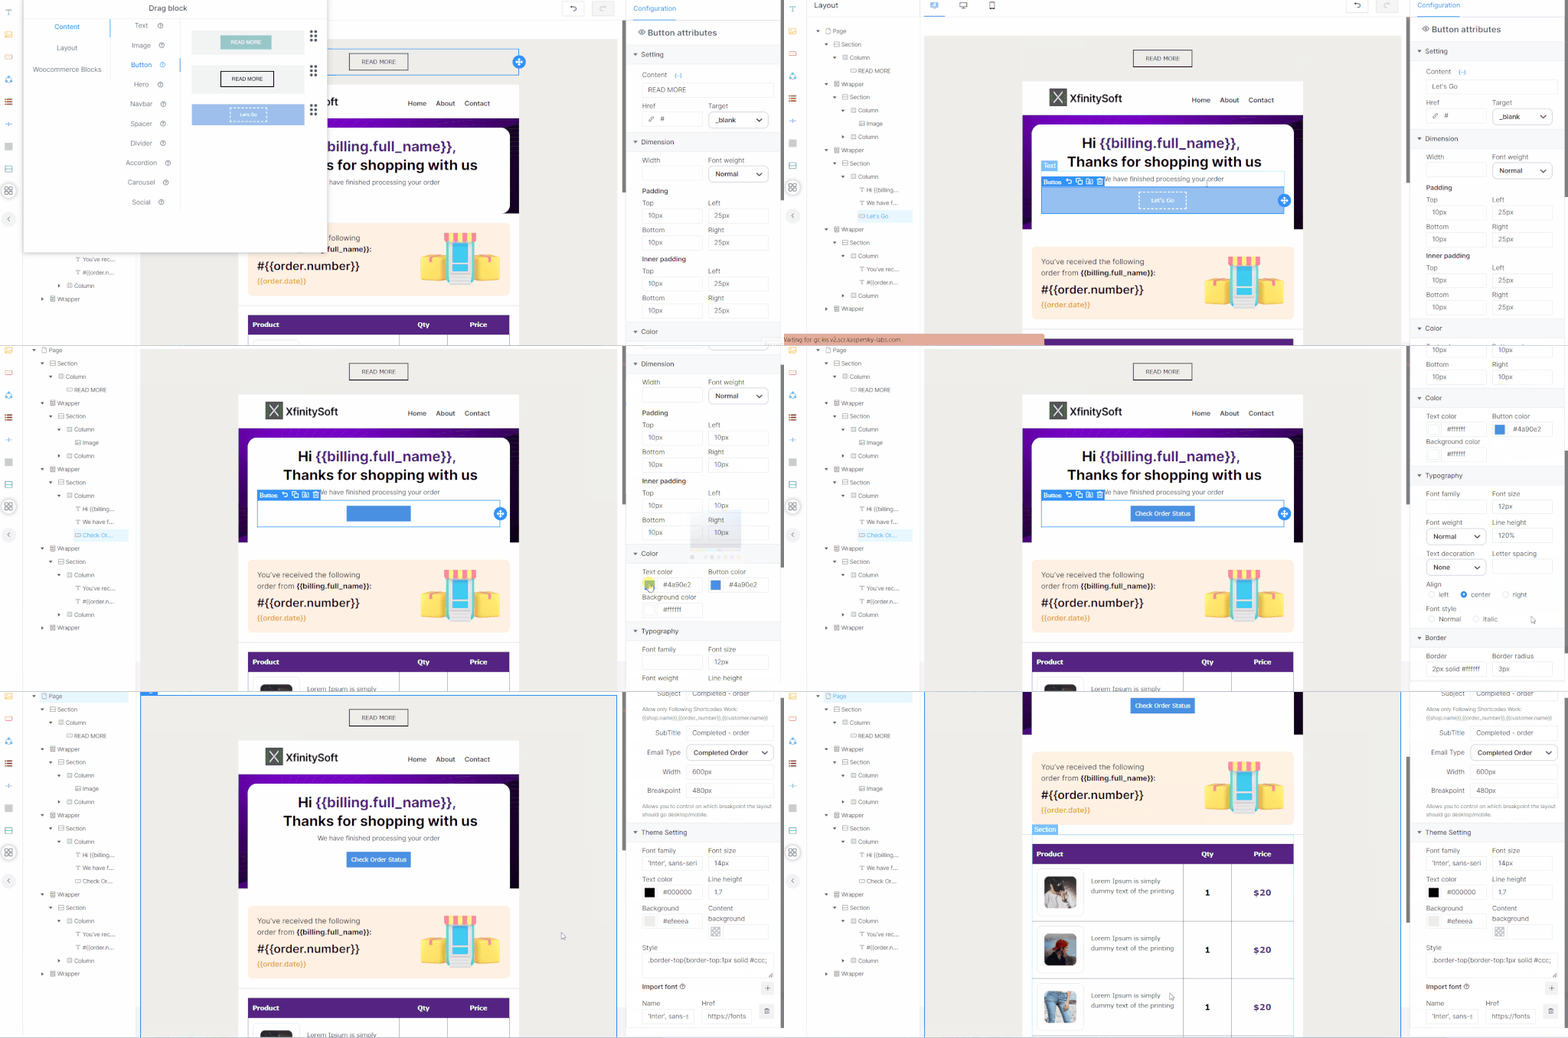
Use the layout blocks provided by Easy Mail Customizer to create the structure of your email.
These include:
- Wrapper: The overall container for your email.
- Section: Acts as a row to hold columns or groups.
- Columns: To add different content side by side.
- Groups: Similar to columns but do not stack on mobile devices.
Step 4: Add Content to your Custom WooCommerce Email Templates
Populate your layout with content blocks by dragging and dropping elements such as text, images, and buttons into the layout sections. Here are the content blocks that are available to use:
- Text: Add textual content to your emails.
- Image: Insert responsive images.
- Buttons: Include clickable buttons.
- Navbar: Add a navigation menu, with a compact hamburger option for mobile.
- Spacer: Create space in your email with varying widths.
- Divider: Insert a horizontal line with styles like solid, dashed, or dotted.
- Accordion: Use tabs to organize content compactly, expanding to show details on click.
- Carousel: Showcase a rotating image gallery.
- Social: Feature social network icons for quick actions.
- Hero Image: Place a large, banner-style image with overlaid text and buttons.
Step 5: Incorporate WooCommerce Blocks
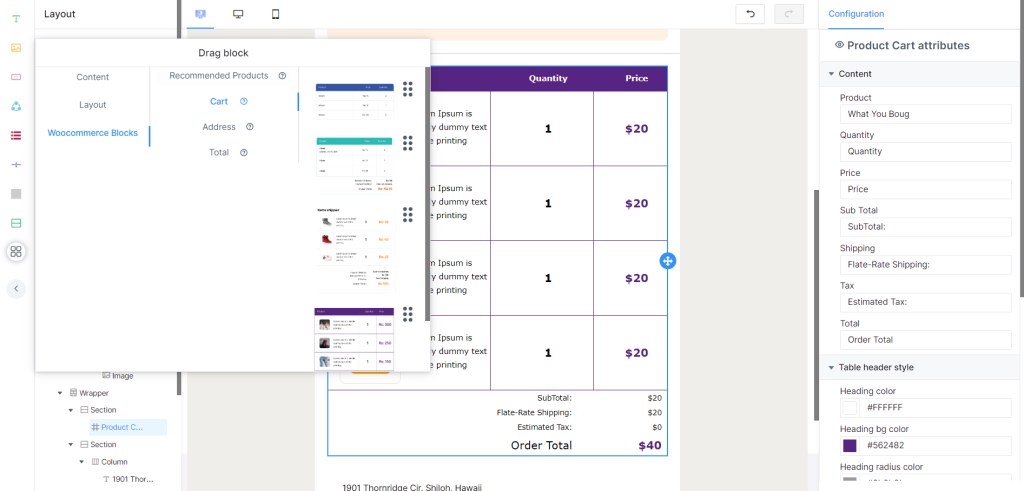
Drag and drop WooCommerce blocks into your email to add dynamic content like product recommendations, order details, and more.
Here are the WooCommerce Blocks available for use when you customize WooCommerce emails:
- Recommended Products: This block showcases additional items for purchase, encouraging further sales.
- Billing Address: Dynamically populates and displays the customer’s billing details.
- Shipping Address: Dynamically populates and displays the customer’s shipping details.
- Order Detail: Provides a comprehensive view of the customer’s order contents.
- Order Total: Displays the complete payment amount for the customer’s order.
- Order Subtotal: Shows the amount for the items purchased before taxes and shipping.
Step 6: Refine with Advanced Settings
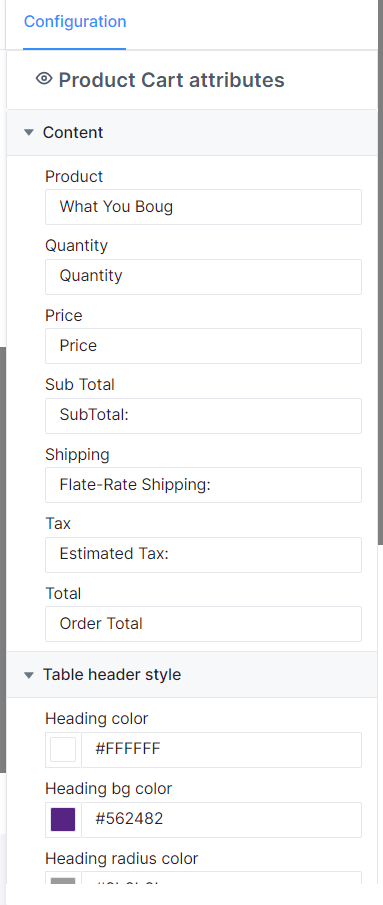
Click on any element to open the advanced settings panel on the right side.
Adjust settings like email subject, width, fonts, and colors to match your brand’s style.
Step 7: Use Shortcodes
Insert shortcodes into your email to personalize content with customer-specific information like names, order numbers, and addresses.
Step 8: Preview Your Email
Use the ‘Email Preview’ feature to see how your email will look on both desktop and mobile devices.
Step 9: Send Test Emails
Before applying the changes, send test emails to yourself or colleagues to ensure everything appears as expected.

Step 10: Apply and Go Live
Once satisfied with the customization, save your changes. Your new, personalized WooCommerce order emails are now ready to enhance your customer’s post-purchase experience.
That’s it. The Easy Mail Customizer Plugin offers a ton of options to customize WooCommerce emails. The easy-to-use interface allows anyone to make edits without any custom coding.
Customize WooCommerce Emails Using Built-in Settings: A Guide
If you don’t want to heavily customize WooCommerce emails and would only like to edit the content, brand colors, and fonts, it’s possible to do so through the built-in email settings of WooCommerce. In this case, you won’t need to install any plugin.
Simply navigate to WooCommerce from your WordPress dashboard and go to Settings. Click the ‘Email’ tab to access these settings.
Here, you’ll see all the different templates of order emails. Click the Manage button at the far right of the template you want to edit. This will open up a bunch of customization options for that template.
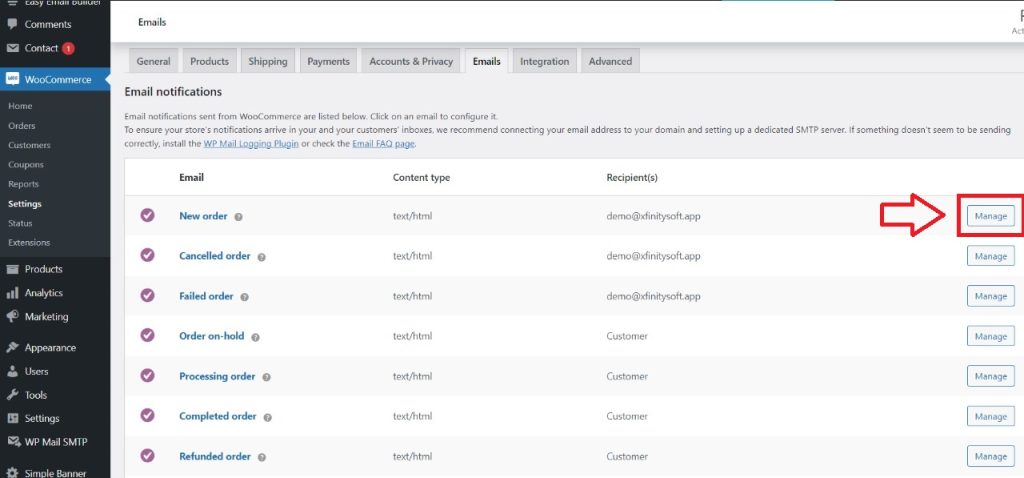
Built-in email settings are limited in the sense that you don’t get a lot of control beyond editing your subject line, heading, from-email, and Additional content (additional product information pulled from the product data of the product being sold). Template variables are available to use for email personalization.
Besides editing these basic settings, you can also edit some global settings including colors, header image, footer text, etc. Note that you don’t get control on a granular level and can only edit these on a global level.
Editing Email Template PHP Files to Customize WooCommerce Emails
Another way to customize WooCommerce emails is by directly editing the template files. This method is only recommended for those who are familiar with PHP and know what they are doing.
This method allows you to practically do anything with your order email templates. Given you can directly edit email templates and edit PHP and HTML code, you can do everything that the plugin mentioned in the first method allows you to do.
Here’s how to customize WooCommerce emails by directly editing the template files:
To override a WooCommerce email template, you need to follow a specific process. Here’s a step-by-step guide, including the file paths:
Step 1: Find the Template Location in WooCommerce Settings
- Go to your WordPress dashboard.
- Navigate to
WooCommerce>Settings. - Click on the
Emailstab. - Choose the email template you want to edit and click
Manage. - On the email settings page, scroll down to find the template file location. This will typically be something like
woocommerce/templates/emails/name-of-template.php.
Step 2: Copy the Original File
- Original File Location: The path you found in the WooCommerce settings will be relative to the WooCommerce plugin directory. For example, if the path is
woocommerce/templates/emails/customer-completed-order.php, the full path will bewp-content/plugins/woocommerce/templates/emails/customer-completed-order.php.
Step 3: Paste the File in your Theme Folder
- Access your server via FTP or File Manager in your hosting control panel.
- Navigate to the original file location (
wp-content/plugins/woocommerce/templates/emails/). - Find the specific email template file (e.g.,
customer-completed-order.php). - Copy this file.
- Navigate to your theme’s directory (
wp-content/themes/mytheme/). - Create a new directory called
woocommerceif it doesn’t already exist. - Inside the
woocommercedirectory, create another directory calledemails. - Paste the copied file into this
emailsdirectory. - Now, you can edit this file with your PHP and HTML changes.
The complete file path of destination will be wp-content/themes/mytheme/woocommerce/emails/customer-completed-order.php.
(mytheme will be the name of your theme)
Important Notes to Remember when You Customize WooCommerce Emails by Editing Template Files
- Use a Child Theme: It’s recommended to do this in a child theme to prevent losing your changes when the parent theme is updated.
- Keep WooCommerce Updated: Ensure that your custom templates are compatible with the latest version of WooCommerce, especially after plugin updates.
- Backup: Always backup your site before making such changes, in case something goes wrong.
By following these steps, you’ll be able to safely customize WooCommerce emails without affecting the core files of the WooCommerce plugin.
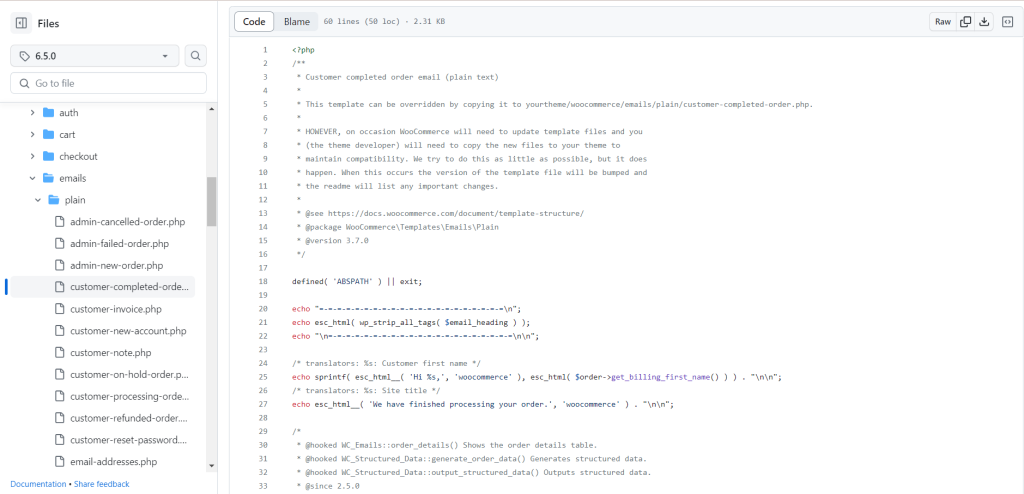
WooCommerce email template files are basically a combination of different hooks that allow you to add and edit content without editing the template files themselves. You can customize WooCommerce emails by editing the template files in 2 ways:
- Directly editing the template files and hard code the PHP and HTML
- Registering your own action hooks in your child theme’s functions.php file and adding the action hooks in the email template
In WooCommerce, the email-styles.php file in woocommerce/templates/emails/ directory contains the CSS styles that are applied to all email templates sent out by WooCommerce. These styles are designed to ensure a consistent look and feel across all types of emails, whether it’s an order confirmation, a password reset, or any other email notification.
If you want to customize WooCommerce emails by editing the styles for a specific email template, you can:
- Add Custom Classes in the Template File: When you override a template file (for example, customer-completed-order.php), you can add your own custom classes to the HTML elements within that template.
- Add Custom CSS in email-styles.php: After adding your custom classes to the template file, you can then write custom CSS styles in the email-styles.php file. You would target the custom classes you’ve added to apply styles only to those specific elements in the email template.
Here’s a simple example:
In your overridden template file, you might add a custom class to a paragraph:
This way, the custom styles will only apply to elements with the custom-greeting class within the emails, and not affect other elements or templates.
Remember to ensure that your custom styles are inline styles or wrapped in a <style> tag within the email template, as most email clients do not support external or header styles due to security reasons. WooCommerce processes the CSS in email-styles.php and automatically inlines them when sending emails to ensure maximum compatibility with email clients.
<p class="custom-greeting">Thank you for your order!</p>
Then, in the email-styles.php file, you would add your custom styles:
.custom-greeting {

    font-size:clamp(14px, 0.875rem + ((1vw - 3.2px) * 0.238), 16px);

    color: #333333;

    /* Other styles */

}
Using Hooks to Customize WooCommerce Emails
You can also customize WooCommerce emails using action or filter hooks. Hooks are a feature of WordPress that allow developers to ‘hook into’ different parts of the platform and add or modify functionality.
In the context of WooCommerce emails, hooks can be used to add custom content to various parts of an email without needing to modify the original template files. This is particularly useful for maintaining changes through updates to the WooCommerce plugin.
There are two types of hooks: actions and filters.
– Action Hooks: allow you to insert custom code at specific points within the WooCommerce code. For example, you can add custom text or HTML after the order details table in an email.
– Filter Hooks: allow you to modify data. For example, you can change the default email subject lines or modify the content of the email header.
Adding Content with Action Hooks to Customize WooCommerce Emails
To customize WooCommerce emails and add content, you can attach functions to action hooks associated with the email templates. Here’s how you can use them:
- Below the Header
To add a personalized message right below the email header, use the `woocommerce_email_header` hook:
add_action( 'woocommerce_email_header', 'your_custom_header_content', 10, 2 );

function your_custom_header_content( $email_heading, $email ) {

    echo "<p>Thanks for shopping with us. We appreciate you and your business!</p>";

}
- After the Order Table
If you want to include additional information or a special offer after the order details, hook into `woocommerce_email_after_order_table`:
add_action( 'woocommerce_email_after_order_table', 'your_custom_order_table_content', 10, 4 );

function your_custom_order_table_content( $order, $sent_to_admin, $plain_text, $email ) {

    echo "<p>Hey! Thanks for shopping with us. As a way of saying thanks, here’s a coupon code for your next purchase: FRESH15</p>";

}
- Above the Footer
To add a closing remark or call-to-action above the email footer, use the `woocommerce_email_footer` hook:
add_action( 'woocommerce_email_footer', 'your_custom_footer_content', 10, 1 );

function your_custom_footer_content( $email ) {

    echo "<p>Thank you for shopping! Discover more items <a href='" . esc_url( get_permalink( wc_get_page_id( 'shop' ) ) ) . "'>here</a>.</p>";}
By using action hooks, you can add custom messages, promotions, and styling to enhance communication with your customers. Remember to follow best practices when you customize WooCommerce emails to ensure that your customizations are effective and preserved over time.
Conclusion: How to Customize WooCommerce Emails in 4 Easy Ways
This article highlighted 4 different ways to customize WooCommerce emails. You can choose whichever method is based on your own preferences. Some webmasters have strict protocols about using plugins and they tend to avoid plugins at all costs.
Others are more inclined towards making things quicker and easier so, a plugin like the Easy Mail Email Customizer by XfinitySoft works well for them.

![Contact Form 7 Formatting in WordPress [How to Do it The Right Way] Contact Form 7 Formatting in WordPress [How to Do it The Right Way]](https://wpdesc.com/wp-content/uploads/2024/07/Contact-Form-7-Formatting-in-WordPress-1024x512.png)
![How to Redirect Contact Form 7 to Thank You Page [2 Easy Ways] How to Redirect Contact Form 7 to Thank You Page [2 Easy Ways]](https://wpdesc.com/wp-content/uploads/2024/07/how-to-redirect-contact-form-7-to-thank-you-page-1024x512.png)
![How to Add reCAPTCHA to Contact Form 7 [2 Easy Steps] How to Add reCAPTCHA to Contact Form 7 [2 Easy Steps]](https://wpdesc.com/wp-content/uploads/2024/07/how-to-add-recaptcha-to-contact-form-7-1024x512.png)
Leave a Reply