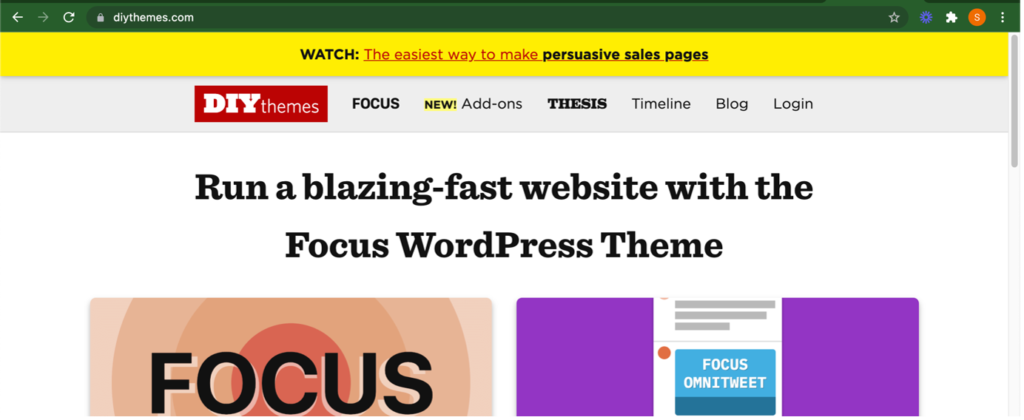
Do you want to learn how to add a WordPress notification bar without plugin? In this post, we’ll show you how to do that step by step with easy instructions.
If you want to promote something on your website like a promotion or an upcoming event you are hosting, adding a notification bar is the perfect way to do that. Why?
For one, a notification bar appears on all pages right at the top so you have an important announcement to make, adding it to the notification bar ensures that no one misses it.
When a visitor comes to your website, the first thing they’re going to see is the announcement in the notification bar. Hence, it’s a surefire way to get an important message in front of your website visitors.
Plus, you can also add a link on the notification bar to take your visitors to a dedicated landing page where they can get more information about the announcement.
If you have added some new products to your store to increase product sales, for example, you can add a brief message in the notification bar and a link that takes your visitors to a product listing page of the new products.

So, how to add a WordPress notification bar without plugin?
Before we dive into it, let’s consider why you would want to avoid using a plugin to add a WordPress notification bar.
One of the major reasons why developers avoid using plugins is the risk of bloating the website with too many plugins, which might affect the performance of the website.
If it’s a simple front-end feature like a notification bar that can easily be achieved with a simple code added to WordPress core files, we can avoid using a plugin for that purpose.
Plus, the more plugins you have, the more effort it requires in security maintenance. You’ll need to ensure you keep all plugins updated to ensure your website security. And this is not as simple as it sounds.
So, if you are comfortable editing WordPress core files and if you are confident you can easily reverse any damage that is accidentally caused by that, go ahead with this tutorial on how to add WordPress notification bar without plugin.
But if you’re not technical and the risk of breaking your site accidentally is too much for you to handle, stay safe by simply installing one of the best notification bar plugins.
In the mood to juggle code files? Read on.
So, there are 2 easy ways how to add WordPress notification bar without plugin:
1- Editing Header.php in your Core WordPress files
2- Using an Action Hook to Add Notification Bar
Best Practices to Implement Before Editing WordPress Files
Editing WordPress files directly carries the risk of breaking your site if not done correctly.
A single mistake or a typo can lead to the dreaded white screen of death on your WordPress website. You won’t even be able to access your WordPress admin area and won’t be able to reverse the damage unless you have FTP access of your website.
To minimize risks and ensure a smooth editing process, it’s crucial to follow best practices before making any changes to WordPress files.
Here are some key practices to implement:
- Backup Your Website: Always create a full backup of your WordPress site, including the database, WordPress files, themes, and plugins, before making any changes.
- Use a Child Theme: Utilize a child theme for customizations to avoid losing changes when the parent theme updates, preserving your edits through theme upgrades.
- Understand the Files You Are Editing: Have a basic knowledge of the structure and purpose of WordPress files to make informed edits and avoid critical mistakes.
- Use the Right Tools: Employ a proper code editor with syntax highlighting and error checking for PHP, HTML, CSS, and JavaScript to help identify syntax errors.
- Develop Locally: Make changes in a local development environment first to test changes without affecting your live site, using tools like XAMPP, MAMP, or Local by Flywheel.
- Implement Version Control: Use a version control system like Git to track modifications, revert changes if necessary, and facilitate collaboration.
- Test Changes in a Staging Environment: Before applying changes to your live site, test them in a staging environment to ensure they don’t adversely affect your live site.
- Ensure FTP Access: Make sure you have FTP (File Transfer Protocol) access to your website. This allows you to manually upload and download your website files. In case of any accidental damage that breaks your site, FTP access can be crucial for quickly restoring files and reversing the damage.
Now that you have taken care of best practices and pre-editing checklist, let’s dive into the editing part.
So like stated above, there are 2 ways of how to add WordPress notification bar without plugin. Let’s explain each one by one.
1- Editing Header.PHP to Add WordPress Notification Bar Without Plugin
Adding a notification bar to your WordPress site by modifying the header.php file in your child theme involves a few straightforward steps.
This guide will walk you through the process from start to finish, including both the setup of a child theme (if you haven’t already) and the specific code additions to implement the notification bar.
Step 1: Copy the header.php File from the Parent Theme to the Child Theme
You’ll need access to your WordPress site’s files. You can use an FTP client or the File Manager provided by your hosting control panel.
Navigate to the wp-content/themes directory of your WordPress installation and locate the parent theme folder
Inside the parent theme folder, locate the header.php file. Copy this file. Now, go to your child theme’s folder (located within the same themes directory) and paste the header.php file here.
If your child theme already has a header.php file, you’ll be replacing it with this one, so make sure to back up any existing versions if you’ve made previous edits.
Step 2: Add the Notification Bar Code
Open the header.php file within your child theme folder using a code editor.
Find the opening <body> tag. Immediately after it, you’ll insert your notification bar’s HTML code.
Here’s a simple example of a notification bar code you can add:
<div class="custom-notification-bar" style="background-color: #007cba; color: white; text-align: center; padding: 10px 0;">

 This is a notification message! <a href="#" style="color: #ffeb3b;">Read more</a>

</div>
This code creates a basic notification bar with a message and a link. You can customize the message, link, and styles according to your needs.
To style your notification bar, you can add CSS directly in the header.php file within <style> tags or, preferably, in your child theme’s style.css file. If adding to style.css, you might use:
.custom-notification-bar {

 background-color: #007cba; /* Blue background */

 color: white; /* White text */

 text-align: center;

 padding: 10px 0; /* Some padding */

}

.custom-notification-bar a {

 color: #ffeb3b; /* Yellow links for contrast */

}
Adjust the styles as needed to fit the look and feel of your site.
Step 3: Save and Upload (if using FTP)
After adding the notification bar HTML and any optional CSS, save your changes.
If you were editing the files locally and using FTP, upload the modified header.php file back to your child theme’s folder on your server, replacing the existing file.
Step 4: Verify the Changes
Visit your website to see the notification bar in action. It should appear at the top of every page, providing a consistent message to all site visitors.
2- Using an Action Hook to Add WordPress Notification Bar Without Plugin
You can add a notification bar to your WordPress site using a filter or action hook, which is a cleaner and more upgrade-proof method compared to modifying theme files directly.
This approach allows you to inject your notification bar without altering the original files of your theme, making your changes more resilient to updates.
Step 1: Determine the Hook
First, decide on the placement of your notification bar. For this example, we’ll use the wp_body_open hook, which is ideal for a notification bar that appears at the top of the page.
Many WordPress themes, including popular ones like Astra, provide their own sets of custom hooks that you can use to extend the functionality of your site, including adding a notification bar.
First, determine where you want the notification bar to appear on your site. Then check the theme documentation to identify the hook that you can use to insert the notification bar.
If you’re using the Astra theme, for example, you can use the astra_header_before hook to add the notification bar.
Step 2: Add Your Function
You’ll add a custom function to your theme’s functions.php file. This function will output the HTML for your notification bar.
Access your WordPress site files using an FTP client or your hosting control panel’s file manager.
Go to wp-content/themes/your-child-theme to navigate to your child theme folder.
Open functions.php for editing. If you’re using a child theme and it doesn’t have a functions.php file, you can create one.
Add the following code to your functions.php file.
add_action('wp_body_open', 'add_custom_notification_bar');

function add_custom_notification_bar() {

 echo '<div class="custom-notification-bar" style="background-color: #007cba; color: white; text-align: center; padding: 10px 0;">This is a notification message! <a href="#" style="color: #ffeb3b;">Read more</a></div>';

}
This code hooks into wp_body_open and outputs your notification bar HTML at the beginning of the body tag.
You can customize the HTML and inline CSS as needed to match your site’s design and message requirements.
.custom-notification-bar {

 background-color: #007cba; /* Blue background */

 color: white; /* White text */

 text-align: center;

 padding: 10px 0; /* Some padding */

}

.custom-notification-bar a {

 color: #ffeb3b; /* Yellow links for contrast */

}
Adjust the CSS as needed to fit your site’s aesthetics.
Step 5: Save and Upload Your Changes
If you’re editing files locally, don’t forget to upload your modified functions.php (and style.css, if applicable) back to your server.
Visit your website to ensure the notification bar appears as expected.
Since this method uses action hooks, your notification bar should be present across all pages without directly modifying any template files.
Using action hooks for such customizations offers flexibility and preserves your changes through theme updates, especially when using a child theme.
Wrapping Up: How to Add WordPress Notification Bar Without Plugin
Hopefully, this guide thoroughly explained to you how to add WordPress notification bar without plugin.
While both the methods are optimal, we recommend using action hooks as it’s a best practice in WordPress development.


![Contact Form 7 Formatting in WordPress [How to Do it The Right Way] Contact Form 7 Formatting in WordPress [How to Do it The Right Way]](https://wpdesc.com/wp-content/uploads/2024/07/Contact-Form-7-Formatting-in-WordPress-1024x512.png)
![How to Redirect Contact Form 7 to Thank You Page [2 Easy Ways] How to Redirect Contact Form 7 to Thank You Page [2 Easy Ways]](https://wpdesc.com/wp-content/uploads/2024/07/how-to-redirect-contact-form-7-to-thank-you-page-1024x512.png)
![How to Add reCAPTCHA to Contact Form 7 [2 Easy Steps] How to Add reCAPTCHA to Contact Form 7 [2 Easy Steps]](https://wpdesc.com/wp-content/uploads/2024/07/how-to-add-recaptcha-to-contact-form-7-1024x512.png)

Leave a Reply