If you are looking for a comprehensive guide on how to build an online course website, you’re in the right place.
With the recent boom in the online courses industry and the prediction of reaching $374.3 billion by 2026, entrepreneurs, educators, and institutions have a unique opportunity to tap into a rapidly expanding market.
Online courses are flexible and convenient, presenting a lucrative business opportunity today.
Let’s dive into this tutorial on how to build an online course website with WordPress and LearnDash, enabling you to share your knowledge with the world and earn a stable income.
Step 1: Plan Your Course Content, Pricing Model, and Website Structure Before you Build an Online Course Website
Before diving into the specifics of building an online course website, it’s crucial to plan your course content and create a business plan.
The nature of the content, whether it comprises video-based courses, interactive lessons, or a mix of different formats, dictates the tools and plugins you’ll need to deliver and manage your courses effectively.
You also need to determine your pricing structure. Are you looking for a membership website where you can create different levels of memberships and give members access to courses based on their membership level? Or do you want to sell courses for a one-time fee? The answers to these questions will determine the plugins required to build your online course website.
Step 2: Get a Domain Name and Hosting Service Before You Build an Online Course Website
Before creating your website, you need a domain name and a hosting service provider.
Hosting Provider
A hosting provider is a company that offers the technology and services needed for your website to be viewed on the Internet. When selecting a hosting provider for a WordPress site, especially one that will host online courses, you should consider:
- WordPress-Specific Hosting: Many providers offer hosting plans optimized for WordPress, which include features like one-click installs, automatic updates, and specialized WordPress support.
- Performance: Look for a provider that guarantees high uptime (the time your website is up and running) and offers fast loading speeds. This is crucial for providing a good user experience.
- Scalability: Choose a provider that allows you to easily upgrade your hosting plan as your website grows. Online courses can attract a lot of traffic and consume more resources, especially if you’re hosting video content directly on your site.
- Security: Ensure the provider offers robust security features to protect your site and user data. Look for SSL certificates, backups, and security monitoring.
- Customer Support: Good customer support is invaluable, especially if you’re not technically inclined. Look for 24/7 support via multiple channels (chat, phone, email).
If you’re just starting out, we recommend Hostinger WordPress hosting.
Hostinger offers managed WordPress hosting, which means they take care of the technical maintenance of your site like security, backups, and WordPress updates.
Plus, their plans are quite reasonable and easy on the pocket.
Domain Name
Your domain name is your website’s address on the internet. It’s how users find you and it plays a role in your brand’s online identity. When choosing a domain name:
- Brandable and Relevant: Your domain should reflect your brand or the nature of your online courses. It should be easy to spell, remember, and preferably short.
- Avoid Hyphens and Numbers: These can be confusing and make your domain name harder to remember or prone to typos.
- Choose the Right Extension: While .com is the most popular and widely recognized domain extension, there are many others available, including .org, .net, .edu, and industry-specific ones like .academy or .courses.
We recommend purchasing your domain from Namecheap, known for its competitive prices and user-friendly interface.
After acquiring a domain name, you’ll need to point it from Namecheap to your Hostinger server by updating the nameservers or A records. This process can take 24-48 hours to fully propagate worldwide.
Step 3: Install WordPress on your domain
Most hosting providers offer a one-click WordPress installation process. After installation, you can access your WordPress dashboard through your hosting account or by visiting yourdomain.com/wp-admin.
For Hostinger users, WordPress can be installed through hPanel by following these steps:
- Log in to hPanel.
- Navigate to “Websites.”
- Select “Create or migrate a website.”
- Choose your website type, specifically opting for WordPress as your platform.
- Fill in the WordPress account details, including language and login information.
- Add desired WordPress plugins during installation, unchecking any you don’t need.
- Choose a WordPress theme, optionally using AI tools for content creation.
- Select your domain for WordPress installation. The process may take a few minutes.
Here is a more detailed article on Installing WordPress on Hostinger.
After installation, access your WordPress dashboard through the “Websites” section in hPanel.
Step 4: Install the Astra WordPress Theme to Build an Online Course Website
We recommend the Astra theme for its performance, flexibility, and LearnDash integration. Astra comes with a LearnDash starter site that you can import immediately.
After purchasing Astra, download the zip file and install the theme on WordPress via Appearance > Themes > Upload.
Astra also comes with a LearnDash starter template. In this tutorial, we’ll skip the design part and just get started with the starter website.

To get the Starter site, install the Starter Templates Plugin. After installing the plugin, navigate to Appearance > Starter Sites and then search for LearnDash starter site. Click Install Complete Site to install the demo site.
Step 5: Install LearnDash Plugin to Build an Online Course Website
Before you can install LearnDash, you need to purchase a license from their official website.
After purchasing LearnDash, you need to download the plugin from your LearnDash account:
Log in to your LearnDash account by visiting the LearnDash website and accessing the “My Account” section.
Navigate to the “Downloads” tab within your account dashboard.
Find the LearnDash plugin in the list of available downloads and click the “Download” button. This will download a .zip file of the LearnDash plugin to your computer.
With the LearnDash .zip file downloaded, you’re now ready to install it on your WordPress site:
Log in to your WordPress dashboard (typically found at yourwebsite.com/wp-admin).
In the WordPress dashboard menu, go to “Plugins” → “Add New”.
On the “Add Plugins” page, click the “Upload Plugin” button at the top.
Click the “Choose File” button and select the LearnDash .zip file you downloaded from your LearnDash account.
Once the file is selected, click the “Install Now” button to upload and install the plugin.
After the installation process is completed, you’ll see a success message with a link to activate the plugin:
Click the “Activate Plugin” link to activate LearnDash on your WordPress site.
After activation, you might be prompted to enter your LearnDash license key to receive updates and support. You can find your license key in your LearnDash account under the “Licenses” tab.
Step 6: Create Your Online Course with LearnDash
Now that you have all the plugins set up, you can begin to add an online course to your website.
After activating the LearnDash plugin, you’ll see a tab on your WordPress dashboard called LearnDash LMS. Hover over the tab to open a side menu. Navigate to Courses.
Here you’ll see the option to add a new course.
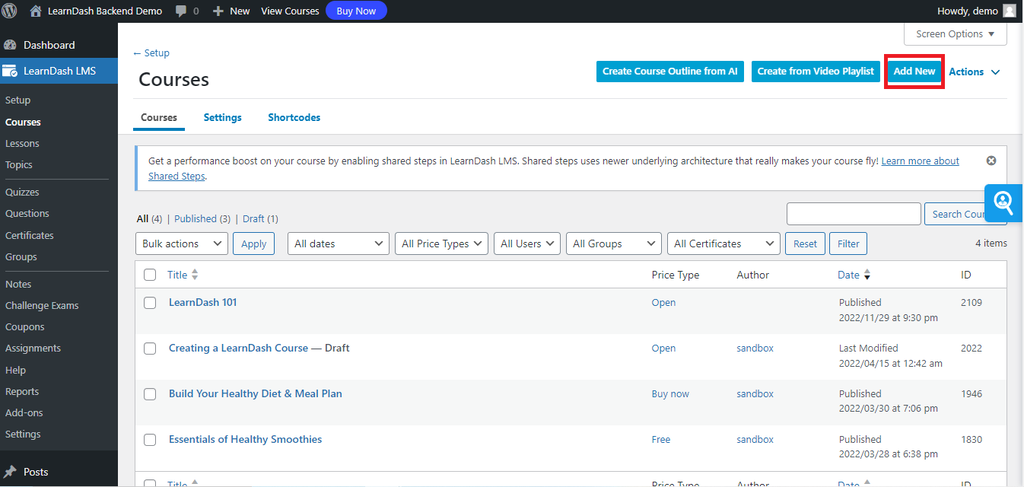
When you click Add New, you’ll see the Gutenberg editor on the next screen where you can add the course title and description.
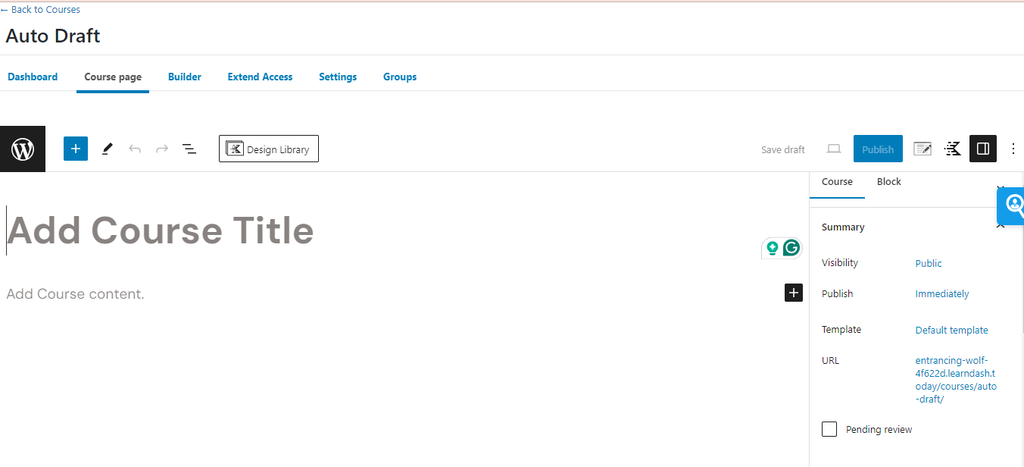
You can use the Gutenberg editor here to add content to your course page.
Add a featured image to your course.
Choose a category for your course and add some tags to keep it nicely organized.

Once you’re happy with the course page, you can go ahead to the Builder tab.
This tab is where you’ll find all the powerful features of LearnDash and multitude of configuration settings for your course.
Adding Course Sections, Lessons, and Topics to Build an Online Course Website
In the builder tab, you can build out your course content.
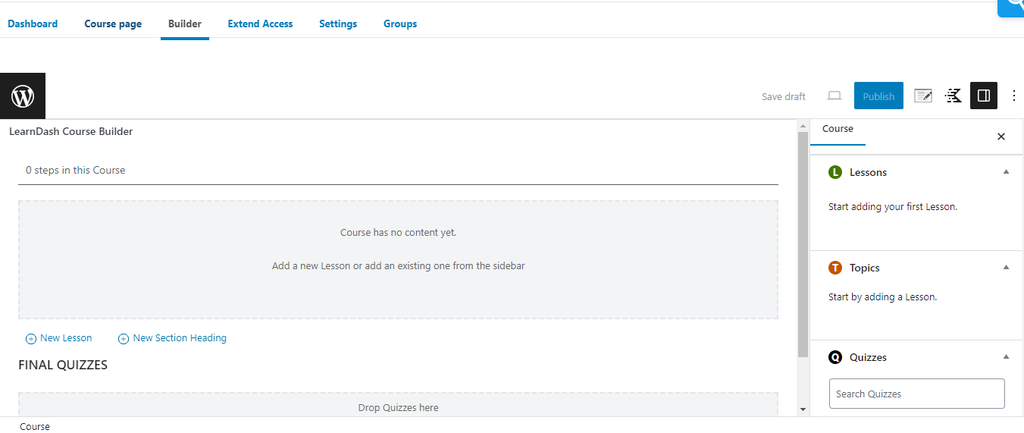
Your online course will likely be structured in modules or sections. Each section or module will have a number of lessons.
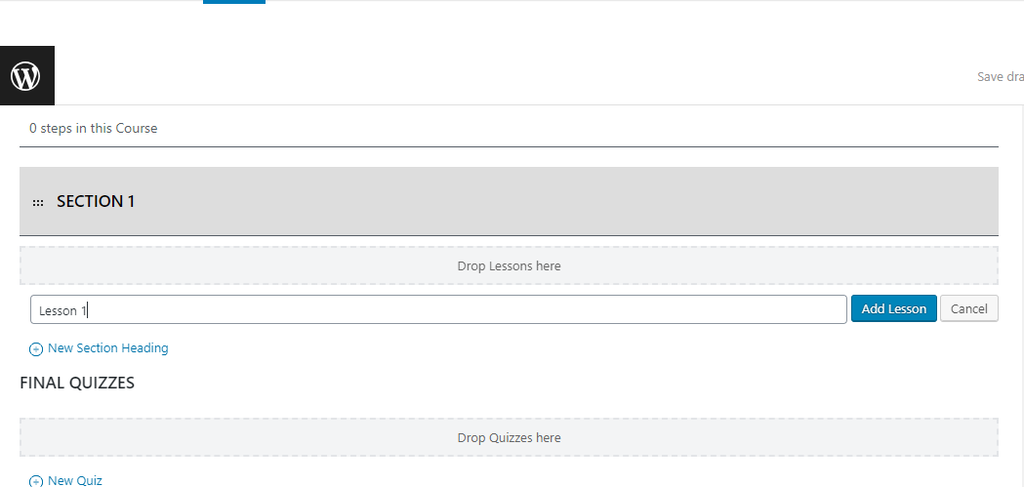
To build out your course, click New Section Heading. Enter the name of the module and click Add Section to add the section/module.
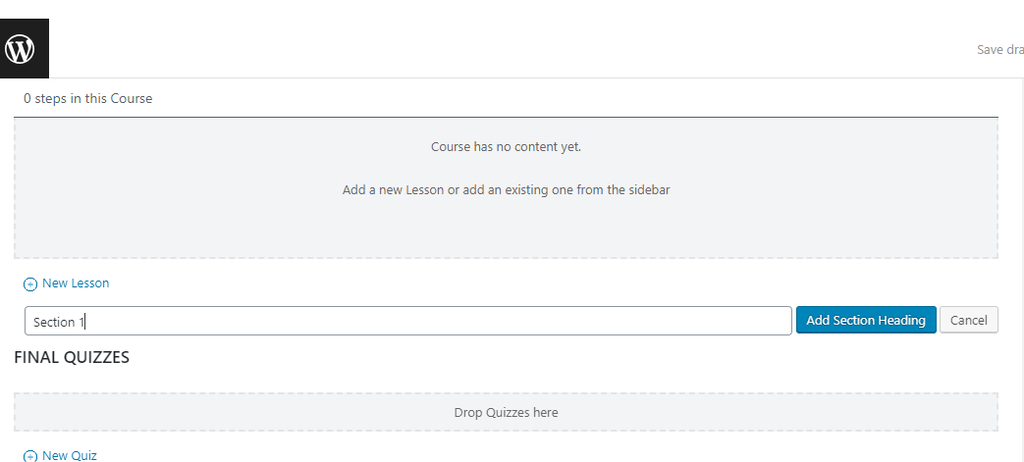
After adding the module, click New Lesson to add a lesson under the module. Add the title of the lesson and click Add Lesson.
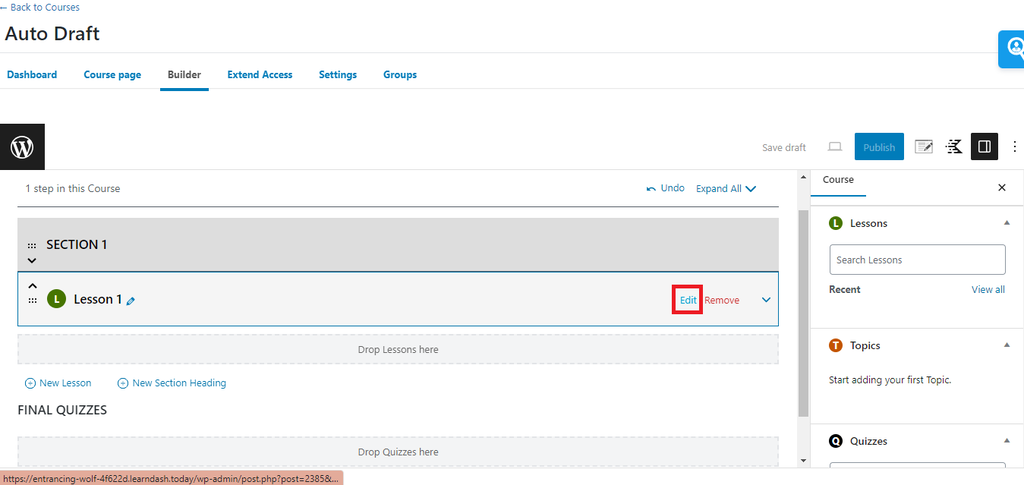
After adding the sections and lessons, you can use the Edit link to build your lessons.
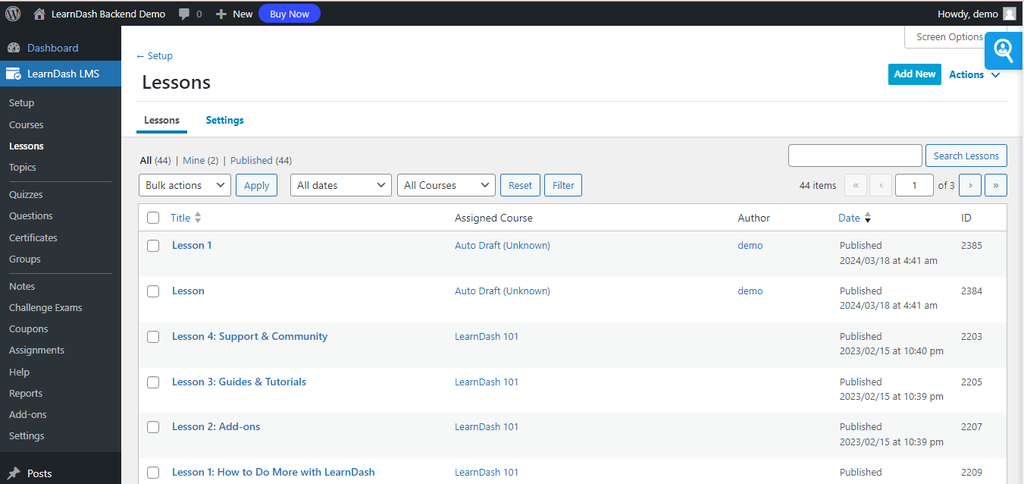
You can also edit Lessons by navigating to LearnDash LMS > Lessons and choosing the lesson you want to edit.
The Lesson Editing page has two tabs: Lesson page and Settings. The first tab has the Gutenberg editor where you can add the lesson content.
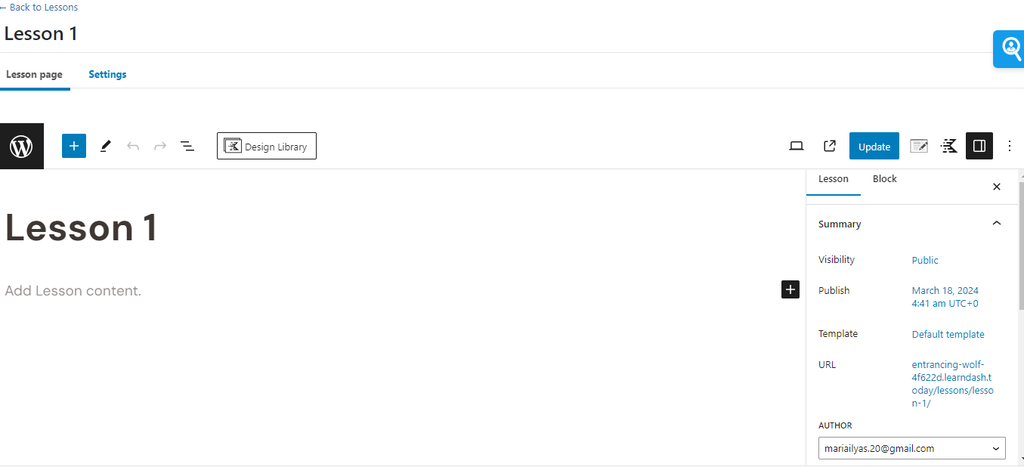
Adding content via Gutenberg is quite straightforward. You get a multitude of widgets like text, images, videos, etc to create your lesson content.
If you want to create a video lesson and tie it to course progression so that the lesson is automatically marked complete when the video is completely watched, you can do so from the lesson settings tab.
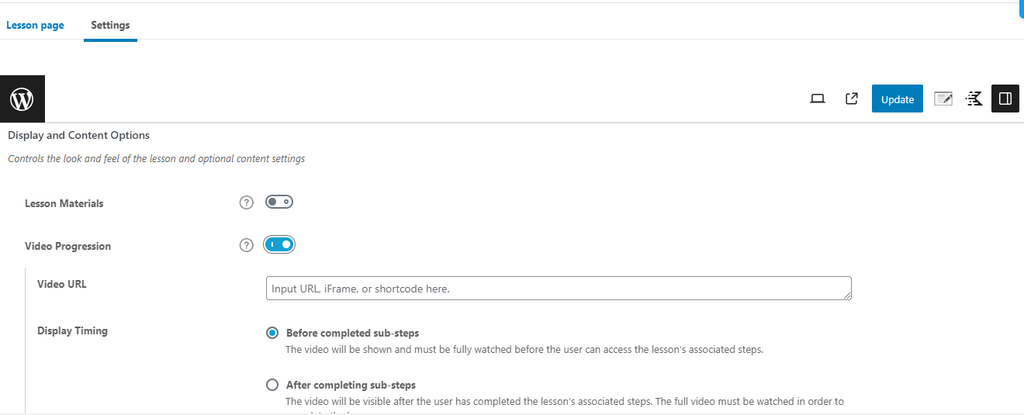
The lesson settings also allow you to:
- Add lesson material so you can add lesson files or links here for your students to use while completing the lesson
- Add a video lesson to be used for course progression
- Configure the video settings like autoplay, player controls, etc
- Ask students to upload assignments
- Make any lesson a sample lesson so it is available for free without any enrollment
- Make it available immediately after enrollment or dripfeed it
You also have the option to add topics under lessons. This is how you can structure your course:
Section > Lesson > Topics
Just like with lessons, you can add videos to your topics and tie them to course progression too.
All these sections, lessons, and topics you create will reflect on the course page as a progress indicator and the course progress will be tracked accordingly.
Configuring Course Settings to Build an Online Course Website
Once you have added all the sections and lessons, head over to the Settings tab on the Course Editing page to configure course settings.
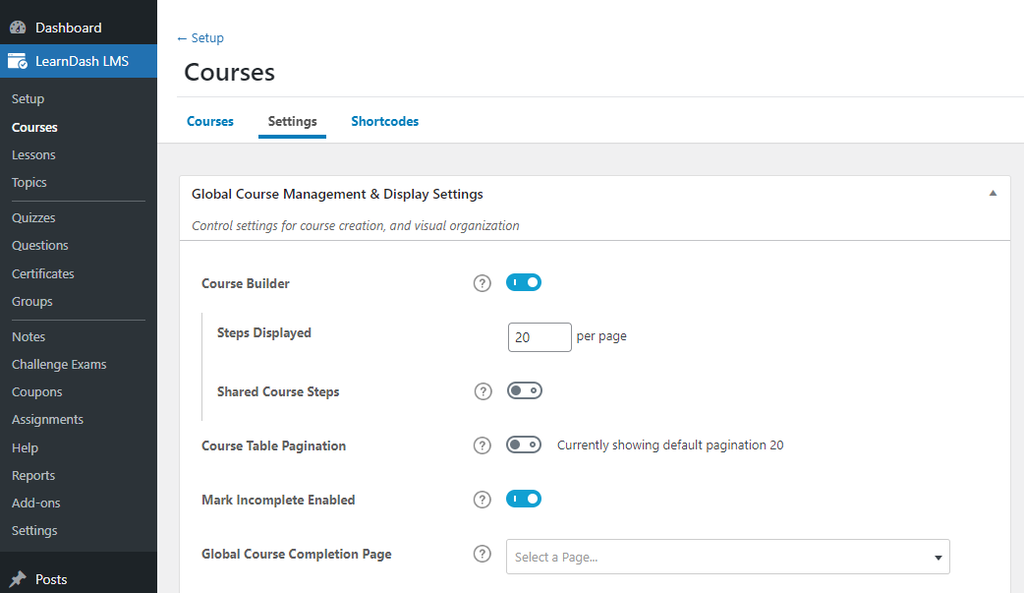
The course settings you have are as follows:
- Course materials: These are the course materials needed to complete the course. You can enable this by toggling on the option. These course materials will be displayed on the course page.
- Course Certificate: You can choose to offer a course certificate here by selecting the certificate from the dropdown.
- Visibility of course content: You can choose to display your modules and lessons only to enrolled users or to everyone.
- Custom Pagination: You can enable custom pagination and choose the number of lessons to show on a single page. So if you don’t like pagination, you can choose a very high number here so that all the lessons are shown on a single page.
- Custom Lesson Order: You can enable it if you want to change the order of lessons. By default, lessons are sorted by Date.
- Course Pre-requisites: if you want the user to complete any courses first before being able to enroll in this course, you can select the course here.
- Course Points: You can choose how many points to reward on completion and how many to require for access.
- Course Access Period: You can choose the access period by entering the number of days the course will be available.
- Course Progression: Choose from linear or free form progression.
- Course Grid options: You get a bunch of options to customize your course grid that is displayed to your site visitors. You can customize the description, button text, ribbon text and even add a video preview.
Next, choose the Access Mode on the same settings tab. Here are the 5 different modes and how they affect access and pricing.
- Open: this means the course is free and open for all. No registration is required to access the course.
- Free: this means the course is free but registration is still required.
- Buy Now: this means users have to pay a one-time fee to access the course. If you select this, you’ll be prompted to add a price. Payment can be accepted by the built-in Paypal/Stripe integration of LearnDash.
- Recurring: this means users have to pay a recurring fee to access the course. On selecting this option, you can enter the course price and the billing cycle. This option also works via the built in payment integration with Paypal/Stripe.
- Closed: With this option, you can just display the course enrollment price but take the user to a separate landing page. Course enrollment is handled through another plugin like WooCommerce or Memberpress.
Related Post:
How to Build an Online Course Website – Conclusion
Here we wrap up this tutorial on how to build an online course website. Hopefully, you can build an online course website with ease.
If you need expert help in building out the site or with any customization, reach out to the WPDesc team for consultation and a quick quotation.

![Contact Form 7 Formatting in WordPress [How to Do it The Right Way] Contact Form 7 Formatting in WordPress [How to Do it The Right Way]](https://wpdesc.com/wp-content/uploads/2024/07/Contact-Form-7-Formatting-in-WordPress-1024x512.png)
![How to Redirect Contact Form 7 to Thank You Page [2 Easy Ways] How to Redirect Contact Form 7 to Thank You Page [2 Easy Ways]](https://wpdesc.com/wp-content/uploads/2024/07/how-to-redirect-contact-form-7-to-thank-you-page-1024x512.png)
![How to Add reCAPTCHA to Contact Form 7 [2 Easy Steps] How to Add reCAPTCHA to Contact Form 7 [2 Easy Steps]](https://wpdesc.com/wp-content/uploads/2024/07/how-to-add-recaptcha-to-contact-form-7-1024x512.png)
Leave a Reply