Ensuring that users provide a legitimate email address on your WordPress site can significantly enhance your site’s functionality and security.
Adding an email verification step prevents users from registering with fake or incorrect email addresses.
This ensures that whenever an email is submitted via a form on your WordPress website, the user is sent a verification email and they have to use the link in the email to verify their email address.
This is crucial for maintaining the integrity of your user base and ensuring reliable communication.
This guide will show you how to add email verification to your Contact Form 7 forms using two different methods: SendGrid and the default WordPress email functionality.
We’ll use the Contact Forms 7 Email Verification plugin for this purpose. This plugin is an add-on to Contact Forms 7 WordPress plugin and lets you integrate your forms with tools like SendGrid, Twilio, or default WordPress email SMTP to send verification email or SMS.
Follow this tutorial if you want to know how to add phone number verification to Contact Forms 7.
To get started, you’ll need to purchase the plugin from a marketplace such as CodeCanyon. This platform offers a range of plugins including the Contact Form 7 Verification plugin.
Installing and Activating the Plugin
Once you have purchased the plugin, you will receive a downloadable file. Here’s how to install and activate it on your WordPress site:
- Download the Plugin: After purchasing, download the ZIP file containing the plugin from CodeCanyon.
- Log Into Your WordPress Dashboard: Navigate to your site’s admin panel to start the installation process.
- Install the Plugin:
- Go to the Plugins section in your dashboard.
- Click on Add New and then Upload Plugin.
- Choose the downloaded ZIP file and select Install Now.
- Activate the Plugin:
- After installation, a prompt will appear. Click on Activate Plugin to enable its functionalities on your site.
Configuring General Settings for Contact Form 7 Verification
With the plugin installed and activated, you can now configure its settings to suit your needs:
- Access General Settings:
- In your WordPress Dashboard, navigate to Settings.
- Find and click on Contact Verification Settings.
- Select General Settings to start customizing.
- Customize Your Settings:
- Verification Modal Colors: Adjust the colors of the verification modal window to match your website’s theme. This includes setting primary, secondary, and button colors to ensure a consistent user experience.
- Return Page: Choose a specific page where users will be redirected after successfully verifying their email. This could be a thank you page or another page that confirms their verification status.
- Email Body Text: Customize the content of the verification email to make it clear and helpful for the user. This is where you can explain why the verification is necessary and how they can complete it.
Adding Email Verification to Contact Form 7 through Send Grid
SendGrid is a cloud-based service used by companies like Uber and Airbnb to manage their emails effectively, ensuring emails do not end up in the spam folder.
To add email verification to Contact Forms 7 through SendGrid, you first need to set up the SendGrid account.
Here’s how to set it up:
Set Up Your SendGrid Account
- Sign Up for SendGrid: Visit the SendGrid website and sign up for a free trial. During the signup process, you will need to provide personal information and verify your email address.
- Enable Two-Factor Authentication: Once registered, enhance your account security by enabling two-factor authentication under “Settings.”
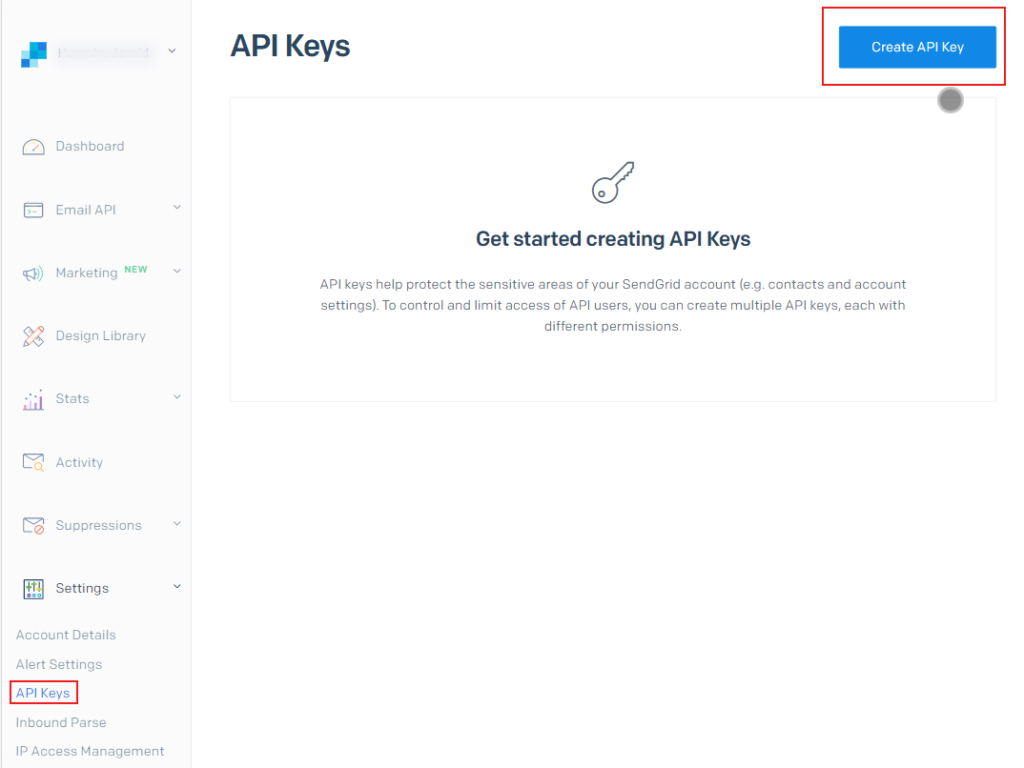
- Generate an API Key: Navigate to “API Keys” in the “Settings” menu. Click on “Create API Key,” choose “Full Access,” name your API, and then create it. Make sure to copy and save your API key securely as it is shown only once.
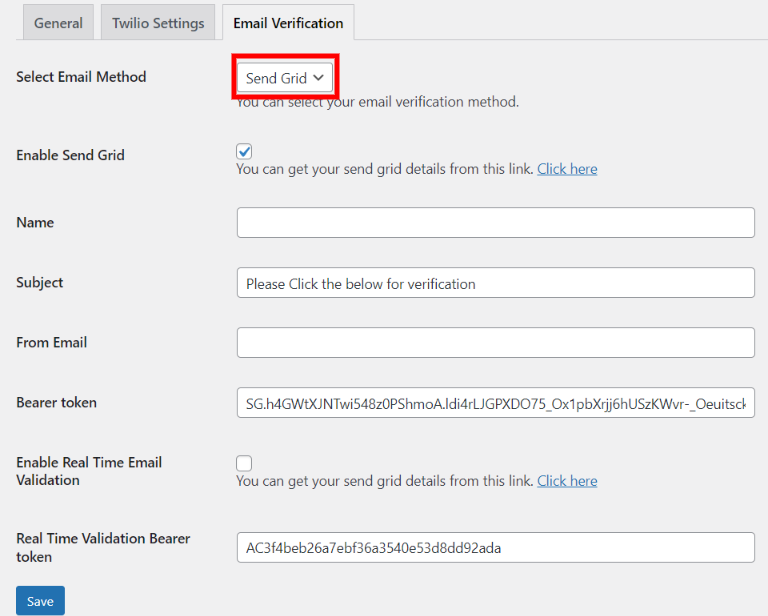
Once you have set up SendGrid, the next step is to configure settings in the Contact Forms 7 Email Verification Plugin and enable SendGrid option there.
Here are the steps to follow:
- Enable SendGrid in Contact Form 7: In the plugin settings, enable the SendGrid option and enter the required details like your API key.
- Configure Email Verification: Add a Bearer token (your SendGrid API key) and enable real-time email validation.
- Save Your Settings: Don’t forget to click “Save” to apply your settings.
Adding Email Verification to Contact Form 7 through WPMail Function
Adding email verification through the default WP Mail function is quite straightforward. Here are the steps to follow:
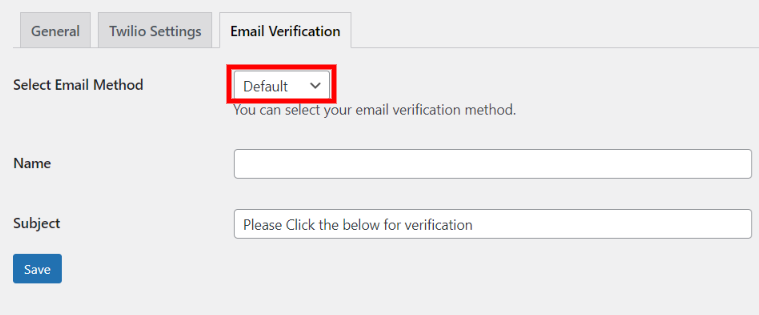
- Enable Default Email Method: In the plugin settings in Email Verification tab, simply select the default email method.
- Configure the Email Settings: Enter a name and subject for the verification email.
- Save Your Settings: Make sure to save the changes to activate the email verification.
And that’s it! It’s that easy to add email verification to Contact Forms 7 in WordPress.
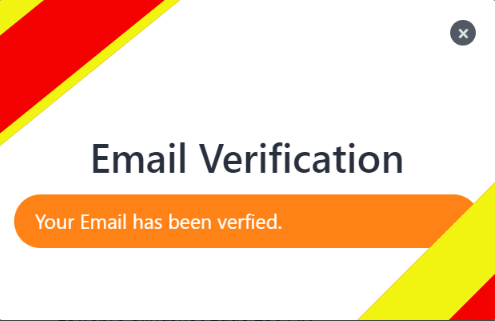
Now, each time a user submits a form, a verification email will be sent to the provided email address, requiring their confirmation to proceed. This adds an essential layer of security and efficiency to your site management practices.
By integrating email verification, you can keep your user base authentic and engaged, ensuring that everyone who registers is genuinely interested in what you have to offer.

![Contact Form 7 Formatting in WordPress [How to Do it The Right Way] Contact Form 7 Formatting in WordPress [How to Do it The Right Way]](https://wpdesc.com/wp-content/uploads/2024/07/Contact-Form-7-Formatting-in-WordPress-1024x512.png)
![How to Redirect Contact Form 7 to Thank You Page [2 Easy Ways] How to Redirect Contact Form 7 to Thank You Page [2 Easy Ways]](https://wpdesc.com/wp-content/uploads/2024/07/how-to-redirect-contact-form-7-to-thank-you-page-1024x512.png)
![How to Add reCAPTCHA to Contact Form 7 [2 Easy Steps] How to Add reCAPTCHA to Contact Form 7 [2 Easy Steps]](https://wpdesc.com/wp-content/uploads/2024/07/how-to-add-recaptcha-to-contact-form-7-1024x512.png)
Leave a Reply