Do you want to learn how to add a wishlist icon in the header on WordPress? If yes, you’ve landed at the right place.
In this post, we’ll go through a step-by-step process of how you can use a WooCommerce wishlist plugin to add a wishlist icon in your header menu.
But before we go into the nitty gritty, let’s talk about why you would want to add a wishlist icon in the header on WordPress.
We have written in detail about why you should add a WooCommerce wishlist to your store and how it can improve your bottom line.
That being said, having a wishlist icon in the header just increases the effectiveness of the wishlist functionality.
Having a wishlist icon in the header makes your wishlist easily accessible. Whenever someone visits your website, they’ll easily and prominently see the wishlist icon in the header and be reminded of the products they saved earlier in their wishlist.
You can also use a pop-up notification to further remind them to check their wishlist. You can even offer some limited-time discounts on the wishlist products and display a countdown timer in the header as well.
All of this is possible with WooCommerce Wishlist Plugins.
With that said, let’s get into the tutorial on how to add a wishlist icon in the header on WordPress.
Using a WooCommerce Wishlist Plugin
To enable the wishlist functionality on WooCommerce, you need a WooCommerce wishlist plugin.
While you can find multiple plugins that will enable this functionality, we recommend using WooCommerce Wishlist and Add to Favorites Plugin by Xfinity Soft.
Why do we recommend this plugin? Here’s why:
- This plugin is sold at Code Canyon, which means you can trust this product.
- It packs all the major features you need in a WooCommerce wishlist plugin.
- You can add a wishlist icon in the menu, on the product page, and even a sticky button on the website.
- You can allow social sharing of wishlists
- You can allow customers to make public wishlists and display the wishlist on the website
- You can even display customers wishlists on your website for everyone to see the Best Products on your store
- The plugin is very easy to use, configure, and customize.
- It allows custom CSS for custom styles
Want to add a wishlist icon in the header on WordPress? This plugin makes it a breeze to do that. Follow along to know how.
Install the WooCommerce Wishlist Plugin
Get the plugin from Code Canyon. Follow this link to purchase the plugin.
Once purchased, you’ll receive a zip file.
Now navigate to Plugins from the left-hand menu and click Add New Plugin from the menu.
On the next page, click Upload Plugin.
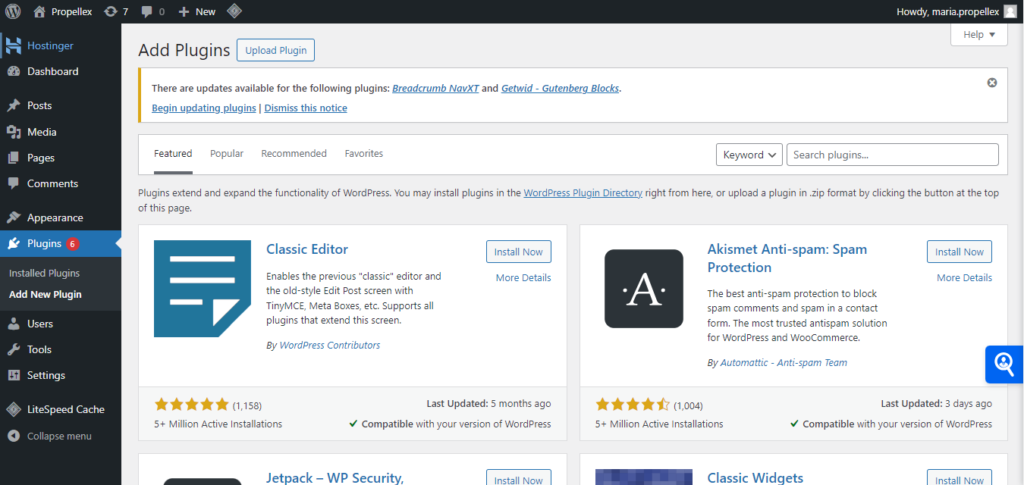
Then upload the zip file you received when you purchased the plugin. You don’t need to unzip the plugin file.
When uploaded, click Install.
It will take a while to install the plugin. Once done, you’ll see an option to Activate. Click Activate to activate the plugin.
Now, move on to plugin configuration.
Create a Wishlist Page
Before you add a wishlist icon in the header on WordPress, you need to create a page that the icon will route to.
So when someone clicks the wishlist icon in the header, they will be routed to that page you created.
This step is required before you configure the WooCommerce Wishlist plugin you installed.
To set up the page, navigate to Pages > Add New.
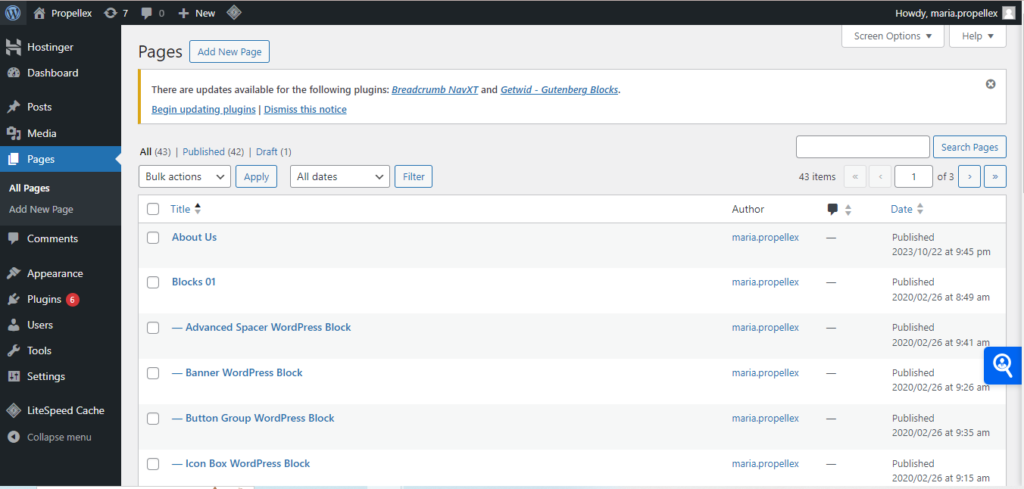
You can name your page anything you would like for example, Favorite Products, My Wishlist, etc.
Change the permalink of the page and add something descriptive like mystore.com/wishlist
Next, using the Gutenberg editor, add a shortcode block to the editor and add the following shortcode:
[wcxs-favourite-products]
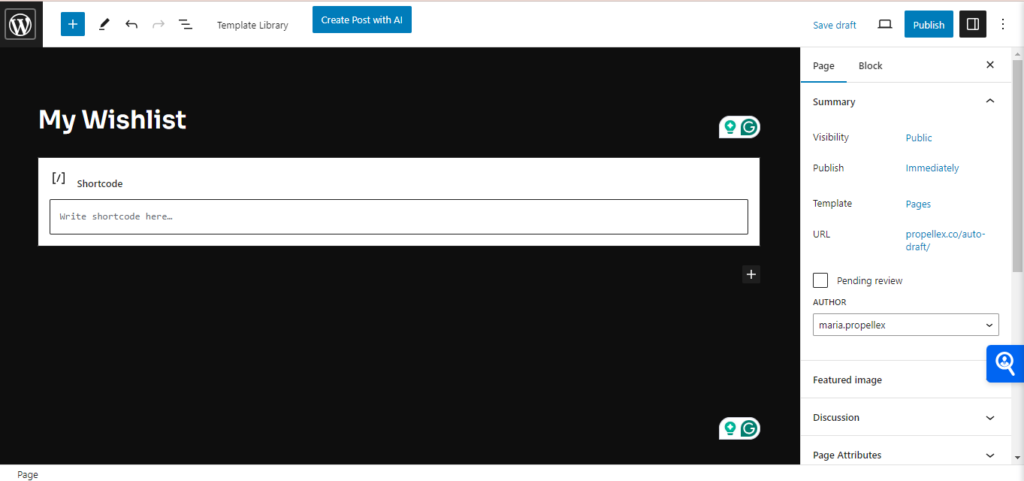
Click Save and Publish.
Now this page will display a customer’s wishlist and the products they saved.
How to Add a Wishlist Icon in the Header on WordPress
To configure the plugin and access all the settings and options, navigate to WooCommerce > Settings > Products > Favorite Products
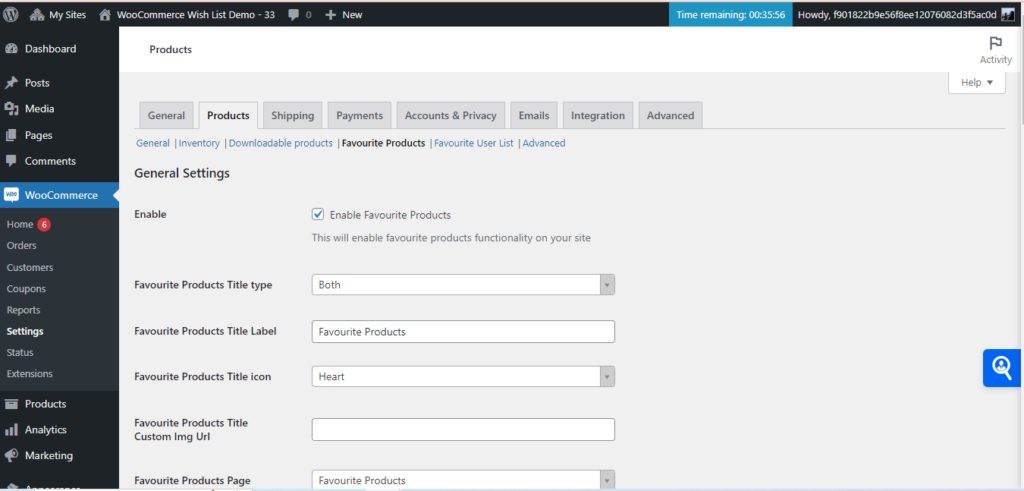
Here, you’ll see a bunch of options and settings.
First, enable the Favorite Products functionality by checking the Enable option.

Next, you have two options for displaying the wishlist button. You can show an icon only, label only, or both.
In the Favorite Products Title Type, choose how you want to display the wishlist option.

Next, you can customize the label text and the icon. It comes with 2 built-in icons: heart and star but you can also add a custom icon by adding the custom icon URL.

Next, choose the page we created earlier from the dropdown menu and connect it to the icon.

Now, you’ll see an option on the settings page: Show link in menu. Check this option to add the wishlist icon in the header on WordPress.
This plugin has built-in integration with your WordPress menu.
This means that regardless of the theme you’re using, just checking this option will automatically add a wishlist icon in the header on WordPress.

And that’s it, the icon will be displayed in the header menu without any coding.
If you want a complete tutorial on how to add WooCommerce wishlist in your store and go through all the options and settings in the WooCommerce Wishlist plugin, check out this article.

![Contact Form 7 Formatting in WordPress [How to Do it The Right Way] Contact Form 7 Formatting in WordPress [How to Do it The Right Way]](https://wpdesc.com/wp-content/uploads/2024/07/Contact-Form-7-Formatting-in-WordPress-1024x512.png)
![How to Redirect Contact Form 7 to Thank You Page [2 Easy Ways] How to Redirect Contact Form 7 to Thank You Page [2 Easy Ways]](https://wpdesc.com/wp-content/uploads/2024/07/how-to-redirect-contact-form-7-to-thank-you-page-1024x512.png)
![How to Add reCAPTCHA to Contact Form 7 [2 Easy Steps] How to Add reCAPTCHA to Contact Form 7 [2 Easy Steps]](https://wpdesc.com/wp-content/uploads/2024/07/how-to-add-recaptcha-to-contact-form-7-1024x512.png)

Leave a Reply