What are WordPress template parts in block themes? How do template parts differ from templates? And what are template part areas?
In this article, we will answer all of the above and explain how to create a custom WordPress template parts and register custom template part areas.
What are WordPress Template Parts in Block Themes?
Let’s recap what block templates are in WordPress before we explain template parts.
WordPress block templates are page templates that WordPress loads up when a visitor types in the URL. WordPress uses the template hierarchy to determine which template to load up based on the URL query passed in. For example, if a site visitor requests a blog article, WordPress will load up single-post.html.
These templates, however, are top-level templates only.
To further organize the content and to reduce code bloat, we use template parts that make up the templates.
If any section on the page template is reused across multiple pages, that section is isolated in a template part and that template part is called on the page template.
The most common template parts that almost every website has are header and footer template parts.
Template Parts act like global components in your website. If you want to change something in your site header, you can customize the header template part and the change will be reflected everywhere the header template part is called.
Template parts are essentially a type of advanced block in WordPress. While a block is a basic building block in WordPress block themes, a template part block is a block pattern, which is made with multiple blocks combined to create the template part.
For example, the header template part can be made up of image, text, menu, and button blocks.
How Template Parts Work on the Backend?
Template parts are stored as individual files within the WordPress theme directory. In block themes, these files typically reside in a subdirectory named parts, template-parts, or a similar convention, depending on the theme’s structure.
Each template part file is a standalone entity, often saved as HTML files with block markup.
Inside these files, the content is formatted using the block markup language, which WordPress introduced with the Gutenberg editor. This block markup describes the structure and attributes of the blocks that make up the template part.
The basic markup for this block looks like this:
<!-- wp:template-part {"slug":"your-template-part-slug"} /-->.Here, wp:template-part is the identifier for the Template Part block, and the {“slug”:”your-template-part-slug”} is a JSON object that specifies the settings for this block.
The slug property is a key aspect of this markup. It uniquely identifies the template part that you want to include. This slug corresponds to the filename of the template part within your theme’s directory structure.
When WordPress processes a page that includes this Template Part block, it looks for a file in the theme’s directory that matches the slug.
For example, if your slug is header, WordPress will look for a file named header.html in the /parts/ directory of your active theme.
Once WordPress finds the corresponding .html file, it reads and parses the block markup contained within this file.
This parsing process converts the block markup into the HTML and CSS that will be rendered on the front end of the website.
This allows for dynamic and flexible content creation, as the contents of the template part can be easily edited and will automatically update wherever the template part is used.
While the slug property is essential, there are additional settings that can be included in the Template Part block markup.
These may control various aspects of the template part’s behavior and appearance, such as alignment, custom classes, or other block-specific settings.
How to Add WordPress Template Parts to Templates?
The Gutenberg site editor lets you easily add template parts to your templates without touching any code.
Say, you are designing a custom template called sample-template for a custom post type.
Here’s how you can insert the template part on your template.
Access the Template or Site Editor: Navigate to Site Editor from the Appearance menu.
Go to the Template Editor: Go to Templates and click the ‘+’ icon to add a new template. Give your template a name and then enter the editor.
Insert the Template Part Block: In the editor, where you want to add the template part, click the “+” (Add Block) button. Search for and insert the “Template Part” at the desired location in your template.
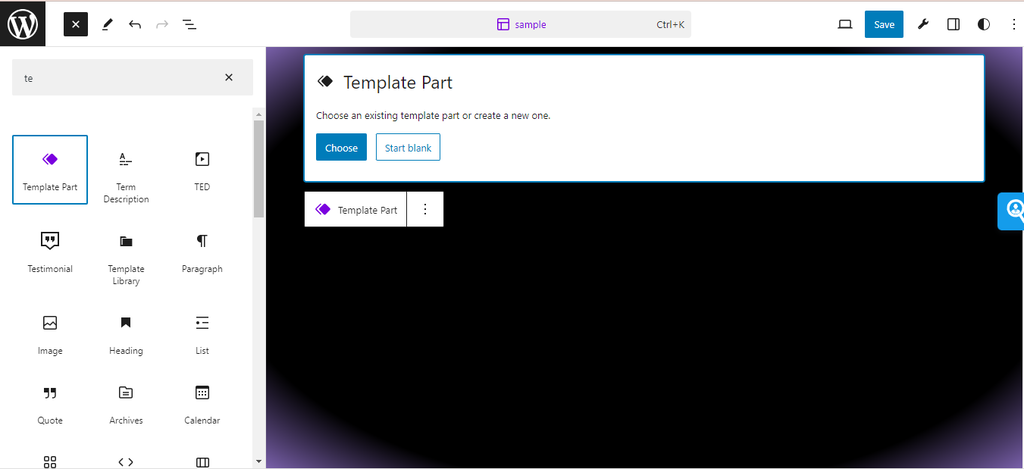
Use the ‘Choose’ Option: Once the Template Part block is inserted, you’ll see two options: “Choose” and “Start Blank”. Click on the “Choose” button. This action will open a modal window.
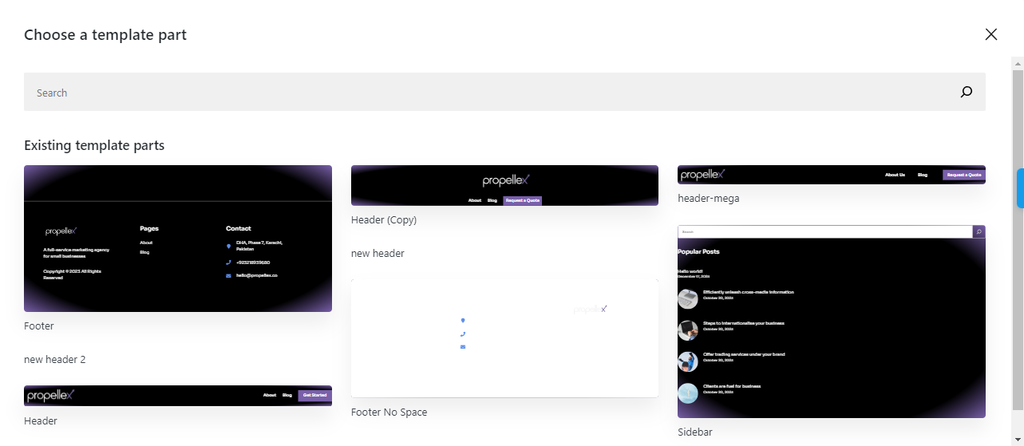
Select from Existing Template Parts: In the modal window, you’ll see a collection of existing template parts available in your theme.
These template parts are predefined components like headers, footers, sidebars, or custom sections that your theme or you have created earlier.
Search and Preview Template Parts: You can browse through the available template parts. If your theme provides several options, you might see a variety of designs for headers, footers, and other sections. Use the search functionality if you’re looking for a specific template part. Hover over the template parts to get a preview of what they look like. This feature helps you decide which part fits your current design needs.
Select and Insert the Desired Template Part: Once you find the template part that suits your needs, click on it to select.
After selecting, the chosen template part will be inserted into your template at the location where you added the Template Part block.
How to Customize WordPress Template Parts
Customizing template parts in WordPress, especially with Full Site Editing (FSE) capabilities, is a key aspect of modern theme design and site management. Template parts like headers, footers, or sidebars can be customized to suit your website’s unique style and functionality.
There are 2 ways to customize WordPress Template Parts.
- Editing the template part directly while editing a page or template
- Editing the template part via the template part focus mode
The first method involves customizing template parts (like headers, footers, or sidebars) directly within the context of a specific page or template. While editing a page or a full template, you can access and modify any embedded template parts in real-time.
Here’s how you can do it:
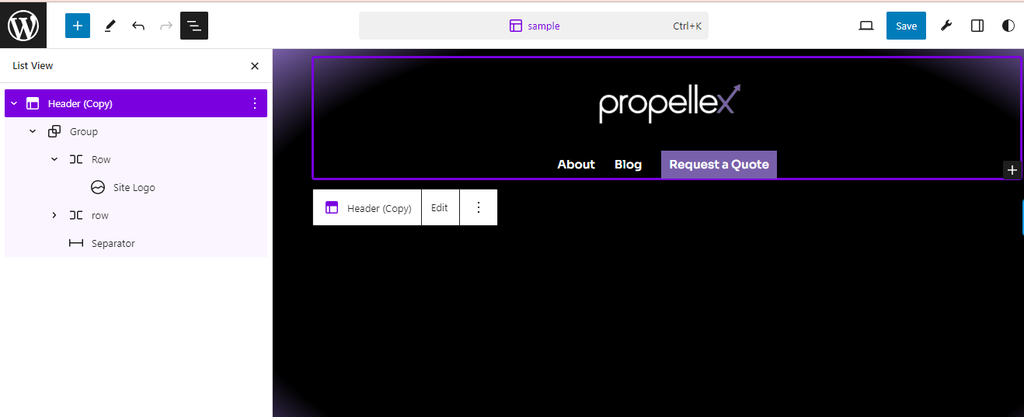
While editing a page template, you can use the List View to navigate to the template part you want to edit and just customize the template part by adding/removing blocks, changing their order, or adding block settings.

The Template Part Focus Mode on the other hand, allows you to isolate and edit a template part independently of the rest of the page or template.
Accessed through the Site Editor, this mode provides a focused environment for editing a specific template part, such as a header or footer.
Here’s multiple ways you can edit via the Template Part Focus Area:
- While editing a page or template through the Site Editor, use the list view to navigate to the template part you want to customize. Select the template part you want to edit and click Edit in the pop up that appears.
- Navigate to Site Editor > Patterns. Under Template Parts, you can see the different template parts available. If you want to customize a header template part, click Headers. You’ll see the different header template parts available in your theme on the right side. Click the template part area you want to edit. It will open the preview screen. Click the pencil icon to edit the template part in the Template Part Focus Area.
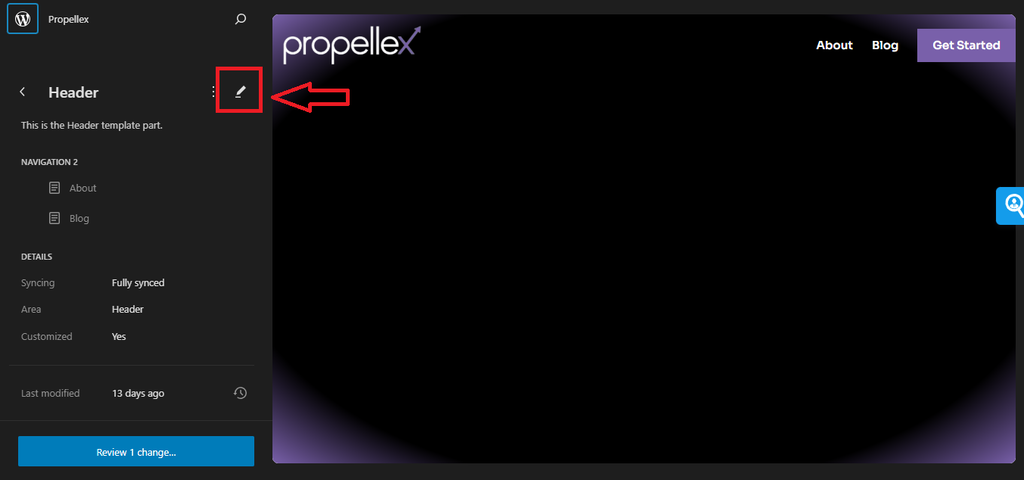
Customizing the WordPress Template Part
- Add or Remove Blocks
- Once you’ve accessed the template part, customize it by adding new blocks (like images, paragraphs, buttons) or removing existing ones.
- This allows you to tailor the layout and content of the template part to your specific needs.
- Adjust Block Settings and Styles
- Each block within the template part has its own set of settings and style options.
- Experiment with different settings like colors, typography, alignments, and spacing to achieve the desired look.
- Use Block Patterns
- Block patterns can be a quick way to add pre-designed layouts to your template part.
- Look for patterns that suit your design goals and insert them into the template part.
- Apply Global Styles
- If your theme supports global styles (via theme.json), use these settings to ensure consistency across all template parts and other areas of your site.
- Responsive Design Considerations
- Check how your customizations look on different screen sizes.
- Adjust block settings for mobile, tablet, and desktop views to ensure a responsive design.
- Custom CSS
- For more advanced customization, you can add custom CSS to specific blocks or the entire template part.
- This is particularly useful for unique styling that can’t be achieved through the block settings.
- Save and Preview Changes
- After customizing, save the changes. Always preview your site to see how the template part looks in the context of the whole page or site.
- Reuse Customized Template Parts
- Once customized, you can reuse these template parts across different templates on your site, ensuring consistency and saving time.
How to Replace Your Template Parts?
With WordPress Block themes, you can create multiple template parts for a particular area. For example, you can create a different header for the header template area.
Here’s how you can replace one template part with another:
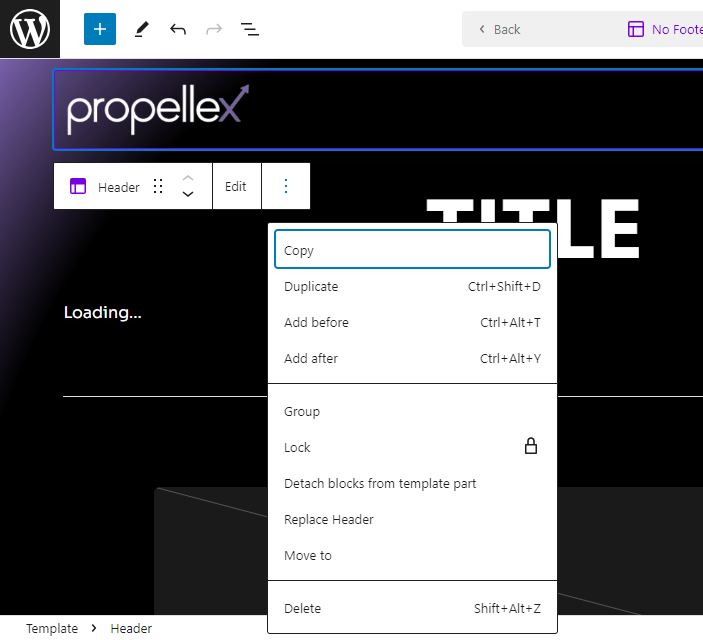
- When editing a page or template, click the template part you want to replace. A toolbar will appear with customization options. Click the three dots on the toolbar.
- In the menu that appears, click Replace [template part]. If you want to change the header template part, the option will appear as ‘Replace Header’. Click to see options for which template part you want to replace with.
How to Create New WordPress Template Parts?
Here’s a step-by-step guide on how to create new template parts:
- Step 1: Accessing the Patterns Library
Begin by navigating to the WordPress Site Editor within your WordPress dashboard.
Locate the “Patterns” heading. Next to it, you’ll find a “+” (plus) icon which you need to click. This action will bring up a dropdown menu with several options.
- Step 2: Initiating Template Part Creation
From the dropdown menu, select the “Create Template Part” option. This choice is specifically designed for starting the process of crafting a new template part.
- Step 3: Naming and Categorizing the Template Part
Upon selection, a popup modal will appear on your screen. Here, you’ll be prompted to enter a name for your new template part. Choose a name that is descriptive and reflective of its function or location (e.g., “Main Header” or “Footer Section”).
You will also have the option to categorize the template part as “General”, “Header”, or “Footer”. These categories help in organizing and identifying the template parts within the Site Editor.
- Step 4: Designing the Template Part
After naming and categorizing, you’ll be taken to a screen where you can start creating your custom template part.
This is where the creative process begins. You can add any blocks you prefer, such as paragraphs, images, buttons, or custom code blocks, to design your template part. Arrange and style these blocks to meet your design requirements.
- Step 5: Saving the Template Part
Once you’ve designed your template part, save your changes. This action stores the new template part in the WordPress database, making it accessible for use across your site.
It’s important to note that while the template part is saved in the database, if you plan to distribute your theme, you need to create a corresponding file for the template part in your theme’s /parts folder.
- Step 6: Exporting for Theme Distribution (Optional)
If you intend to distribute your theme, manually create a file in your theme’s /parts directory corresponding to your new template part. The file name should match the slug of the template part.
Copy the block markup from the WordPress editor and paste it into this file. This step ensures that your template part is included with the theme files when distributed.
What are Template Part Areas and How to Create Custom Template Part Areas?
When you are creating new template parts, you’ll notice that WordPress only gives you 3 options of template part areas: Header, Footer, and General. What if you want to add a template part for the sidebar area? Or a template part for a recent post loop that will go on every page?
This can be easily done by creating custom template part areas.
Template part areas in WordPress serve as an organizational and navigational tool in the Full Site Editing (FSE) environment, particularly beneficial in block themes.
They help categorize template parts like headers, footers, or custom sections, enhancing the user interface and the site editing workflow. Let’s delve into understanding these areas and how to create custom ones.
Creating Custom Template Part Areas
Custom areas can be created to enhance theme organization and provide a better editing experience. Here’s how to create them:
Registering Custom Areas
- Custom areas are registered using the default_wp_template_part_areas filter hook in WordPress.
- Add a filter to this hook in your theme’s functions.php file.
- The callback function should accept an array of area definitions, each being an array with specific key/value pairs.
For example, to add a custom area named “Loop”, add the following code to your functions.php:
add_filter('default_wp_template_part_areas', 'themeslug_template_part_areas');

function themeslug_template_part_areas(array $areas) {

 $areas[] = array(

 'area' => 'loop',

 'area_tag' => 'section',

 'label' => __('Loop', 'themeslug'),

 'description' => __('Custom description', 'themeslug'),

 'icon' => 'layout'

 );

 return $areas;

}
Each custom area should include the following:
- area: A unique slug for the template part area.
- area_tag: The HTML tag (like div, section, header) to wrap the template parts.
- label: A human-readable name for the area.
- description: A brief description of the area and its intended template parts.
- icon: The icon representing the area (limited options available as of now).
Assigning Template Parts to Custom Areas
- After registering a custom area, assign template parts to it in your theme.json file.
- Define the template part with its area, name, and title within the template parts array.
- For instance, to assign a loop-default.html template part to the “Loop” area, add the following in theme.json:
{
{
    "version": 2,
    "templateParts": [
        {
            "area": "loop",
            "name": "loop-default",
            "title": "Loop - Default"
        }
    ]
}
 }
 ]
}
Once registered and assigned, the custom area and its template parts become visible in the Site Editor.
This structured approach not only enhances the editor’s UI but also simplifies the management of different template parts.
Template parts and custom template part areas in WordPress enhance the organization and editing experience in block themes. They allow theme developers to categorize and manage template parts efficiently, making the Site Editor more intuitive and user-friendly.
This feature, particularly in conjunction with the Full Site Editing capabilities, demonstrates the flexibility and power of modern WordPress theme development.

![Contact Form 7 Formatting in WordPress [How to Do it The Right Way] Contact Form 7 Formatting in WordPress [How to Do it The Right Way]](https://wpdesc.com/wp-content/uploads/2024/07/Contact-Form-7-Formatting-in-WordPress-1024x512.png)
![How to Redirect Contact Form 7 to Thank You Page [2 Easy Ways] How to Redirect Contact Form 7 to Thank You Page [2 Easy Ways]](https://wpdesc.com/wp-content/uploads/2024/07/how-to-redirect-contact-form-7-to-thank-you-page-1024x512.png)
![How to Add reCAPTCHA to Contact Form 7 [2 Easy Steps] How to Add reCAPTCHA to Contact Form 7 [2 Easy Steps]](https://wpdesc.com/wp-content/uploads/2024/07/how-to-add-recaptcha-to-contact-form-7-1024x512.png)

Leave a Reply