You probably need to create content for your WordPress site and find yourself wondering how to use Gutenberg editor in WordPress. If so, you’re in the right place.
Since its launch with WordPress version 5.0 back in December 2018, the Gutenberg block editor has replaced the Classic editor. The best thing is that the WordPress block editor has introduced an intuitive block-based approach, which gives you so much flexibility with content creation and editing.
Keep reading this Gutenberg editor WordPress tutorial as we will walk you through the step-by-step process of how to use Gutenberg editor in WordPress. We will also give you Gutenberg keyboard shortcuts to speed up the creation of your WordPress content.
Ready? Let’s dive right in!
How Does the WordPress Gutenberg Editor Work
The Gutenberg editor, also known as the WordPress block editor, offers immense flexibility to users through its modular block-based approach. Each block serves as an independent component, which allows users to easily add and customize various elements within their posts and pages.
To access the Gutenberg editor in WordPress, simply navigate to Pages or Posts in your WordPress dashboard and select ‘Add New Post’ or ‘Add New Page’ to access the Gutenberg interface.
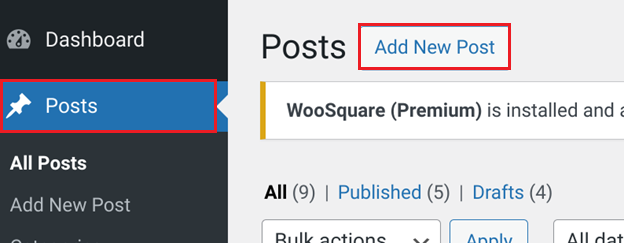
Once inside the editor, you’ll notice three primary sections that make up the block editor workspace:
- Top Toolbar
- Sidebar
- Content Area
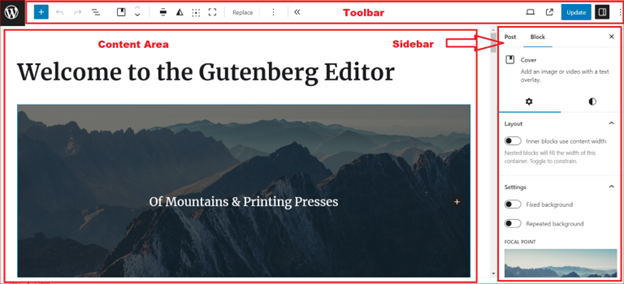
Let’s explore each of them in detail:
- Top Toolbar
Positioned at the top of the screen, the toolbar provides quick access to essential editing functions.

On the left, you’ll find options for inserting new blocks, undoing or redoing recent changes, and the Details option, which offers insights into your post or page, including character and word counts, as well as estimated reading time.

On the right-hand side of the Gutenberg toolbar, you have various options related to post or page settings. These include previewing your post/page across different devices, publishing or updating content, accessing additional options to customize your editing experience, etc.

- Sidebar
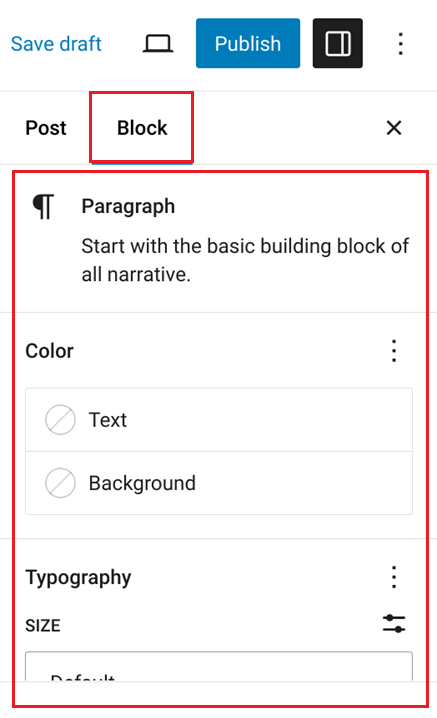
In the Gutenberg editor, the sidebar is a handy feature that you can access right from the toolbar, as shown in the screen below.
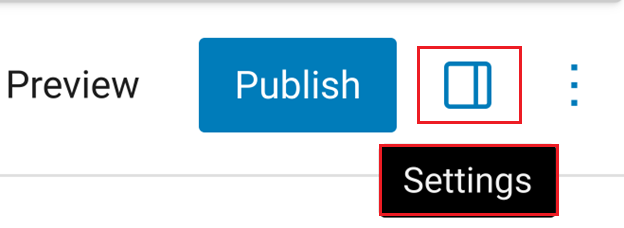
It has two tabs: “Post” or “Page,” depending on your current task.
The left tab contains settings for the entire page or post, including visibility, publishing options, URL (permalink), category selection, tags, etc.
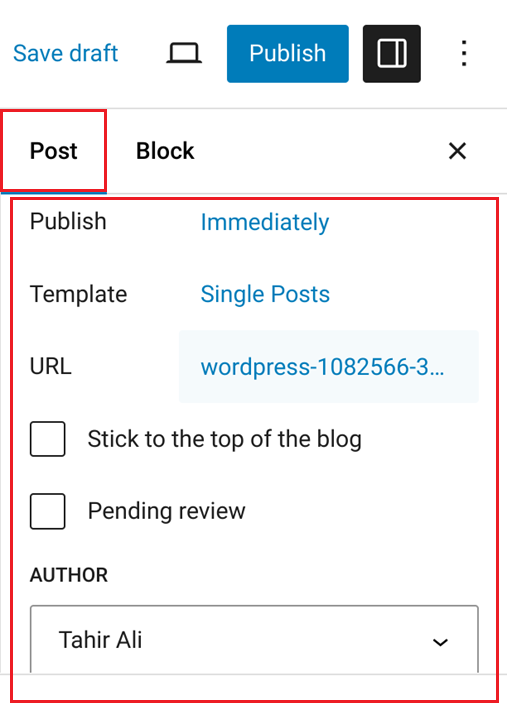
Conversely, the right tab displays settings for the selected block, such as block name, text and background color, dimensions of the block, and even the option to add additional CSS for that particular block.
- Content Area
The content area is the main section of the editor, where you compose and arrange your blocks to create engaging content. Whether you’re adding text, images, or multimedia elements, you simply add a new block for each purpose and create content as you like.
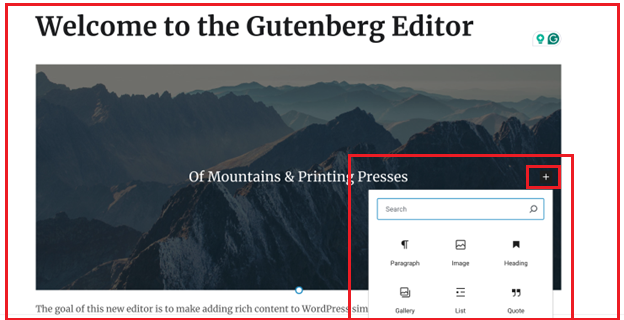
In addition to these main sections, you have the ‘W’ icon at the top left of the Gutenberg editor workspace, which allows you to exit the editor.

NOTE: Before exiting the block editor, make sure to save the changes you have made to the post or page.
How to use Gutenberg Editor in WordPress [Step-by-Step]
Now that you’ve a better understanding of the main three sections of the Gutenberg editor, let’s explain how to use Gutenberg editor in WordPress at each step of the way to create content.
How to Add and Remove Gutenberg Blocks
As we told you earlier, whenever you want to add something to the content, such as a paragraph, an image, a video, or anything else, you need to add a block.
To add and remove any Gutenberg block, follow the instructions below.
Adding Gutenberg Blocks
There are a couple of methods to add a block in Gutenberg editor, which are as follows:
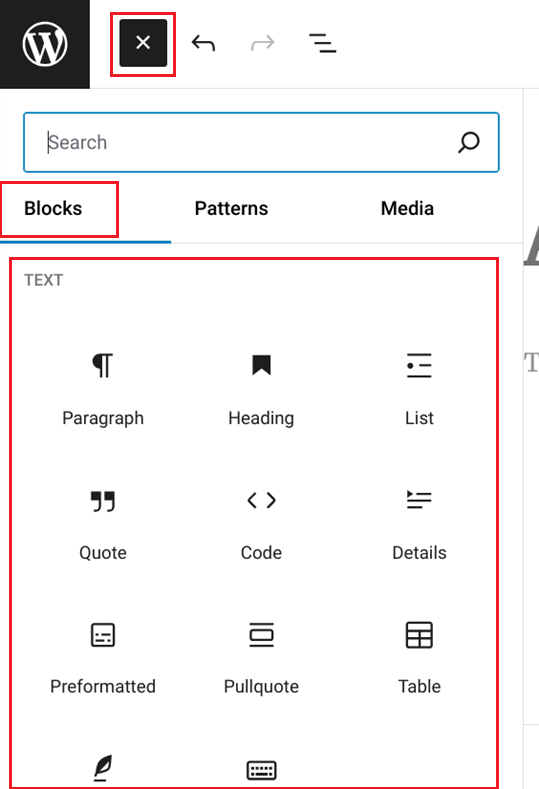
- Using the Toggle Block Inserter: Click on the blue ‘+’ icon located at the top left corner of the editor interface, and then simply under block section select the block you want to add.
- Via Cursor Selection: Alternatively, you can simply click on the area of the page where you want to add the block. Then, click the blue ‘+’ icon to choose the block from the list.
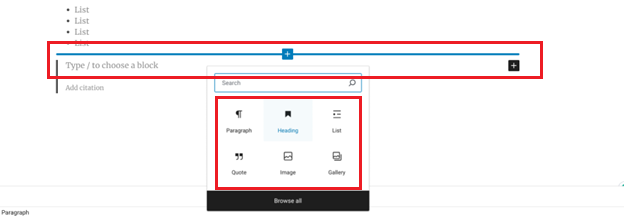
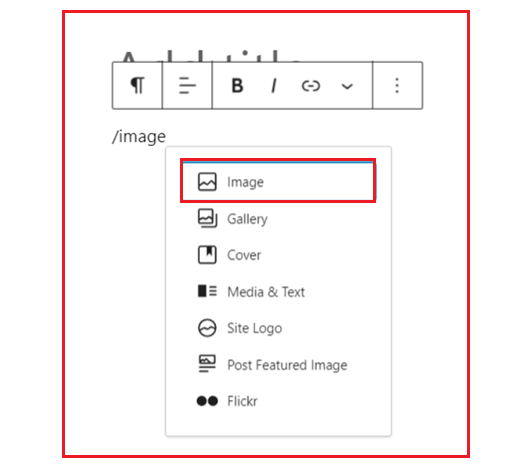
- Using Forward Slash: An even quicker method is to use the forward slash ‘/’ followed by the name of the block you want to add. For example, typing ‘/image’ will highlight the image block, which you can then select and add to the page.
Removing Gutenberg Blocks
Removing blocks is just as easy as adding them. Here’s how to do it:
- Select the Block: Click on the block you want to remove to activate it.
- Open Block Menu: Upon selection of the block, you’ll see the new editing features will appear on the top toolbar for that block, locate and click on the three dots on the right-hand side.
- Remove Block: From the options that appear, scroll down and select “Delete,” located at the bottom of the menu.
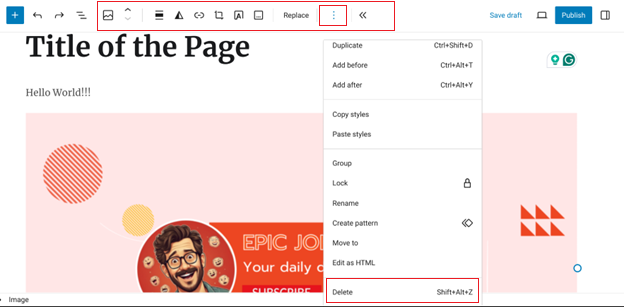
Alternatively, you can use the shortcut key combination ‘Shift + Alt + Z’ to remove the block quickly.
How to Customize Gutenberg Blocks in WordPress
Once you have added the Gutenberg block, you might want to customize its particular element. Here’s the step-by-step process to customize any Gutenberg block:
- Select Your Block: Click on the block you need to customize within your content editor. Once selected, you’ll notice that new customization features appear on the top toolbar specifically for that block.
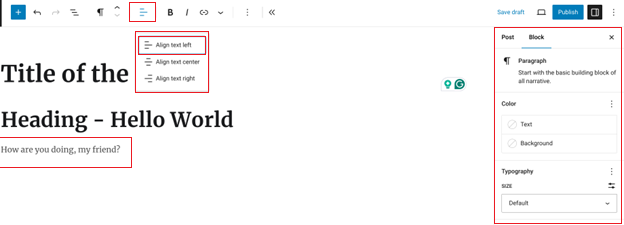
- Use the Block’s Toolbar: The block’s toolbar is dynamic and adjusts to the type of block you’ve selected. For example, if you choose a table block, the toolbar will offer options for changing text alignment and adding new rows and columns.
Explore the toolbar options to find the customization tools relevant to your selected block.
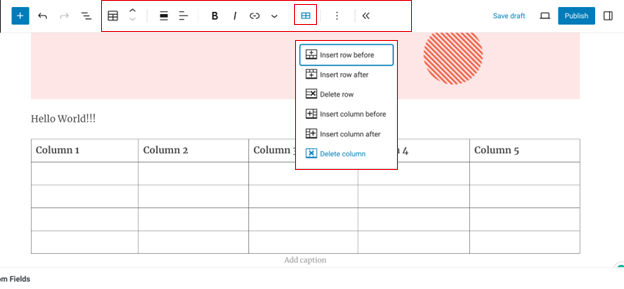
In addition to the block’s toolbar, you can access further customization options through the block settings. Click on the settings icon located in the top-right corner of the Gutenberg editor main toolbar to reveal a right-side panel.
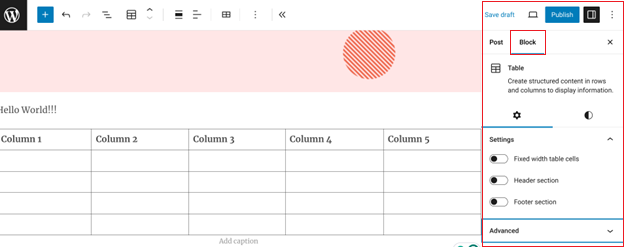
Within the right-side panel, navigate to the Block tab. Here, you’ll find a range of customization options tailored to the block you’ve selected.
For advanced users, Gutenberg sidebar block customization also has the option to insert custom CSS directly into the block settings.
How to Add Heading and Text Blocks in Gutenberg
To add text for WordPress posts and pages, Gutenberg offers heading and paragraph blocks. Follow the below instructions to add heading and text blocks in Gutenberg.
Adding Heading Block in Gutenberg Editor
If you are wondering how do I add a heading block in WordPress? Then follow the steps below:
- Head to the Block Inserter: Open the block inserter by clicking the blue ‘+’ icon at the top left corner of the editor interface.
- Select Heading: From the block inserter, choose the “Heading” option.
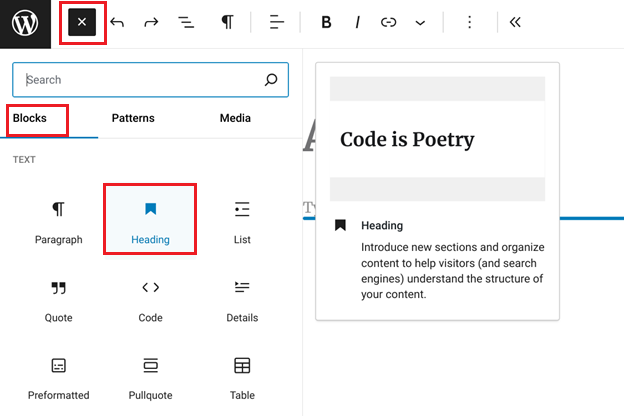
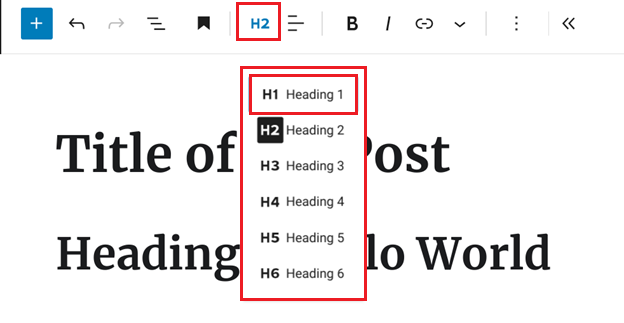
- Choose Heading Level: Once the heading block is added to your content, select the appropriate heading level (from H1 to H6) using the block’s toolbar.
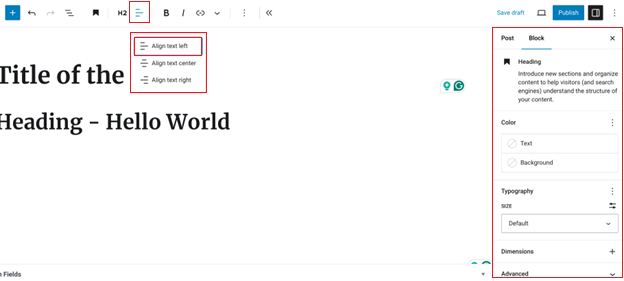
- Customization: Customize the appearance of your heading by adjusting attributes such as width, alignment, and more from the block’s toolbar or the side panel settings.
Adding Text Block in Gutenberg Editor
The simplest method to add text in Gutenberg is by typing directly into the Gutenberg interface. But still if you want to know how do I add a text block in WordPress? Follow the steps below:
- Go to the Block Inserter: Open the block inserter and select the “Paragraph” option to add a new paragraph block.
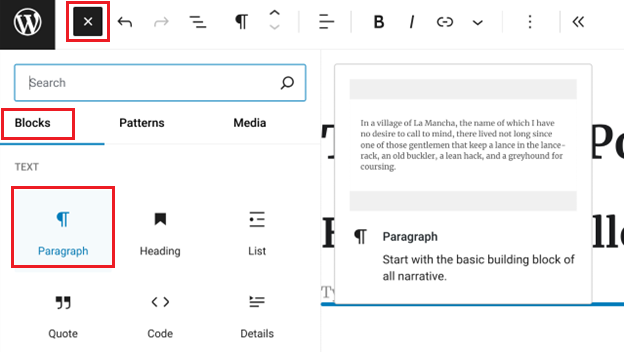
- Customize the Text block: Once the text block is added, use the block’s toolbar to align text, style words in bold or italics, embed links, insert footnotes, highlights, inline images, and more.
- Access Advanced Customization: Access the right-side text block settings to further customize attributes such as text color, typography, and dimensions to enhance the appearance of your content.
How to Add Images and Media via Gutenberg Blocks
Want to add media to your WordPress post or page and wondering how do I add media to Gutenberg? Below, we will show you how to do just that.
The Gutenberg WordPress editor lets you add various types of media to your posts and pages, such as images, videos, and even audio files.
Following is the list of Gutenberg blocks included in the media section.
- Media & Text Block: This versatile block enables you to blend media and text content side by side, which increases the visitor’s engagement.
- Image Gallery Block: Perfect for showcasing multiple image files in a unified layout, the Image Gallery Block is an excellent choice for photographers and portfolio sites.
- Cover Block: With the Cover block, you can overlay text on images or videos, creating visually stunning headers or highlights that grab attention instantly.
- Video Block: Add captivating video content to your posts or pages to enhance engagement and storytelling.
- Audio Block: Easily embed audio files into your WordPress content (post/page).
- File Block: You can upload and share a variety of file types, giving your audience easy access to downloads, resources, and important documents.
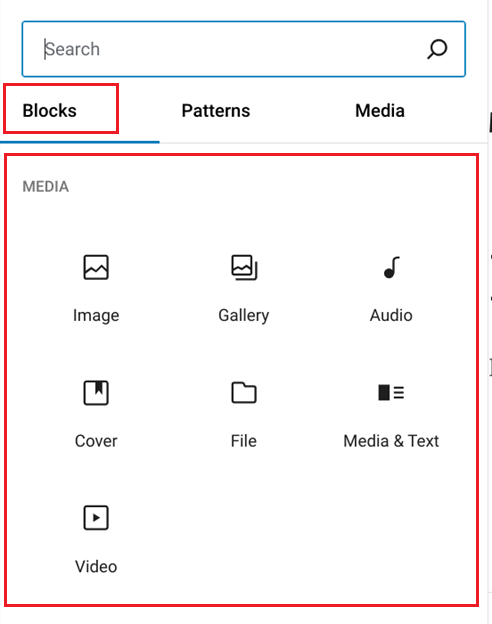
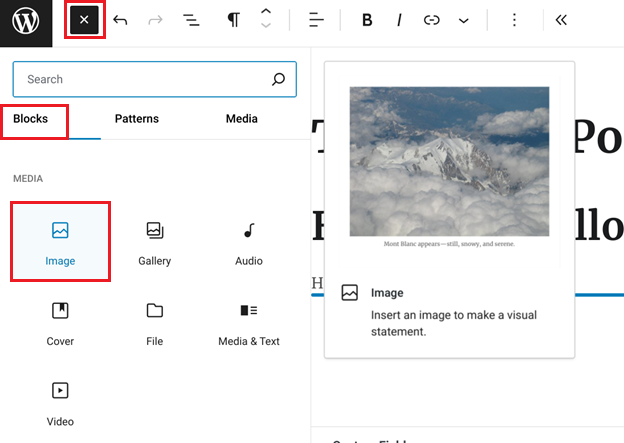
To add images or any other media to a WordPress post or page, open the block inserter by clicking the blue ‘+’ icon at the top left corner of the editor interface. Then, select that particular block (e.g., image, video, audio, etc.).
Here, we are going to add an image, as shown in the screenshot below:
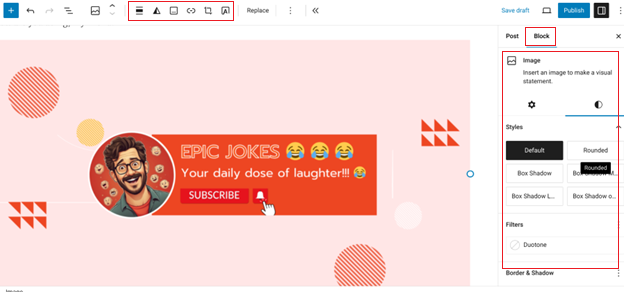
Each block comes with its own set of customizable options, which you can access from the top toolbar and from the left sidebar when you select the block.
For example, the Image block allows you to tweak details such as cropping, adding a caption, using different styles, etc.
How to Add and Edit a Link in Gutenberg Block Editor
Adding links to your WordPress post or page is crucial because that’s how we add a reference for the other webpage.
Adding a Link in Gutenberg Editor
Are you curious about how I can add a link in Gutenberg? Follow the steps below to add a link in the Gutenberg editor.
- Select Your Content: Highlight the text or element where you want to insert the link.
- Access the Link Icon: Look for the link icon in the top toolbar of the editing options.
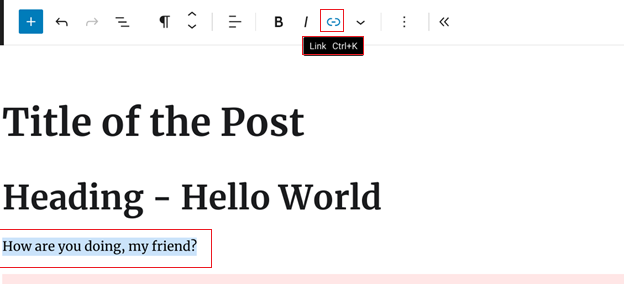
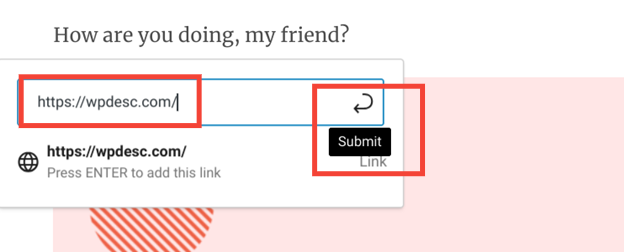
- Insert Your Link: Simply paste or type your desired URL into the designated URL box that appears.
- Preview Your Link: Double-check the URL in the preview box below to ensure accuracy.
- Submit the link: Once you are sure, click on the arrow on the left to submit the link.
Editing a Link in Gutenberg Editor
You have very few options when it comes to editing links within the Gutenberg Block Editor because there is only so much you can do with links.
To edit a link, follow the instructions below:
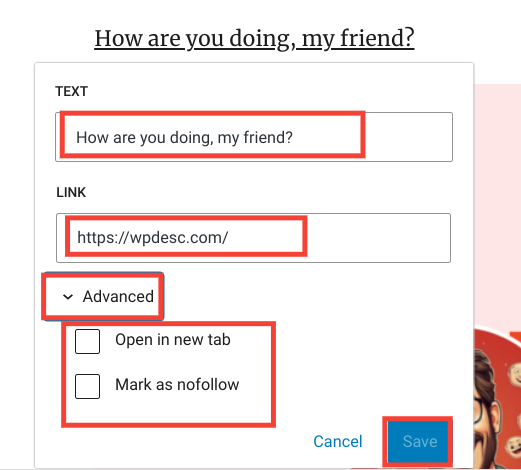
- Select Your Link: Click on the link you want to edit, and a pop-up menu will appear. Here, you’ll see copy and remove link options along with the link editing.
- Access the link editing section: Click on the link editing option from the pop-up menu.

- Modify Link Properties: Now, you can change the Text, URL, and the advanced settings to whether it opens in a new page, and mark as no follow..
How to Embed Any Media using Gutenberg Editor
In this section of our Gutenberg WordPress tutorial, we will show you how to embed any media in the Gutenberg editor.
Following are some of the dedicated Gutenberg blocks designed for embedding content:
- Videos: Whether it’s YouTube, Dailymotion, Vimeo, TED Talks, or TikTok, you can effortlessly embed captivating videos into your posts or pages.
- Images: To enrich your content, showcase stunning images sourced from various platforms, such as Imgur, Flickr, Pinterest, Instagram, etc.
- Social Media Posts: Embed posts from Facebook, Twitter, or Reddit directly into your WordPress site.
- Audio Files: Embed audio files from Spotify, SoundCloud, or Mixcloud.
- Documents: Whether it’s a presentation or a publication, embed documents from Scribd or Issuu directly into your pages.
- Polls and Surveys: Engage your audience with interactive content by embedding polls and surveys from Crowdsignal, encouraging participation and feedback.
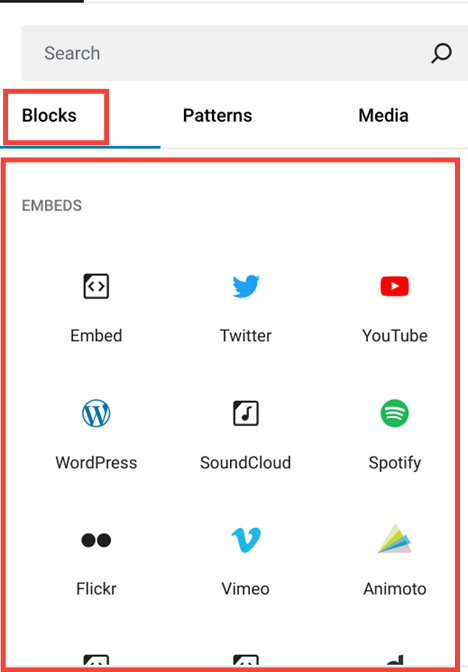
Now, let’s see how you can embed media using the Gutenberg editor:
- Open the Block Inserter: Access the block inserter within Gutenberg and navigate to the Embeds section.
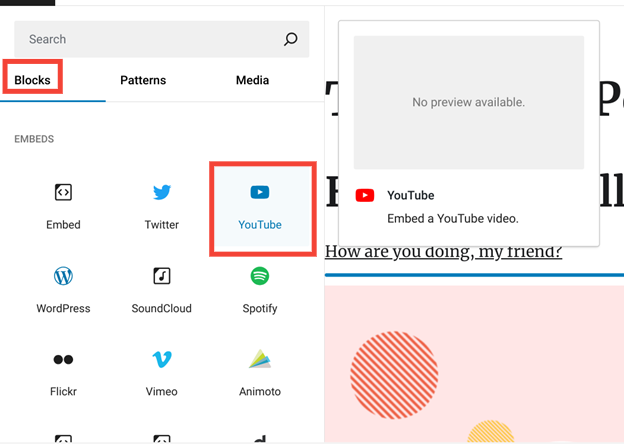
- Choose Your Media Source: Select your desired media source from the available options. Here, we will add a YouTube video.
- Paste the Media URL: Simply paste the URL of the media you want to embed into the designated field.

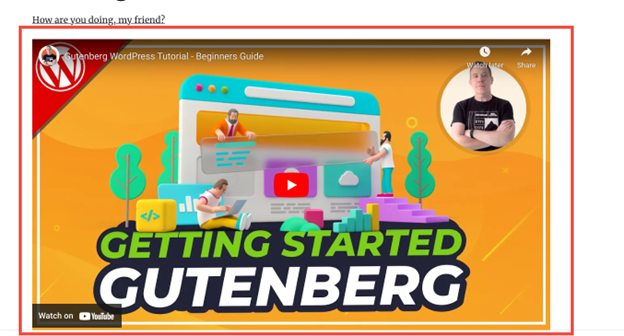
- Select Embed: Click on the Embed button, and voila! Your page or post will now display the embedded content, as shown in the screenshot below.
How to Rearrange or Move Gutenberg Blocks
You might need to move certain Gutenberg blocks to rearrange the content for your WordPress post or page. You can easily do it with the ‘Move up’ and ‘Move down’ options.
To rearrange or move Gutenberg blocks, follow the steps below:
- Select the Block: Click on the block you want to rearrange or move.
- Access the Editing Menu: From the editing options located on the top toolbar, click on the ‘Move up’ or ‘Move down’ option.
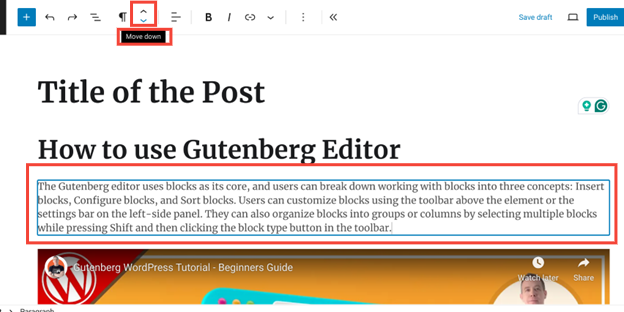
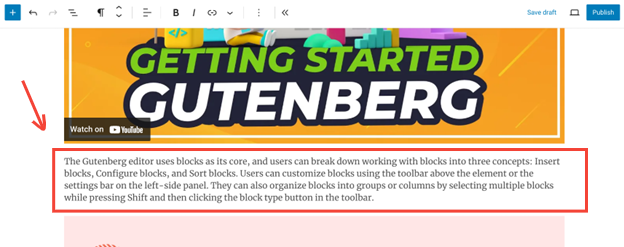
When you select the ‘Move down’ option, the text will move below the embedded video, as shown in the screenshot below.
List of Useful Gutenberg Keyboard Shortcuts
Gutenberg keyboard shortcuts make your work faster in the WordPress block editor. Instead of clicking around, you can use key combinations to do things quickly. You can find these shortcuts by clicking on the three-dot icon in the editor’s top-right corner.
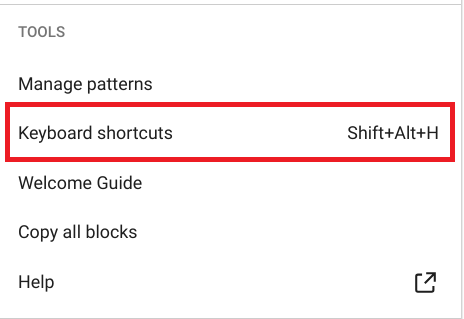
Here’s the list of most useful keyboard shortcuts for the Gutenberg Editor:
NOTE: If you’re on macOS, just swap Ctrl with Command ⌘ in the shortcuts.
| Action/Function | Keyboard Shortcut |
| To view keyboard shortcuts. | Shift+Alt+H |
| Global shortcuts | |
| – Navigate to the nearest toolbar. | Alt+F10 |
| – Open the command palette. | Ctrl+K |
| – Switch between visual editor and code editor. | Ctrl+Shift+Alt+M |
| – Toggle distraction free mode. | Ctrl+Shift+\ |
| – Toggle fullscreen mode. | Ctrl+Shift+Alt+F |
| – Show or hide the Settings sidebar. | Ctrl+Shift+, |
| – Navigate to the next part of the editor. | Ctrl+` |
| – Navigate to the previous part of the editor. | Ctrl+Shift+` Shift+Alt+P Ctrl+Shift+~ |
| – Save your changes. | Ctrl+S |
| – Undo your last changes. | Ctrl+Z |
| – Redo your last undo. | Ctrl+Shift+ZCtrl+Y |
| – Open the block list view. | Shift+Alt+O |
| Selection shortcuts | |
| – Select all text when typing. Press again to select all blocks. | Ctrl+A |
| – Clear selection. | escape |
| – Select text across multiple blocks. | Shift+Arrow |
| Block shortcuts | |
| – Duplicate the selected block(s). | Ctrl+Shift+D |
| – Remove the selected block(s). | Shift+Alt+Z |
| – Insert a new block before the selected block(s). | Ctrl+Alt+T |
| – Insert a new block after the selected block(s). | Ctrl+Alt+Y |
| – Delete selection. | Del or backspace |
| – Move the selected block(s) up. | Ctrl+Shift+Alt+T |
| – Move the selected block(s) down. | Ctrl+Shift+Alt+Y |
| – Change the block type after adding a new paragraph. | / |
| Text formatting | |
| – Make the selected text bold. | Ctrl+B |
| – Make the selected text italic. | Ctrl+I |
| – Convert the selected text into a link. | Ctrl+K |
| – Remove a link. | Ctrl+Shift+K |
| – Insert a link to a post or page. | [[ |
| – Underline the selected text. | Ctrl+U |
| – Striketh through the selected text. | Shift+Alt+D |
| – Make the selected text inline code. | Shift+Alt+X |
| – Convert the current heading to a paragraph. | Shift+Alt+0 |
| – Convert the current paragraph or heading to a heading of levels 1 to 6. | Shift+Alt+1-6 |
NOTE: For any reason, if you don’t want to use the Gutenberg editor, check out our detailed guide on how to disable Gutenberg editor in WordPress.
Wrapping Up
Undoubtedly, the Gutenberg block editor revolutionizes how you create content in WordPress. Its user-friendly interface introduces a block-based approach to creating content. With simple drag-and-drop functionality, you can easily add, edit, and arrange elements like paragraphs, headings, images, and more.
Not just limited to content creation, Gutenberg extends its usability to theme customization through the site editor, making WordPress even more beginner-friendly and adaptable.
We hope that this tutorial on how to use Gutenberg editor in WordPress has helped you to clarify the new WordPress block editor’s use and highlight its benefits over the Classic editor.
Lastly, if you have any further questions or need assistance, feel free to ask them in the comment section below. We would love to help you!

![How to use Gutenberg Editor in WordPress [Gutenberg Tutorial 2024] How to use Gutenberg Editor in WordPress](https://wpdesc.com/wp-content/uploads/2024/05/how-to-use-gutenberg-editor-in-wordpress-1024x520.png)
![Contact Form 7 Formatting in WordPress [How to Do it The Right Way] Contact Form 7 Formatting in WordPress [How to Do it The Right Way]](https://wpdesc.com/wp-content/uploads/2024/07/Contact-Form-7-Formatting-in-WordPress-1024x512.png)
![How to Redirect Contact Form 7 to Thank You Page [2 Easy Ways] How to Redirect Contact Form 7 to Thank You Page [2 Easy Ways]](https://wpdesc.com/wp-content/uploads/2024/07/how-to-redirect-contact-form-7-to-thank-you-page-1024x512.png)
![How to Add reCAPTCHA to Contact Form 7 [2 Easy Steps] How to Add reCAPTCHA to Contact Form 7 [2 Easy Steps]](https://wpdesc.com/wp-content/uploads/2024/07/how-to-add-recaptcha-to-contact-form-7-1024x512.png)
Leave a Reply