Are you curious about how to enable Gutenberg Editor in WordPress? If so, you’ve come to the right place!
After the launch of WordPress version 5.0 in December 2018, the Gutenberg block editor has become the default editor for WordPress.
Most people prefer it over the classic editor because it allows for greater customization and ease of WordPress content creation.
If you are one of them, then keep reading. In this WordPress Gutenberg editor tutorial, we will show you the three easy methods to enable the Gutenberg Editor in WordPress.
Are you ready? Let’s dive right in!
Method #1: Upgrade Your WordPress to Version 5.0 or Higher
Upgrading your WordPress to version 5.0 or higher is the easiest way to enable the Gutenberg editor, as it comes built-in with these versions. However, before you proceed with the upgrade, there are a few important points to consider.
Firstly, make sure that all your themes and plugins are compatible with Gutenberg to avoid compatibility issues after the upgrade. Certain themes and plugins might require updates to work smoothly with Gutenberg.
Additionally, always remember to back up your website’s data before performing any major updates to prevent any potential data loss.
Once you’ve taken these precautions, follow these simple steps to upgrade WordPress:
- Sign in to your WordPress admin panel as an Administrator.
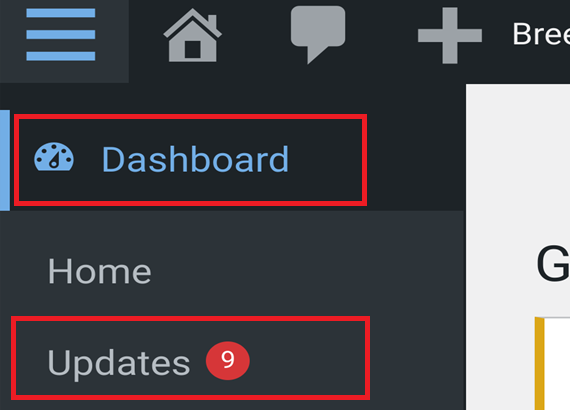
- Navigate to the ‘Dashboard’ menu and select ‘Updates.’
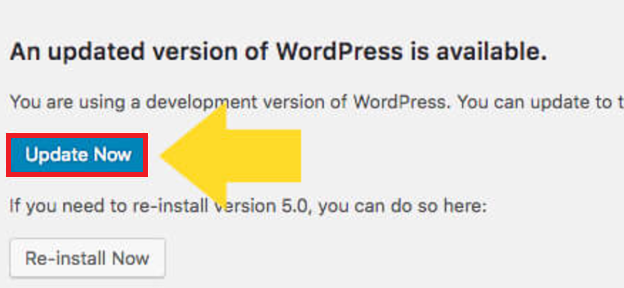
- Click on the ‘Update Now’ button displayed under the section ‘An updated version of WordPress is available.’
- Wait patiently as WordPress upgrades to the latest version. The process may take a few moments, depending on your internet connection and server speed.
- After the upgrade is complete, you’ll see a WordPress update status indicating that the upgrade was successful.

- If you have any caching plugins installed, remember to clear the cache to ensure that visitors see the updated version of your site.
- Check your website thoroughly to ensure that all functionality, such as sliders and contact forms, works properly with the new WordPress version.
- Finally, double-check your admin panel to ensure that everything is in order and that you have successfully enabled the WordPress Gutenberg Editor to create posts and pages.
And there you have it! You’ve successfully enabled the WordPress Gutenberg Editor. But if you are not comfortable upgrading to the latest WordPress version, don’t worry! The following is another method you can explore to enable Gutenberg in WordPress.
Method #2: Install Gutenberg Editor in WordPress
If you have reasons for not updating your WordPress version but still want to enable the Gutenberg editor, you can simply install the Gutenberg editor in WordPress via the Gutenberg plugin.
Follow these easy steps to install the Gutenberg plugin in WordPress:
- Sign in to your WordPress dashboard.
- Navigate to the Plugins section from the menu on the left-hand side.
- Click on the ‘Add New Plugin’ button located on the Plugins page.
- In the Search bar, type ‘Gutenberg’ and search for the Gutenberg plugin.
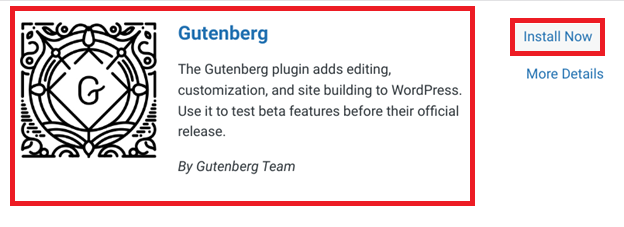
- Once you find the Gutenberg plugin, click on the ‘Install Now’ button and wait for the installation process to complete.
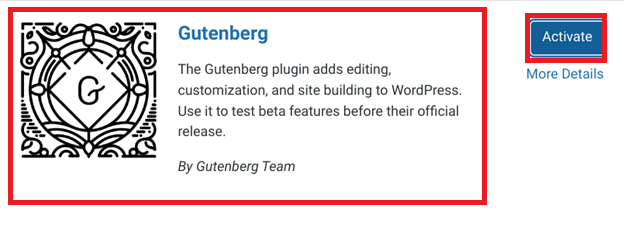
- Upon successful installation, select the ‘Activate’ button to enable the Gutenberg plugin.
There you have it! You can now use the Gutenberg Editor to create WordPress content.
Method #3: Enable Gutenberg Editor in WordPress Selectively
The method we’ve discussed above will enable Gutenberg editor in WordPress everywhere.
However, if you want to stick with the Classic Editor for the most part, except for a couple of things, such as posts, WooCommerce, social categories, etc., you need to enable Gutenberg editor in WordPress selectively.
To enable Gutenberg editor in WordPress selectively, follow the instructions below:
First, Disable Gutenberg in WordPress
There are two main ways to disable Gutenberg editor in WordPress, which are as follows:
- Disable Gutenberg Editor via Functions.php File
- Install Disable Gutenberg Plugin
Let’s explore both options in detail.
Option #1: Disable Gutenberg Editor via Functions.php File
One way to disable the Gutenberg editor in WordPress is to add a certain code snippet to the functions.php file of your WordPress theme. Depending on your WordPress version, you’ll need to add one of the following codes to the functions.php file.
For WordPress versions prior to 5.0:
add_filter('gutenberg_can_edit_post', '__return_false', 5);For WordPress versions 5.0 and above:
add_filter('use_block_editor_for_post', '__return_false', 5);
You can choose either or both of these hooks based on your WordPress version and add them to your theme’s functions.php file.
Option #2: Install the Disable Gutenberg Plugin
Alternatively, you can opt for a more convenient solution by installing the Disable Gutenberg plugin. This lightweight plugin offers a hassle-free way to disable the Gutenberg editor in WordPress.
The Disable Gutenberg plugin has over 700,000 active installations. It is extremely lightweight and easy to set up, making it an excellent solution for websites seeking to disable Gutenberg functionality completely.
You can install the Disable Gutenberg plugin directly via the WordPress repository or through your WordPress plugin’s page.
For a complete step-by-step process, check out our guide on how to disable Gutenberg Editor in WordPress.
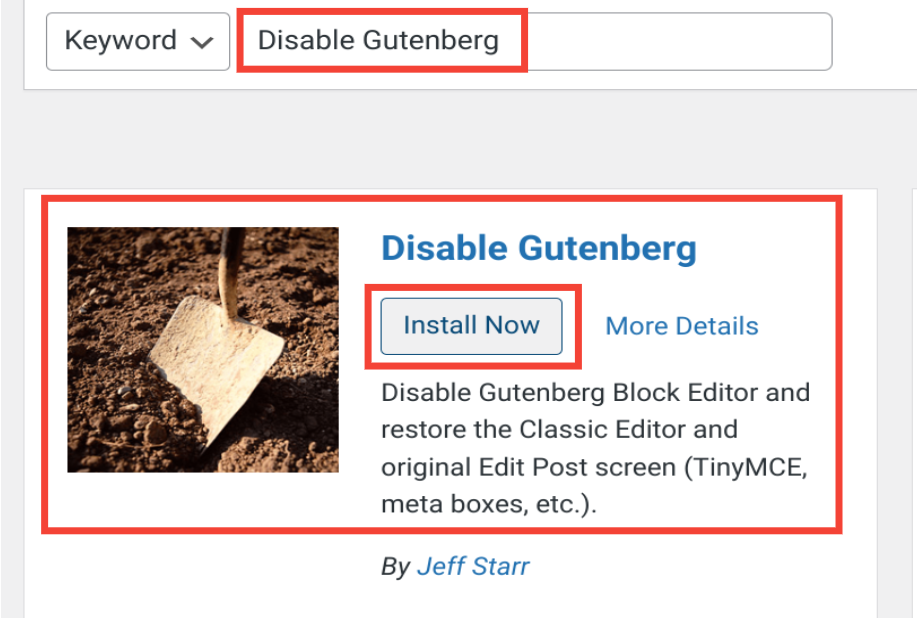
NOTE: The Disable Gutenberg plugin will automatically disable the Gutenberg Editor completely after successful installation.
As you have completely disabled the Gutenberg editor, now you are free to enable it for any specific purpose, such as creating posts, specific categories, tags, WooCommerce, etc.
Let’s check out each option one by one:
Mode #1: Enable Gutenberg in WordPress for Any Post ID
To enable the Gutenberg editor for any specific Post ID using code, simply add the following code snippet to the functions.php file of your WordPress theme.
First, add the following function.
function enable_gutenberg_for_specific_post_ids($can_edit, $post) {

// Check if post ID is empty

if (empty($post->ID))

return $can_edit;

// Enable Gutenberg for specific post IDs

if (1 === $post->ID)

return true;

return $can_edit;

}
Then, add one of the following codes as per your WordPress version.
For WordPress versions prior to 5.0:
// Enable Gutenberg for WordPress versions prior to 5.0 betaadd_filter('gutenberg_can_edit_post', 'enable_gutenberg_for_specific_post_ids', 10, 2);For WordPress versions 5.0 and above:
// Enable Gutenberg for WordPress version 5.0 and above add_filter('use_block_editor_for_post', 'enable_gutenberg_for_specific_post_ids', 10, 2);NOTE: This code snippet will enable Gutenberg in WordPress for a specific post with the ID of 1. However, you can customize it to enable Gutenberg for any desired post ID by adjusting the post ID value in the third line of the function.
Mode #2: Enable Gutenberg for New Posts
If you prefer to enable Gutenberg in WordPress for all new posts, you can easily accomplish this by adding a code snippet to your theme’s functions.php file.
Here’s how you can do it:
First, insert the following function:
function enable_gutenberg_for_new_posts($can_edit, $post) {

    // Check if post ID is empty

    if (empty($post->ID))

        return $can_edit;

    // Check if the user is on the post-new.php screen

    $current = get_current_screen();

    if ('post' === $current->base && 'add' === $current->action)

        return true;

    return $can_edit;

}
Next, depending on your WordPress version, add one of the following codes:
For WordPress versions before 5.0:
add_filter('gutenberg_can_edit_post', 'enable_gutenberg_for_new_posts', 10, 2);For WordPress version 5.0 and above:
add_filter('use_block_editor_for_post', 'enable_gutenberg_for_new_posts', 10, 2);This function essentially checks whether the user is navigating the post-new.php screen, which indicates the creation of a new post. If this condition is met, it returns true to enable Gutenberg to create new posts.
Remember, the priority value of 10 in the add_filter hooks is critical. It ensures that this function takes precedence over any disabling functions previously set, thus enabling Gutenberg specifically for new posts. By adjusting this priority value, you can get more over the execution order of filters, which gives you a more flexible WordPress editing environment.
Mode #3: Enable Gutenberg for WooCommerce Product Page
If you’re running a WooCommerce store and want to enable Gutenberg editor in WordPress for your product pages, Follow these steps to enable Gutenberg for your WooCommerce product pages:
Update Note: With the introduction of WooCommerce version 7.7.0, a new template was introduced for new products, rendering the old code ineffective. So, make sure you update your old code with the new code provided below for optimal functionality.
First, let’s disable the new WooCommerce product template introduced in version 7.7.0 so you can later enable the Gutenberg editor WooCommerce product page:
function disable_new_product_template($post_type_args) {

    if (array_key_exists('template', $post_type_args)) {

        unset($post_type_args['template']);

    }

    return $post_type_args;

}

add_filter('woocommerce_register_post_type_product', 'disable_new_product_template');
Next, let’s activate the Gutenberg editor in WordPress specifically for WooCommerce product pages with the following code snippet:
function activate_gutenberg_for_product($can_edit, $post_type) {

    if ($post_type == 'product') {

        $can_edit = true;

    }

    return $can_edit;

}

add_filter('use_block_editor_for_post_type', 'activate_gutenberg_for_product', 10, 2);
Additionally, to enable taxonomy fields for WooCommerce with Gutenberg editor enabled, use the following code:
function enable_taxonomy_with_gutenberg($args) {

    $args['show_in_rest'] = true;

    return $args;

}

add_filter('woocommerce_taxonomy_args_product_cat', 'enable_taxonomy_with_gutenberg');

add_filter('woocommerce_taxonomy_args_product_tag', 'enable_taxonomy_with_gutenberg');
Congratulations! You’ve now enabled the Gutenberg Editor for your WooCommerce product pages. Enjoy more flexibility and efficiency in managing your WooCommerce store’s product content!
Mode #4: Enable Gutenberg for Specific Categories
With a simple code snippet, you can enable the Gutenberg editor only for specific categories on your WordPress. Follow these steps to enable Gutenberg for specific categories:
Begin by integrating the following PHP function into your theme’s functions.php file:
function enable_gutenberg_for_specific_categories($can_edit, $post) {

    // Check if post ID is provided

    if (empty($post->ID))

        return $can_edit;

    // Check if the post belongs to the specified category (category ID: 12 in this example)

    if (has_category(10))

        return true;

    return $can_edit;

}
Next, depending on your WordPress version, add one of the following lines of code to enable Gutenberg for specific categories:
For WordPress versions before 5.0:
add_filter('gutenberg_can_edit_post', 'enable_gutenberg_for_specific_categories', 10, 2);For WordPress version 5.0 and later:
add_filter('use_block_editor_for_post', 'enable_gutenberg_for_specific_categories', 10, 2);This function uses WordPress’s has_category() function to verify whether the current post belongs to a specific category, such as category 10. If the post indeed belongs to the specified category, the function returns true, which will enable Gutenberg for that post.
Feel free to customize the category ID as needed to enable Gutenberg for your desired categories. With this approach, you have the flexibility to customize your Gutenberg experience based on specific categories.
Mode #5: Enable Gutenberg for any Post Type
If you’re looking to enable the Gutenberg editor for specific post types on your WordPress site, Follow these steps to enable Gutenberg for any post type via code:
First, add the following function to your theme’s functions.php file:
function enable_gutenberg_for_post_type($can_edit, $post) {

    // Check if post ID is provided

    if (empty($post->ID))

        return $can_edit;

    // Specify the post type for which you want to enable Gutenberg (e.g., 'books' in this example)

    if ('Laptops' === $post_type)

        return true;

    return $can_edit;

}
Next, depending on your WordPress version, insert one of the following lines of code to enable Gutenberg for any post type:
For WordPress versions before 5.0 beta:
add_filter('gutenberg_can_edit_post_type', 'enable_gutenberg_for_post_type', 10, 2);For WordPress version 5.0 and later:
add_filter('use_block_editor_for_post_type', 'enable_gutenberg_for_post_type', 10, 2);This function works similarly to the previous examples, but it focuses on specific post types. By defining the post type you wish to enable Gutenberg for (e.g., ‘Laptops’), you can ensure that Gutenberg is only activated for that particular post type.
Remember to include ‘show_in_rest’ => true and ‘supports’ => array(‘editor’) when defining your Custom Post Type to ensure compatibility with Gutenberg.
Mode #6: Enable Gutenberg for Specific Tags
To enable the Gutenberg editor for specific tags using code, follow the steps below:
Begin by inserting the following function into your theme’s functions.php file:
function enable_gutenberg_for_specific_tags($can_edit, $post) {

    // Check if post ID is provided

    if (empty($post->ID))

        return $can_edit;

    // Check if the post has the specified tag (tag ID: 5 in this example)

    if (has_tag(50))

        return true;

    return $can_edit;

}
Next, as per your WordPress version, add one of the following lines of code to enable Gutenberg for specific tags:
For WordPress versions before 5.0:
add_filter('gutenberg_can_edit_post', 'enable_gutenberg_for_specific_tags', 10, 2);For WordPress version 5.0 and later:
add_filter('use_block_editor_for_post', 'enable_gutenberg_for_specific_tags', 10, 2);This function utilizes WordPress’s has_tag() function to verify whether the current post has a specific tag, such as tag ID 5. If the post is indeed tagged with the specified tag, the function returns true, which will, in turn, enable Gutenberg for that post.
NOTE: You can change the tag ID according to your preference to enable Gutenberg for specific tags.
Mode #7: Enable Gutenberg for Specific Post Meta
Do you want to enable the Gutenberg Block Editor only for posts with specific metadata attached? If so, follow the steps below:
Start by adding the following function into the functions.php file of your WordPress theme:
function enable_gutenberg_for_specific_post_meta($can_edit, $post) {

    // Check if post ID is provided

    if (empty($post->ID))

        return $can_edit;

    // Check if the post has a specific metadata named 'current_mood' with the value 'Happy'

    if ('Elegant' === get_post_meta($post->ID, 'current_mood', true))

        return true;

    return $can_edit;

}
Next, depending on your WordPress version, add one of the following lines of code to enable Gutenberg for posts with specific metadata:
For WordPress versions before 5.0:
add_filter('gutenberg_can_edit_post', 'enable_gutenberg_for_specific_post_meta', 10, 2);For WordPress version 5.0 and later:
add_filter('use_block_editor_for_post', 'enable_gutenberg_for_specific_post_meta', 10, 2);This function checks the current post for a custom field named ‘current_mood’ with the value ‘Elegant.’ If such metadata exists, the function returns true, which will enable the Gutenberg editor for that post.
NOTE: For any reason, if you don’t want to use the Gutenberg editor, check out our detailed guide on how to disable Gutenberg editor in WordPress.
Wrapping Up
Congratulations! You’ve now learned several methods to enable the Gutenberg editor in WordPress, giving you greater flexibility and control over your content creation process.
In the above Gutenberg editor WordPress tutorial, we’ve mentioned three primary methods to enable the Gutenberg editor in WordPress, which are:
- Upgrading your WordPress version to 5.0 or higher.
- Installing the Gutenberg plugin.
- Selectively enabling Gutenberg for specific posts, categories, WooComemrce or post types, etc.
Using Gutenberg, you can tap into a modern and intuitive editing experience that empowers you to create visually stunning and engaging content for your WordPress website.
If you have any further questions or need assistance, feel free to ask in the comment section below. We would love to help you!
Frequently Asked Questions
How do I turn on Gutenberg in WordPress?
To enable Gutenberg in WordPress, simply upgrade your WordPress version to 5.0 or higher or install the Gutenberg plugin from the WordPress plugin repository.
How to install the Gutenberg block editor in WordPress?
To install the Gutenberg block editor in WordPress, navigate to the Plugins section in your WordPress admin dashboard, click on “Add New Plugin,” search for “Gutenberg,” and then click on “Install Now” followed by “Activate.”
How to enable gutenberg editor in WordPress custom post type?
You can enable the Gutenberg editor for custom post types by using filter hooks in your theme’s functions.php file. For detailed instructions check out the “Enable Gutenberg for any Post Type” section above.

![How to Enable Gutenberg Editor in WordPress [3 Simple Ways] How to Enable Gutenberg Editor in WordPress](https://wpdesc.com/wp-content/uploads/2024/05/how-to-enable-gutenberg-editor-in-wordpress-1024x520.jpeg)
![Contact Form 7 Formatting in WordPress [How to Do it The Right Way] Contact Form 7 Formatting in WordPress [How to Do it The Right Way]](https://wpdesc.com/wp-content/uploads/2024/07/Contact-Form-7-Formatting-in-WordPress-1024x512.png)
![How to Redirect Contact Form 7 to Thank You Page [2 Easy Ways] How to Redirect Contact Form 7 to Thank You Page [2 Easy Ways]](https://wpdesc.com/wp-content/uploads/2024/07/how-to-redirect-contact-form-7-to-thank-you-page-1024x512.png)
![How to Add reCAPTCHA to Contact Form 7 [2 Easy Steps] How to Add reCAPTCHA to Contact Form 7 [2 Easy Steps]](https://wpdesc.com/wp-content/uploads/2024/07/how-to-add-recaptcha-to-contact-form-7-1024x512.png)
Leave a Reply