Are you wondering how to add custom fonts to WordPress? If so, you are on the right page!
With custom fonts, you can create a beautiful combination of different fonts to enhance your typography and user experience.
Additionally, custom fonts can make your WordPress website more readable, make it more brand-conscious, and increase your website’s user engagement.
In this guide, we will explain what custom fonts are and how to find them. Then, we’ll go over four easy methods you can use to add custom fonts to WordPress.
Ready? Let’s get started!
What Are Custom Fonts and Why Add Them to WordPress?
Custom fonts refer to any typeface that isn’t included by default in WordPress. There are thousands of these fonts available online, offering a wide range of styles and options. You can easily find a custom font that fits your website’s unique needs and aesthetic.
When choosing custom fonts, it’s crucial to consider more than just their appearance. Here are a few key criteria:
- Readability: The font should be easy to read. This is essential for maintaining a good user experience.
- Consistency: The font needs to blend well with the overall style of your website and other fonts you use. This helps create a cohesive look.
- Responsiveness: The letters should look good at both large and small sizes. This ensures that your site remains mobile-friendly.
Custom fonts are not just about aesthetics; they also play a significant role in branding. The right font can enhance your site’s style and make your content more engaging. Over time, users may even start to associate certain fonts with your brand, making your site more memorable.
Incorporating custom fonts can help your website stand out. They allow you to express your site’s personality and make a lasting impression on visitors. By carefully selecting fonts that meet readability, consistency, and responsiveness criteria, you can significantly enhance your site’s overall design and user experience.
Where to Find Custom Fonts for WordPress?
If you want to add custom fonts to WordPress, you need to find the right one for a better look and feel. A quick search for ‘free fonts’ online gives you a lot of results, but many of these sites lack quality control. You may find a few gems, but most of the time, you’ll encounter outdated or unattractive fonts.

Thankfully, there are reputable font repositories that curate their collections carefully. Here are two of the best options:
- Google Fonts: Google Fonts offers over 1,600 font families in multiple languages, all available for free. This extensive library provides a wide range of styles and options, ensuring you’ll find a font that fits your needs. The fonts are also optimized for web use, ensuring they load quickly and look great on any device.
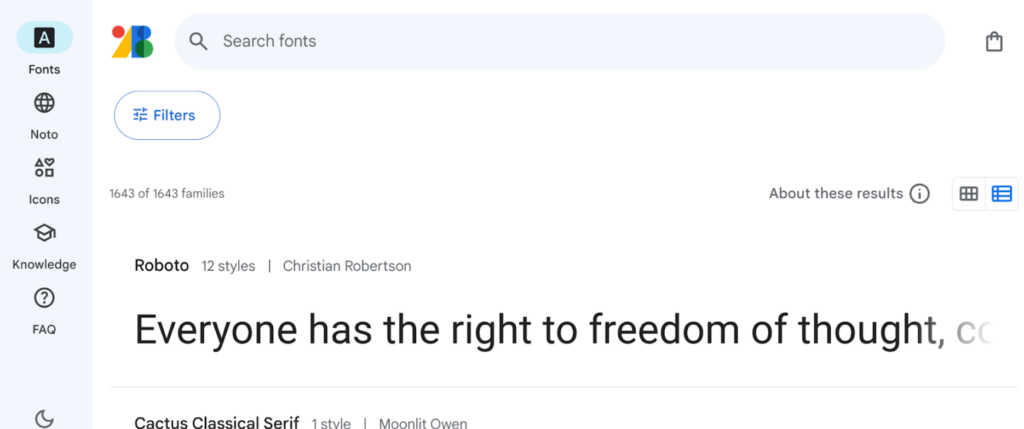
- Adobe Fonts: Formerly known as Typekit, Adobe Fonts boasts a collection of over 25,000 fonts. To access these, you need a Creative Cloud subscription, which many designers and developers already use. Adobe Fonts integrates seamlessly with other Adobe tools, making it a convenient option for those already in the Adobe ecosystem.

These two sources alone offer a plethora of choices for enhancing your website’s typography. When selecting a font, remember that it should not only look good but also align with your site’s overall style and be easy to read. Consistency and readability are key to maintaining a professional appearance and ensuring a positive user experience.
Once you’ve chosen your fonts, the next step is to add them to your WordPress site. This can be done through various methods, such as using plugins, editing your theme’s CSS, or uploading font files directly. With the right fonts, you can significantly improve your site’s visual appeal and create a more engaging user experience.
4 Easy Ways to Add Custom Fonts to WordPress
To add custom fonts to WordPress, you have multiple options to choose from. Let’s explore each method so you can choose what works best for you.
Method #1: Use the WordPress Built-in Font Library
If you’re using a WordPress block theme with full site editing (FSE) functionality and have WordPress version 6.5 or higher, you can easily access the WordPress built-in font library. This feature allows you to import thousands of fonts from sources like Google Fonts and Adobe Fonts directly into your site.
To get started:
- Navigate to the full site editor by going to Appearance → Editor.
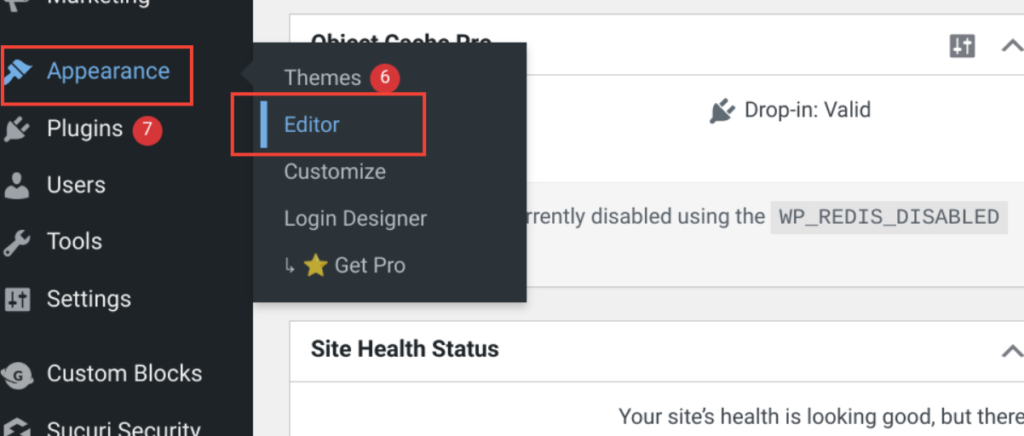
- Once in the editor, click on Styles, and then click on the pencil icon to edit styles. This action will take you to the FSE interface with the Styles option (represented by a split-circle icon) selected by default.
- From here, click on Typography.
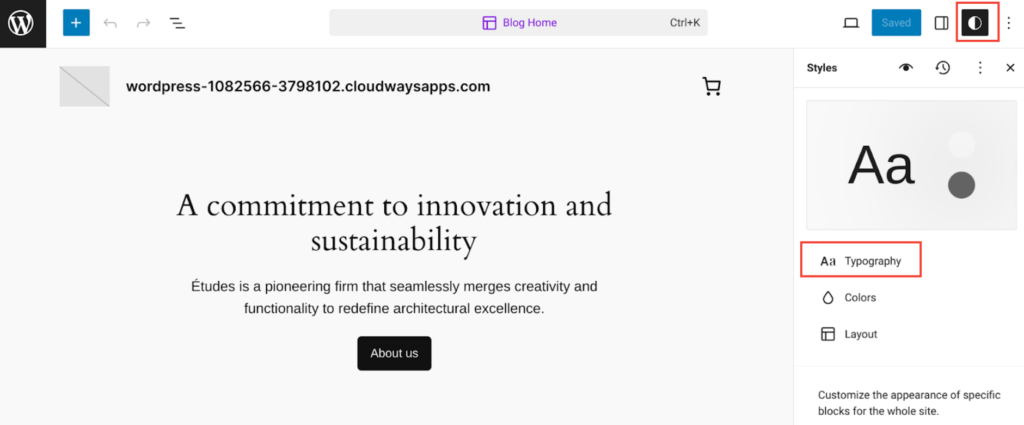
This step will display a list of available fonts.
- To access Google Fonts, click on the icon to the right of the subheading titled FONTS. This icon looks like two lines with a dot inside each line.
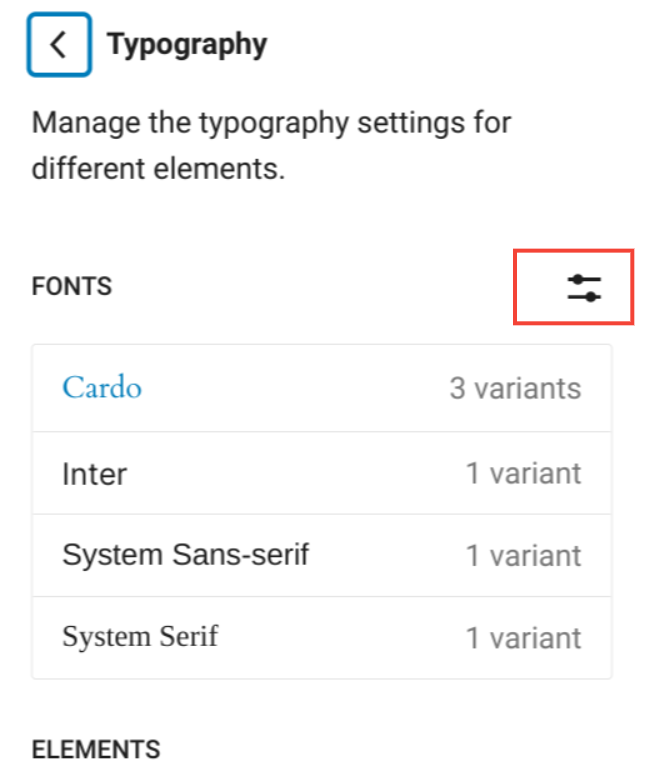
- Once you click it, the font library window will open. As shown below.
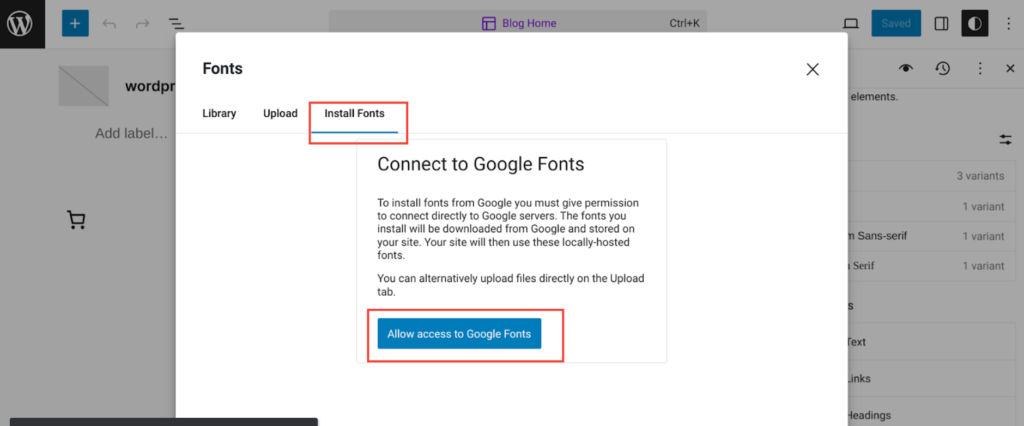
- In the font library window, select the third option: Install Fonts. Then, click Allow access to Google Fonts.
This simple process connects your site to Google Fonts, giving you access to more than 200 pages of font selections.
After connecting to Google Fonts, you can browse and choose the fonts you like. Once you’ve made your selections, you can apply these fonts globally across your entire site or locally to individual pages or posts.
Method #2: Embed Code to Fetch Fonts From Google
If you’re not using a block theme or have a version of WordPress below 6.5, you can still use custom fonts by embedding code from Google Fonts. This method allows you to import fonts from third-party repositories without manually uploading font files to your website.
Google Fonts is one of the most popular repositories for free fonts. To use it, find a font you like on the Google Fonts website and click on Get Font.
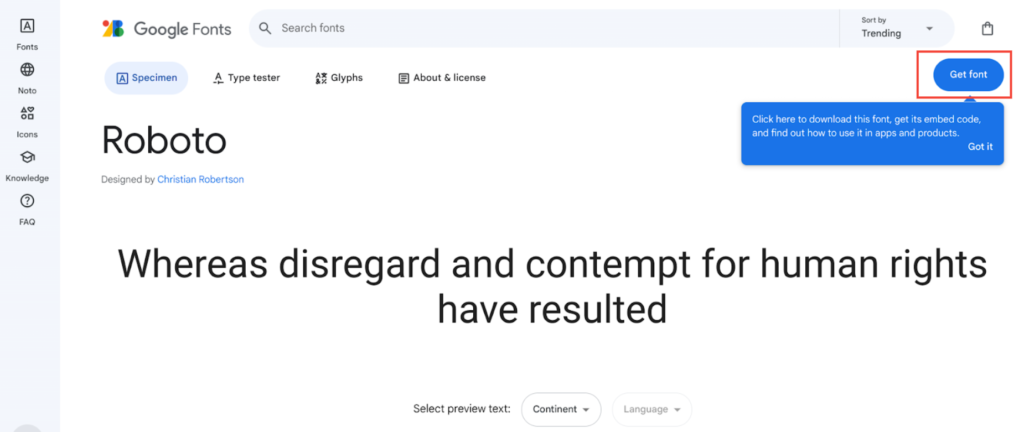
This action will open another screen where you need to click on Get embed code.
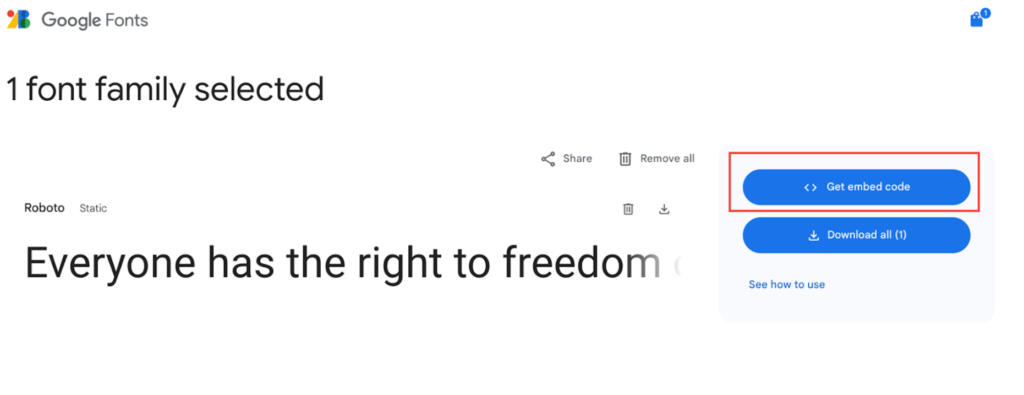
Next, go to Web → Link and then click on the ‘Copy code.’
This code will enable your website to fetch the font directly from Google.
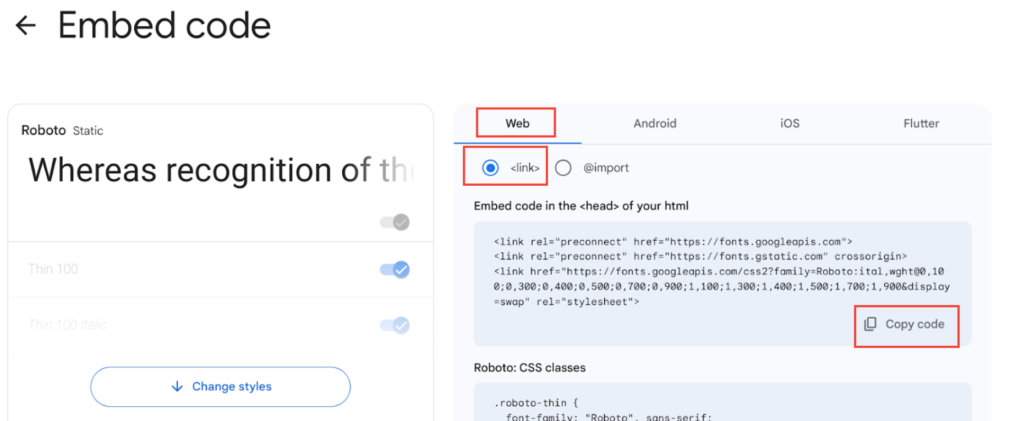
There are two main ways to add this embed code to your WordPress site:
- Edit the header.php file: If you’re comfortable editing your theme’s files, you can add the embed code directly into the <head></head> tags of your header.php file. This method ensures that the font loads on every page of your website.
- Use a plugin: If you prefer not to edit your theme’s files, you can use a plugin like “Head & Footer Code“. Install and activate the plugin, then navigate to its settings and paste the embed code into the HEAD Code section. This method is safer and easier for those unfamiliar with code editing.
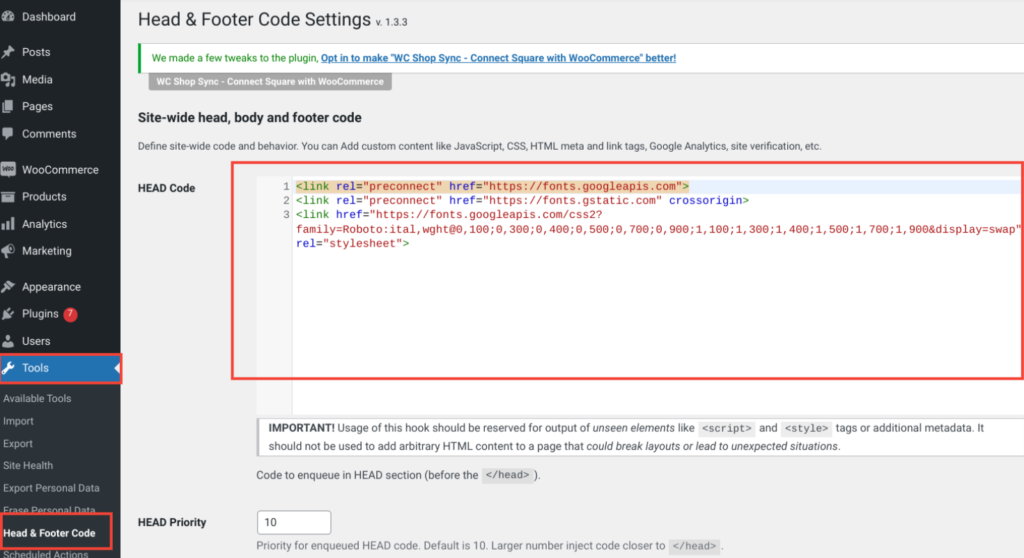
After adding the embed code, you need to assign the new font to specific elements on your website. The easiest way to do this is through the WordPress Customizer. Go to Appearance → Customize, then click on Additional CSS.
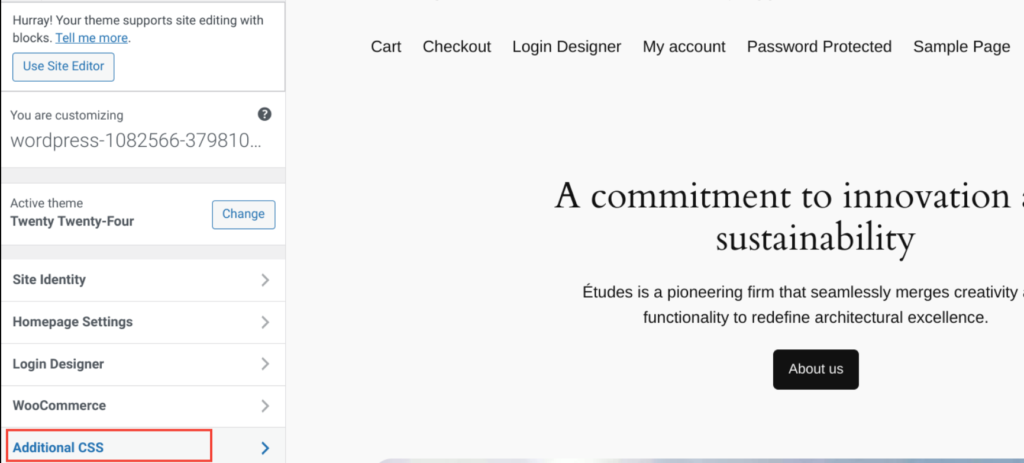
In the Additional CSS section, you can write custom CSS to apply the new font to different elements. For instance, to use your new font for main headings, you can add:
.h1, .site-title { font-family: "New Font", sans-serif; }Replace “New Font” with the name of the font you selected from Google Fonts. This CSS code tells WordPress to apply the new font to the specified elements.
NOTE: If you want to apply custom CSS to any specific Gutenberg block, check out our detailed guide about how to add Custom CSS to Gutenberg blocks.
Method #3: Upload a Custom Font File to WordPress
If you prioritize performance optimization, uploading font files directly to your website can help reduce loading times. The first step is to download the font file you want to use.

WordPress doesn’t have a dedicated fonts folder by default, so you’ll need to create one using an FTP client. It’s best to place this folder within your theme’s directory to keep everything organized. Once you’ve created the folder, upload your font file to it.
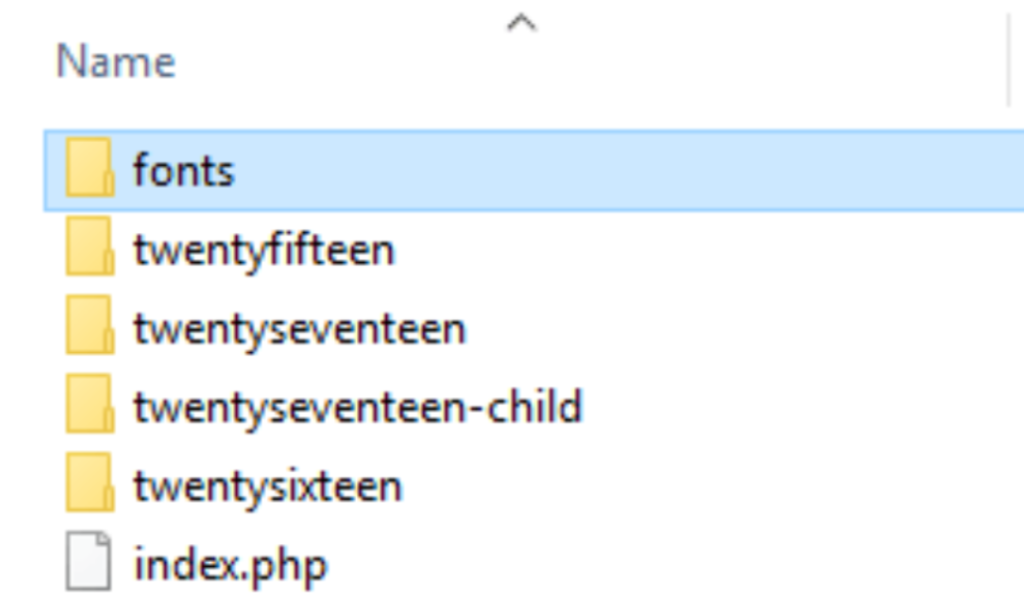
After uploading the font file, you need to instruct WordPress to use it. The most efficient way to do this is by adding custom code through the Customizer interface. Here’s how to do it:
- Access the Customizer: Go to Appearance → Customize and then navigate to Additional CSS.
- Add the Font-Face Rule: In the Additional CSS section, add the following code:
@font-face { font-family: 'New Font'; src: url('http://www.yourwebsite.com/wp-content/themes/your-theme/fonts/your-new-font.ttf'); font-weight: normal; }Replace ‘New Font’ with the name of your font, and update the URL to point to the location of your font file on your server.
- Specify Where to Use the Font: Below the @font-face rule, you can specify where you want to apply the new font. For example, to use the new font for your H1 headings, add:
.h1, .site-title { font-family: 'New Font', Arial, sans-serif; }In this example, ‘.h1, .site-title’ are the elements that will use the new font. You can replace these with any other elements or add multiple elements to apply the font in various places on your site.
Method #4: Use a Plugin to Add Custom Fonts to WordPress
The simplest way to add custom fonts to your WordPress site is by using a plugin. There are many plugins available, but two excellent options are the Fonts plugin and the Custom Fonts plugin.
- Fonts Plugin | Google Fonts Typography
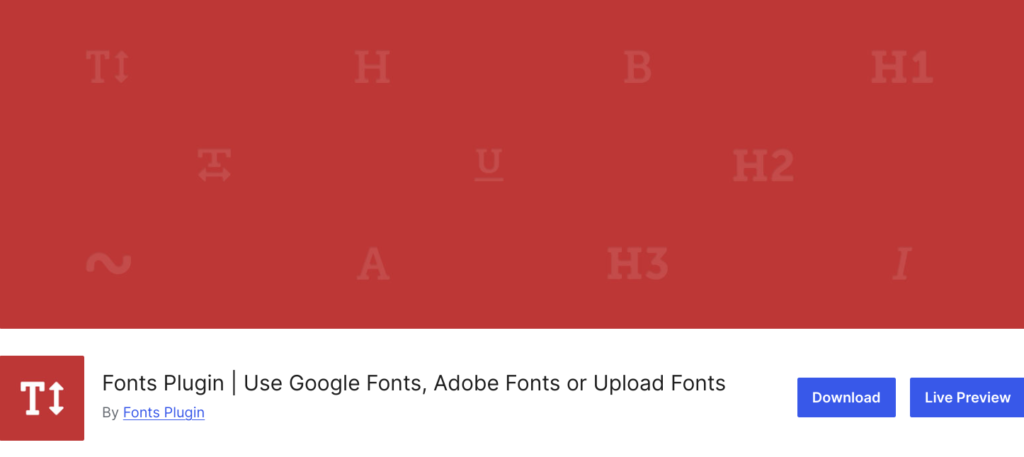
- Custom Fonts – Host Your Fonts Locally

Both plugins allow you to choose from the entire Google Fonts catalog for your pages and posts without needing to add any code to your website.
Additionally, they offer the capability to upload your own custom fonts directly from the WordPress dashboard. You can then use the Customizer to decide where and when to apply these fonts.
If you’re looking for a completely free solution, Custom Fonts is the better choice. It allows you to upload and use custom fonts without any cost. On the other hand, the Fonts plugin requires a paid version to upload custom fonts.
Wrapping Up
You’ll often notice the same fonts on many WordPress websites. These fonts are popular because they are reliable choices for readability and user accessibility.
However, with thousands of free and paid fonts available, it’s worth exploring options that perfectly match your website’s style and target audience.
To add custom fonts to WordPress, you have four main methods:
- Use the WordPress built-in font library
- Embed code to fetch fonts from Google
- Upload a custom font file to WordPress
- Use a plugin to add custom fonts to WordPress
Each method offers unique benefits, allowing you to choose the one that best fits your needs and technical comfort level. Whether you want to optimize performance by hosting fonts locally or prefer the convenience of a plugin, there’s a solution for everyone.
If you have any questions about which fonts to use on your WordPress site. Let’s discuss them in the comments section below. We would love to help you!

![Contact Form 7 Formatting in WordPress [How to Do it The Right Way] Contact Form 7 Formatting in WordPress [How to Do it The Right Way]](https://wpdesc.com/wp-content/uploads/2024/07/Contact-Form-7-Formatting-in-WordPress-1024x512.png)
![How to Redirect Contact Form 7 to Thank You Page [2 Easy Ways] How to Redirect Contact Form 7 to Thank You Page [2 Easy Ways]](https://wpdesc.com/wp-content/uploads/2024/07/how-to-redirect-contact-form-7-to-thank-you-page-1024x512.png)
![How to Add reCAPTCHA to Contact Form 7 [2 Easy Steps] How to Add reCAPTCHA to Contact Form 7 [2 Easy Steps]](https://wpdesc.com/wp-content/uploads/2024/07/how-to-add-recaptcha-to-contact-form-7-1024x512.png)

Leave a Reply