You probably don’t know how to add custom CSS to Gutenberg Blocks. Don’t worry! You are not alone!
As most WordPress users are familiar with the Classic Editor, using Gutenberg, especially for something a little more technical, like adding custom CSS to a Gutenberg block, seems complicated.
But the good news is that adding custom CSS to a Gutenberg block is as easy as pouring water into a glass. YES! You heard it right.
In this WordPress Gutenberg editor tutorial, we walk you through step-by-step instructions on how to add custom CSS to Gutenberg Blocks in two simple ways.
Ready? Let’s dive right in!
Method #1: Add Custom CSS to Gutenberg Blocks via WordPress Theme Customizer
If you are new to Gutenberg Editor, you might be thinking that there is no way to add custom CSS. In reality, this is not the case. In fact, adding custom CSS to Gutenberg blocks via the WordPress Theme Customizer is simpler than you might think.
To add custom CSS to Gutenberg Blocks, follow the steps below:
- First, select the post or page on which you want to add custom CSS to Gutenberg Blocks, then click to edit it.

- Once the editing window opens, choose the specific block you wish to edit.
- Now, open the settings sidebar by either using the shortcut key Ctrl + Shift + , or clicking the Settings icon (which looks like a square with two uneven columns ) in the top right corner.
- In the settings sidebar, navigate to the ‘Block’ section and locate ‘Advanced’ → ‘Additional CSS Class(es).’
- In the field labeled ‘Additional CSS Class(es),’ type in the name of your desired custom class name, e.g., my-custom-block.
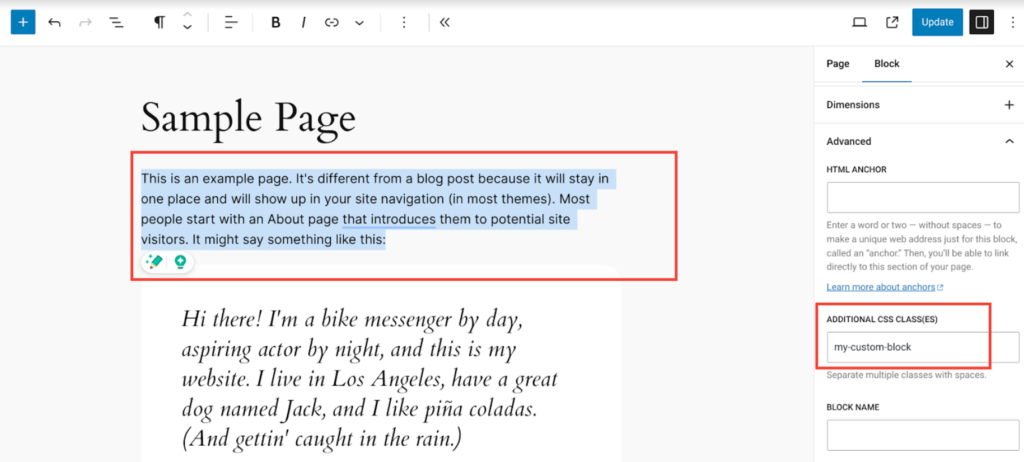
- After entering the CSS style name, select ‘Preview’ to fully add the custom CSS to your Gutenberg block.
- On the preview window, click the ‘customize’ button on the top panel of the screen.

- On the preview window, click the ‘customize’ button on the top panel of the screen.
- Once in the customization panel, find the ‘Additional CSS’ option from the right-hand menu and click on it. You’ll see a box where you can add your custom CSS.
- Now, you can add custom CSS code to the box, but make sure the first line of the code is the name of the custom CSS style you entered earlier (i.e., ‘my-custom-block’)
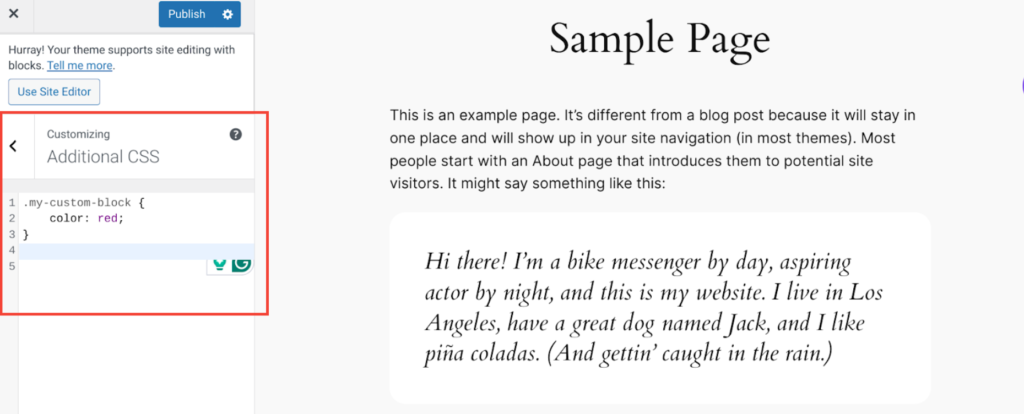
- After successfully adding the custom CSS code, simply hit the ‘Update’ button.
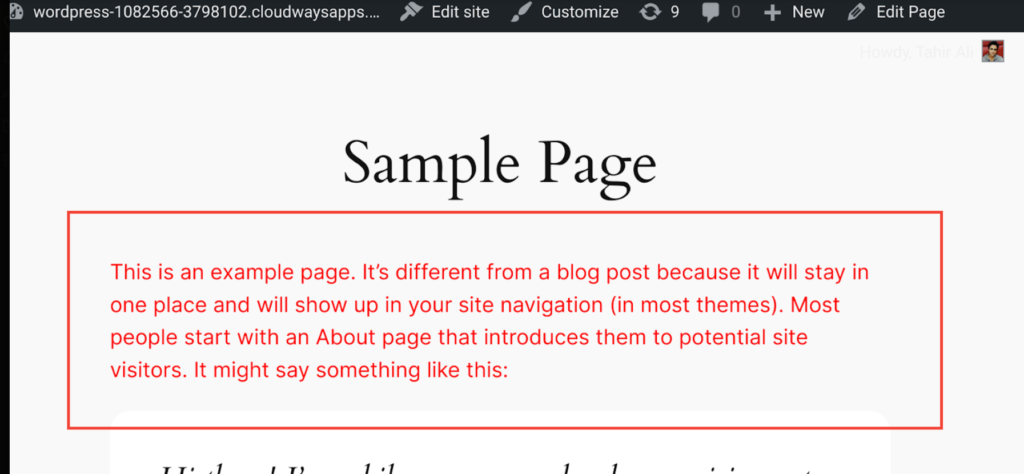
Now, go back to that particular page or post, and you’ll see the changes you just made by adding the custom CSS code.
In our example, we have changed the color of the initial paragraph of the Sample Page to red, which you can see in the screenshot below.
If you want to use the site editor to add custom CSS to Gutenberg blocks, follow the steps below:
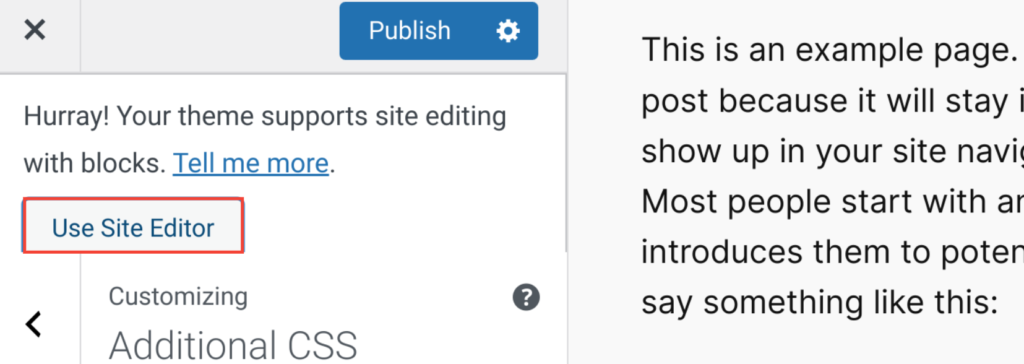
- After clicking the ‘customize’ button, simply select the ‘Use Site Editor’ option.
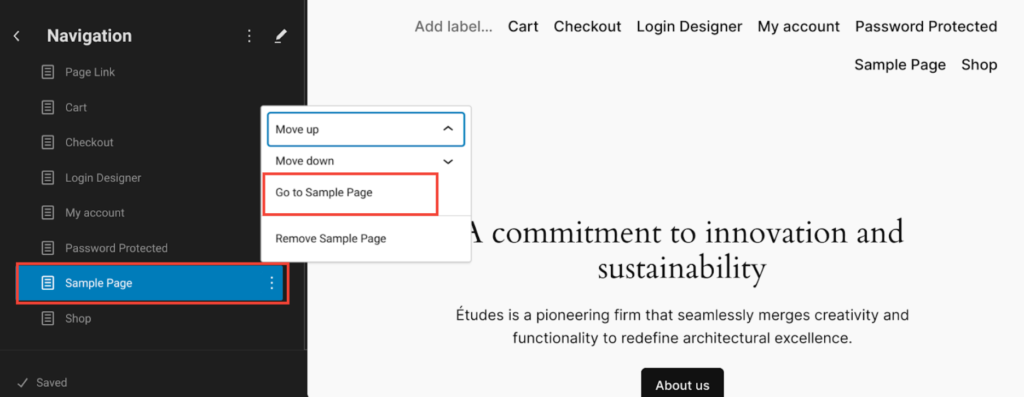
- Next, go to ‘Navigation’ → ‘Sample Page’ (your desired page or post).
- Click on the ‘three-dot’ to open the menu and then select ‘Go to Sample Page.’
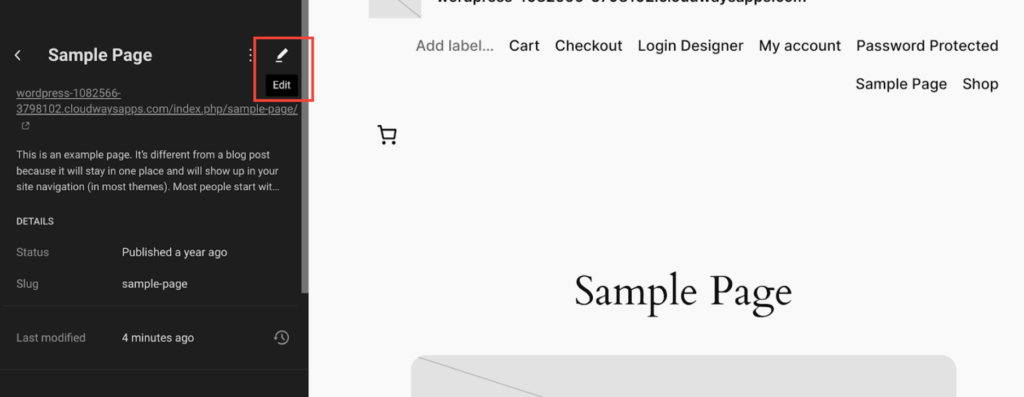
- Now, click on the edit icon next to ‘Sample Page’ (or your desired page or post).
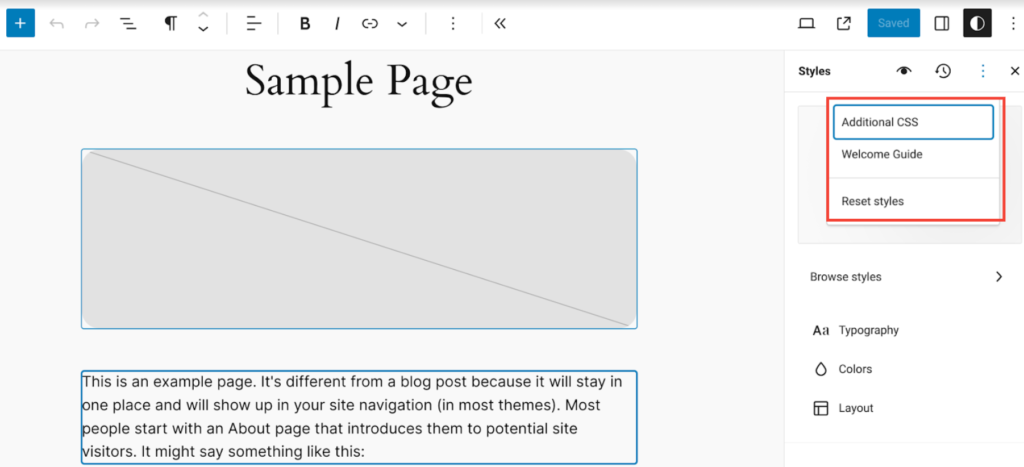
- Once you are on the page, click on the ‘Style’ icon at the top left corner, select the ‘three dots’ option, and click ‘Additional CSS’ from the drop-down menu.
- Now, you can add custom CSS code to the box that appears in the left sidebar, but make sure the first line of the code is the name of the custom CSS style you entered earlier (i.e., ‘my-custom-block’).
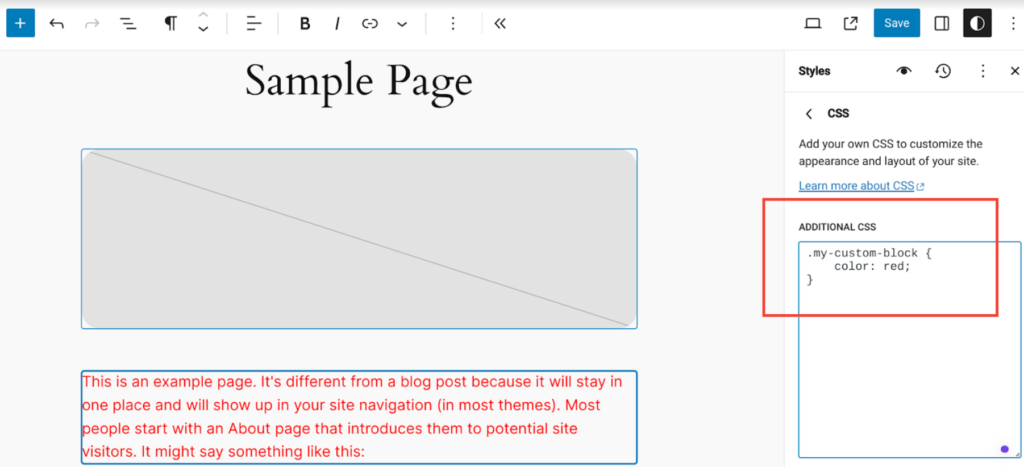
NOTE: The benefit of using the site editor is that you see the changes in real time when you add custom CSS to Gutenberg blocks.
Method #2: Add Custom CSS to Gutenberg Blocks via Plugin
If you want a less complicated method to add custom CSS to Gutenberg blocks, all you have to do is install a plugin that allows you to add custom CSS to your blocks straight from the Gutenberg Editor.
- Login to your WordPress dashboard.
- Navigate to ‘Plugins’ → ‘Add New Plugin.’
- Type in ‘Block CSS’ in the search bar.
- Look for “Blocks CSS: CSS Editor for Gutenberg Blocks.”
- Click ‘Install Now’ and then ‘Activate.’
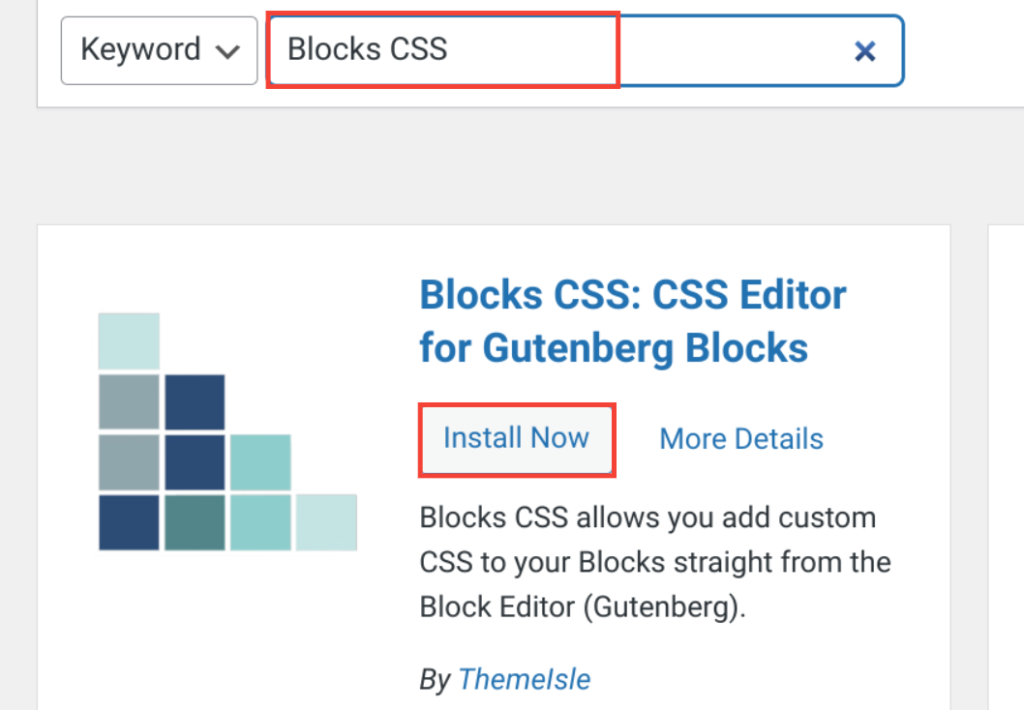
- After activation, open your desired post or page in the Gutenberg editor.
- Select the block that you want to add custom CSS to and open the additional settings by clicking on the Settings icon (which looks like a square with two uneven columns ) in the top right corner.
- Finally, click on the ‘Custom CSS’ option and add your custom CSS code in the box.
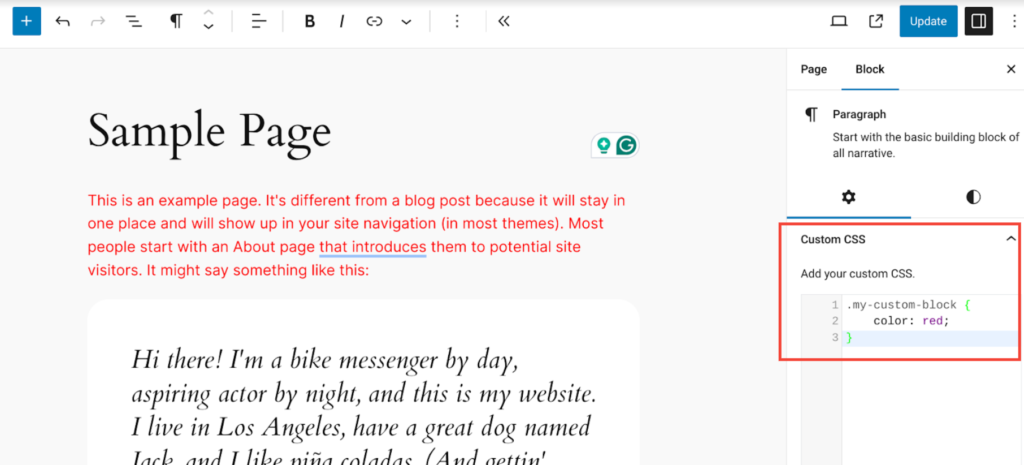
That’s it! These are two methods to easily add custom CSS to Gutenberg blocks.
Wrapping Up
To add custom CSS to Gutenberg blocks is a great way to customize your design. In this WordPress Gutenberg tutorial, we have discussed two methods which are:
- Add custom CSS to Gutenberg blocks via WordPress Theme Customizer
- Add custom CSS to Gutenberg blocks via a plugin
We believe that after reading this tutorial, you can now easily add custom CSS to Gutenberg blocks.
However, if you still have any questions, feel free to leave a comment below. We would love to help!
Frequently Asked Questions
How to use CSS in Gutenberg?
With Gutenberg, you can either add custom CSS classes to individual blocks or apply global CSS styles through the WordPress Theme Customizer or dedicated plugins.
How to add CSS in the WordPress Block editor?
To add CSS in the WordPress Block editor, access the block settings directly within Gutenberg, specify the CSS class for a specific block, and then add custom CSS code via the WordPress Theme Customizer. You can also use a plugin such as “Blocks CSS: CSS Editor for Gutenberg Blocks” to add the customer CSS directly from the block (Gutenberg) editor.
How to add custom CSS in WordPress without a plugin?
You can add custom CSS to WordPress without a plugin by going to Theme Customizer and adding CSS code directly there. But first, you need to specify the custom CSS classes inside Gutenberg to style individual blocks.

![How to Add Custom CSS to Gutenberg Blocks [2 Simple Ways] How to Add Custom CSS to Gutenberg Blocks](https://wpdesc.com/wp-content/uploads/2024/06/how-to-add-custom-css-to-gutenberg-blocks-1024x520.png)
![Contact Form 7 Formatting in WordPress [How to Do it The Right Way] Contact Form 7 Formatting in WordPress [How to Do it The Right Way]](https://wpdesc.com/wp-content/uploads/2024/07/Contact-Form-7-Formatting-in-WordPress-1024x512.png)
![How to Redirect Contact Form 7 to Thank You Page [2 Easy Ways] How to Redirect Contact Form 7 to Thank You Page [2 Easy Ways]](https://wpdesc.com/wp-content/uploads/2024/07/how-to-redirect-contact-form-7-to-thank-you-page-1024x512.png)
![How to Add reCAPTCHA to Contact Form 7 [2 Easy Steps] How to Add reCAPTCHA to Contact Form 7 [2 Easy Steps]](https://wpdesc.com/wp-content/uploads/2024/07/how-to-add-recaptcha-to-contact-form-7-1024x512.png)

Leave a Reply