This blog is your one-stop guide if you want to learn how to create block themes and WordPress block templates.
If the words ‘blocks’ and ‘templates’ are alien to you, read our post on full site editing tutorial.
Read on if you are comfortable with these terms.
What are WordPress Block Templates?
In a nutshell, blocks are the building blocks of modern WordPress websites. In a block theme, all templates are made up of blocks.
Individual blocks are combined to make patterns and template parts like header and footer.
Check out this post on how to edit header in WordPress.
Blocks are also used to create top-level page templates for example the template for single blog posts, archive page, 404 page, etc.
Templates are not a new concept in website development. Whenever there is any code that is reused across the website, we create a template and call the template instead of hard coding everything.
With that said, WordPress block templates are created a bit differently as compared to classic themes.
Read this detailed comparison on block themes vs classic themes.
In classic themes, we used PHP to create templates. Everything was stored in the database and php is used to query the database and call dynamic data. In classic themes, using template tags was the standard practice for retrieving dynamic data.
In block themes, on the other hand, block templates are created using structured html markup.
Now, you must be wondering how come HTML is used to display dynamic data. If you know a thing or two about HTML, you would know that it’s not possible to display dynamic data with plain HTML.
That’s where the unique and revolutionary templating system of WordPress comes in.
Let’s explore how the block markup works in displaying dynamic data in WordPress.
A Closer Look at Block Markup of WordPress Block Templates
To understand how block markup works, let’s delve into its structure and processing within the WordPress environment.
The Composition of Block Markup
- Nature of Block Markup: Block markup is essentially a form of HTML comment syntax that WordPress interprets in a specific way. Despite being in a .html file, this markup goes beyond standard HTML by incorporating WordPress-specific functionalities.
- Syntax and Structure: A piece of block markup is wrapped within HTML comment tags (<!– and –>). This encapsulation distinguishes block markup from regular HTML content. The syntax within these comment tags follows a structured format, typically comprising a prefix, namespace, slug, and block settings.
- Prefix: The wp: prefix is a critical identifier. It signals to WordPress that what follows is not just a standard HTML comment, but a block that needs to be parsed and rendered accordingly.
- Namespace: The namespace is used to identify the source or type of the block. It’s crucial for categorizing blocks, especially when dealing with custom or third-party blocks.
- Slug: The slug is a unique identifier for the block itself. It tells WordPress exactly which block to render.
- Block Settings: Following the slug, block settings are provided in JSON format. These settings dictate various aspects of how the block should behave or appear, such as alignment, color, size, or any custom attributes the block might support.
Dynamic Rendering Process
- Parsing the Markup: When a WordPress page is loaded, the WordPress engine which is made in PHP parses the block markup. This process involves interpreting the structured comments.
- Retrieving Dynamic Data: For blocks that require dynamic content, like a site title or latest posts, WordPress fetches the necessary data from its database. This allows the content to be up-to-date and specific to each instance of the website.
- Converting to HTML: After parsing the markup and fetching any dynamic content, WordPress then translates the block markup into standard HTML and CSS. This conversion is what makes the content viewable and styled correctly in web browsers.
What’s in a WordPress Block Template?
WordPress Block templates are made up entirely of block markup. Let’s delve deeper into what you can typically find in a block template:
1. Block Markup:
At their core, block templates consist of block markup. This is the HTML-like code that WordPress uses to represent different types of content blocks, such as paragraphs, images, or headers. Each block has its own set of attributes and settings that dictate how it behaves and appears on the page.
2. Template Parts References:
Block templates often include references to template parts. Template parts are reusable sections of your website, like headers and footers. In the block template, these are referenced through a specific block markup syntax. For example, a header template part may be included using a line like <!– wp:template-part {“slug”:”header”,”tagName”:”header”} /–>.
3. Block Patterns References:
Another common element in block templates is the reference to block patterns. Block patterns are pre-designed collections of blocks that can be inserted into your pages or posts. They offer a quick way to add complex arrangements of blocks, like a grid of images or a sophisticated header. In templates, these are also included via block markup, such as <!– wp:pattern {“slug”:”pattern-slug”} /–>.
Example of a Block Template:
To illustrate, let’s examine a typical block template, such as the /templates/404.html file. This file includes all the elements mentioned above:
<!-- wp:template-part {"slug":"header","tagName":"header"} /--> <!-- wp:group {"tagName":"main","layout":{"type":"constrained"}} --> <main class="wp-block-group"> <!-- wp:pattern {"slug":"twentytwentythree/hidden-404"} /--> </main> <!-- /wp:group --> <!-- wp:template-part {"slug":"footer","tagName":"footer"} /--> In this example, the template starts with a header template part, followed by a main content area that utilizes a group block. Inside this group, a specific block pattern is referenced. Finally, the template concludes with a footer template part.
While the example above is relatively simple, block templates can be much more complex. The beauty of WordPress block templates lies in their flexibility. You can create highly intricate designs by combining various blocks, template parts, and block patterns. The key principle is that these templates must be entirely composed of block markup to ensure WordPress can correctly parse and render them in a browser.
How to Create WordPress Block Templates
While you can definitely write your own WordPress block templates from scratch using block markup, there is often no need for that.
WordPress allows you to create block templates through its visual editor. Even when you are building a theme of your own, you can use the WordPress Template Editor of the default Twenty Twenty Four Theme and build a template through the visual interface.
Here’s the step-by-step process of creating a WordPress block template.
Accessing the Site Editor: To build an entire template, navigate to the WordPress admin dashboard, then go to Appearance > Editor > Templates. Click the plus icon to add a new template. A modal will open with options to choose the type of template.

Designing Your Template: Using the Site Editor, you can design your template visually. This involves adding new blocks, moving them around to create the desired layout, and tweaking individual block settings. For instance, you might create a home page template with a three-column grid of posts.
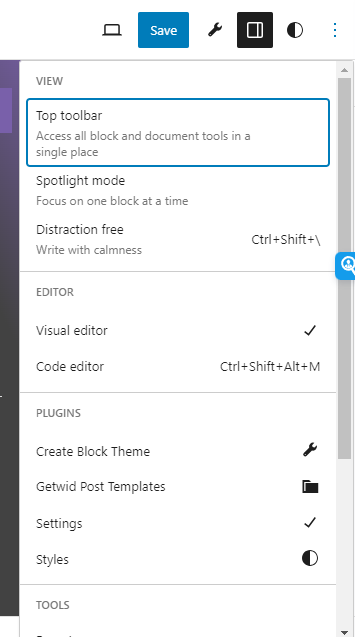
Switch to Code Editor: Once you’re satisfied with the design, you can access the block markup. Click the Options button (represented by a ⋮ icon) in the toolbar and select ‘Code Editor’. This will display the HTML markup of your template.

Copying the Block Markup: In the Code Editor view, you’ll see the block markup which can be copied. This is the HTML code that represents the layout and settings of your template.
Paste into Your Theme’s Template File: Copy the block markup and paste it into the appropriate template file within your theme. For instance, if you’re designing a home page template, you would paste it into the /templates/home.html file.
If the template is for your own website, you can save it directly from the Site Editor, and it will be saved to the database. This action overwrites the corresponding template file in your theme.
Be sure that your template filename matches a valid filename in the Template Hierarchy (for example, the Home template filename is home.html).
How to Create a Custom WordPress Block Template
Say, you want to create a page for a custom post type and want it to look different than other standard templates in WordPress.
Or you want a page with a different header.
The solution is to create a custom WordPress block template.
The beauty of WordPress full site editing is that you can do all that without touching any code. Everything is possible through the visual interface.
Here’s how to build a custom WordPress block template.
To add a new custom template, go to the Templates screen in your WordPress admin area. Here, you’ll find an option to create a ‘Custom Template’. Selecting this will allow you to create and save a new template to your site’s database.

If you want to include your custom template in a WordPress theme, particularly for distribution, copy the code and place it in a file in the /templates folder of your theme. The filename can be anything you choose, as long as it’s unique and doesn’t conflict with standard template filenames used in the WordPress Template Hierarchy.
If you create a custom WordPress block template for a custom theme of your own, you’ll also need to register that template through the theme.json file. Without that, your template won’t be available as an option in the Templates setting in the Page/Post editor.
We’ll do another post on theme.json styling in WordPress block themes.
How to Assign a Custom Template to a Post or Page
- Go to the post or page that you want to assign the template.
- Now, go to the Post/Page Settings sidebar tab.
- Under Summary, click the name of the template. A popup will appear.
- Here, you’ll see the list of all the custom templates you have created. Choose the template you want to assign to that post or page.
And that’s it! We have reached the end of the WordPress Block Template tutorial. By now, you should be able to add, edit, and create WordPress block templates and understand how they work.


![Contact Form 7 Formatting in WordPress [How to Do it The Right Way] Contact Form 7 Formatting in WordPress [How to Do it The Right Way]](https://wpdesc.com/wp-content/uploads/2024/07/Contact-Form-7-Formatting-in-WordPress-1024x512.png)
![How to Redirect Contact Form 7 to Thank You Page [2 Easy Ways] How to Redirect Contact Form 7 to Thank You Page [2 Easy Ways]](https://wpdesc.com/wp-content/uploads/2024/07/how-to-redirect-contact-form-7-to-thank-you-page-1024x512.png)
![How to Add reCAPTCHA to Contact Form 7 [2 Easy Steps] How to Add reCAPTCHA to Contact Form 7 [2 Easy Steps]](https://wpdesc.com/wp-content/uploads/2024/07/how-to-add-recaptcha-to-contact-form-7-1024x512.png)

Leave a Reply