Do you want to add custom font in WordPress without a plugin? If so, you have landed on the right page.
When visitors come to your website, they notice everything, from the speed of your web pages to the overall aesthetics. The visual experience of your website significantly impacts its ranking and success by encouraging visitors to stay longer.
One of the key elements in enhancing the visual appeal of your WordPress site is to use good fonts. However, the default font options in WordPress are limited and dependent on your theme.
If you want to use a different font, you can add custom font in WordPress. Custom fonts allow you to integrate unique font styles, font families, and typography types, making your website stand out.
In this guide, we will walk you through the process of finding custom fonts and show you how to add custom font in WordPress without a plugin.
Ready? Let’s get started!
What are Custom Fonts, and Why Should You Use Them for WordPress Site?
Custom fonts are those that are not included in the WordPress font library by default. They are unique typefaces that you can add to your website to achieve a specific look and feel. Custom fonts provide more options for typography styles, sizes, and font families than the standard fonts available in WordPress.
With custom fonts, you can customize your design and user experience to match your brand’s personality and style.
There are several reasons to add custom font in WordPress, such as:
- Aesthetic Enhancement: Custom fonts improve the visual appeal of your site.
- Improved Typography: They provide a wide range of typography options to suit your design needs.
- Brand Consistency: Custom fonts help maintain a consistent brand identity.
- Stylistic Compatibility: They allow you to match your font style with your site’s theme and content.
- Readability: Well-chosen fonts can make your content easier to read.
- Enhanced User Experience: Custom fonts contribute to a better user experience.
- Differentiation from Competitors: Unique fonts can make your website stand out in the crowded online market.
Using custom fonts in your WordPress website enhances its design, improves readability, strengthens brand identity, and differentiates you from competitors.
Where You Can Find Custom Fonts for WordPress?
If you want to add custom fonts to WordPress, you need to find the right one for a better look and feel. A quick search for ‘free fonts’ online gives you a lot of results, but many of these sites lack quality control. You may find a few gems, but most of the time, you’ll encounter outdated or unattractive fonts.

Thankfully, there are reputable font repositories that curate their collections carefully. Here are two of the best options:
- Google Fonts: Google Fonts offers over 1,600 font families in multiple languages, all available for free. This extensive library provides a wide range of styles and options, ensuring you’ll find a font that fits your needs. The fonts are also optimized for web use, ensuring they load quickly and look great on any device.

- Adobe Fonts: Formerly known as Typekit, Adobe Fonts boasts a collection of over 25,000 fonts. To access these, you need a Creative Cloud subscription, which many designers and developers already use. Adobe Fonts integrates seamlessly with other Adobe tools, making it a convenient option for those already in the Adobe ecosystem.

These two sources alone offer a plethora of choices for enhancing your website’s typography. When selecting a font, remember that it should not only look good but also align with your site’s overall style and be easy to read. Consistency and readability are key to maintaining a professional appearance and ensuring a positive user experience.
Once you’ve chosen your fonts, the next step is to add custom font in WordPress. You can do this through various methods, such as using plugins, editing your theme’s CSS, or uploading font files directly.
With the right fonts, you can significantly improve your site’s visual appeal and create a more engaging user experience.
5 Easy Steps to Add Custom Font in WordPress Without Plugin
If you want to add a custom font in WordPress without a plugin, follow these steps:
Step #1: Connect to Your WordPress Site
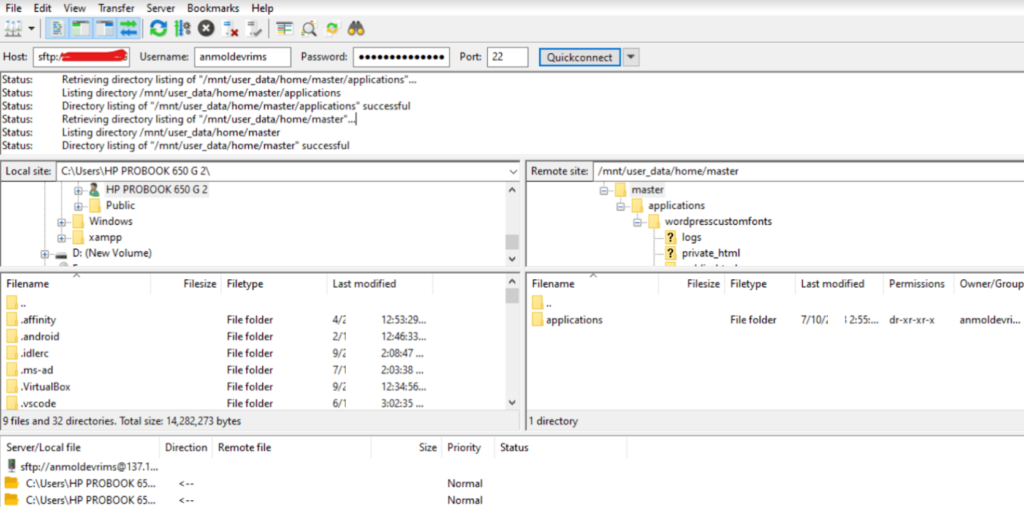
First, connect to your WordPress site using FTP or a file manager to access your website’s directories and files. You can find this in the File Management section of cPanel.
For this guide, we will use FileZilla to connect to your server and access your WordPress application. Open FileZilla, connect to your server and navigate to your WordPress directory.

Step #2: Create a Custom Fonts Directory
Inside your WordPress application folder, navigate to public_html > wp-content > themes > your-current-theme. Create a new directory in this folder and name it something like “custom-fonts.” Upload your downloaded custom font files into this directory.

PLEASE NOTE: Make sure the files you upload are in WOFF format for compatibility.
Step #3: Define the Custom Font in CSS
Return to your theme’s directory and find the style.css file, or create a new CSS file in your “custom-fonts” directory. Open this file using a text or code editor.
Inside the CSS file, write the following code to define and apply the custom fonts:
@font-face {

    font-family: 'CustomFontName';

    src: url('custom-fonts/custom-font.woff') format('woff');

}
Replace ‘CustomFontName’ with the name you want for your custom font and ‘custom-fonts/custom-font.woff’ with the path to your font file.
Step #4: Apply the Custom Font to Your Website
In the same CSS file, use CSS selectors to apply the custom font to specific elements on your website. For example:
h1 {

    font-family: 'CustomFontName', sans-serif;

}
Replace ‘CustomFontName’ with the name you specified in the @font-face rule and adjust the CSS selectors and properties as needed.
Step 5: Enqueue the Custom Font CSS File
To make WordPress load the custom font CSS file, enqueue it in your theme’s functions.php file. Open the functions.php file located in your theme directory and add the following code:
function enqueue_custom_fonts() {

    wp_enqueue_style('custom-fonts', get_template_directory_uri() . '/custom-fonts.css', array(), '1.0', 'all');

}

add_action('wp_enqueue_scripts', 'enqueue_custom_fonts');
Save the functions.php file after adding this code. Save all modified files and upload them to your WordPress theme directory using FTP or a file manager. Preview your website to see the custom fonts in action. Ensure the fonts are displayed correctly and applied to the intended elements.
By following these steps, you can manually add custom font in WordPress without using a plugin. This method gives you more control over font integration and requires some technical knowledge of CSS and file management.
NOTE: If you want to use a different method to add custom font in WordPress, check out our detailed guide on how to add custom fonts to WordPress in 4 easy ways.
Final Thoughts: Add Custom Font in WordPress Without Plugin
Adding custom fonts to your WordPress site without using a plugin can significantly enhance its visual appeal and readability. This improvement contributes to a better user experience and helps your site stand out.
By following the steps outlined in this guide, you can manually integrate custom fonts, allowing for more control and customization. This approach requires some technical skills but provides a rewarding way to make your website unique with custom typography.
If you have any questions, feel free to ask in the comment section below. We would love to help! Remember, learning how to add custom font in WordPress can take your site’s design to the next level.
Frequently Asked Questions
How do I manually add fonts to WordPress?
To manually add fonts to WordPress, connect to your site using FTP or a file manager. Create a new directory in your theme folder and upload your font files there. Add the @font-face rule in your CSS file to define the font, then use CSS selectors to apply it to your site elements. Finally, enqueue the custom CSS file in your theme’s functions.php file.
Can you use any font on WordPress?
Yes, you can use any font on WordPress as long as you have the font file and proper licensing. You can manually upload the font files to your theme directory and define them in your CSS. Alternatively, you can use web font services like Google Fonts or Adobe Fonts, which provide easy integration and a wide selection of fonts.
How to upload a custom font in WordPress without plugins?
To upload a custom font in WordPress without plugins, first connect to your site via FTP or a file manager. Create a folder for your fonts in your theme directory and upload your font files. Define the font using the @font-face rule in your CSS file, and apply it to your site elements with CSS selectors. Finally, enqueue your custom CSS file in the functions.php file of your theme.

![How to Add Custom Font in WordPress Without Plugin [5 Easy Steps] How to Add Custom Font in WordPress Without Plugin](https://wpdesc.com/wp-content/uploads/2024/06/how-to-add-custom-font-in-wordpress-without-plugin-1024x520.png)
![How to Fix Formidable Forms Not Sending Email [3 Easy Steps] How to Fix Formidable Forms Not Sending Email [3 Easy Steps]](https://wpdesc.com/wp-content/uploads/2024/08/how-to-fix-formidable-forms-not-sending-email-1024x512.png)
![How to Fix Divi Contact Form Not Sending Email in [3 Easy Steps] How to Fix Divi Contact Form Not Sending Email in [3 Easy Steps]](https://wpdesc.com/wp-content/uploads/2024/08/how-to-fix-divi-contact-form-not-sending-email-1024x512.png)


Leave a Reply