You are probably wondering how to redirect Contact Form 7 to the thank you page. Right? Fortunately, you’ve landed on the right page.
Undoubtedly, Contact Form 7 is the most popular and powerful WordPress plugin, with over 10 million active installations. However, by default, this plugin does not allow you to redirect to a thank you page or any other page after you submit the form.
Don’t worry! In this article, we will show you how to redirect Contact Form 7 to the thank you page in two easy ways.
Ready? Let’s get started!
Why Should You Use Contact Form 7?
Contact forms have become a staple on websites over time. Due to this, WordPress has a wide selection of contact form plugins, both free and paid. However, among all of them, Contact Form 7 stands out.
Contact Form 7 excels because it accomplishes tasks easily and quickly. It offers a range of options to suit different needs. The form builder is easy to use and resembles the WordPress text editor.
Initially, it might seem challenging to use due to the absence of a syntax highlighter or drag-and-drop feature. However, once you get accustomed to it, you’ll find it easy to manage.
This plugin is highly extensible with numerous add-ons. Its popularity ensures broad support from various themes and plugins. Other notable features include:
- The form editor supports HTML.
- Seamless integration with WordPress.
- Programmer-friendly with many hooks.
- Customizable response messages and emails.
- It automatically inherits styles from the theme.
- Extensive documentation and a large community, etc.
So, the question remains: How do you redirect Contact Form 7 to a specific page after submitting it? Let’s see how in the following section.
2 Easy Ways to Redirect Contact Form 7 to Thank You Page
Most WordPress users prefer to use plugins for every new functionality, but some still don’t want to use plugins to redirect Contact Form 7. Luckily, we have a specific solution for both types of WordPRess users.
So, let’s check out each method in detail.
Method #1: Redirect Contact Form 7 With a Plugin
The simplest way to redirect Contact Form 7 to a custom page is by using a plugin. We recommend the “Redirection for Contact Form 7” plugin, which we’ve tested and found reliable.
Here’s how to do it step-by-step:
1. Download and Activate the Plugin
- First, log in to your WordPress as an administrative
- Go to “Plugin” → “Add New Plugin”
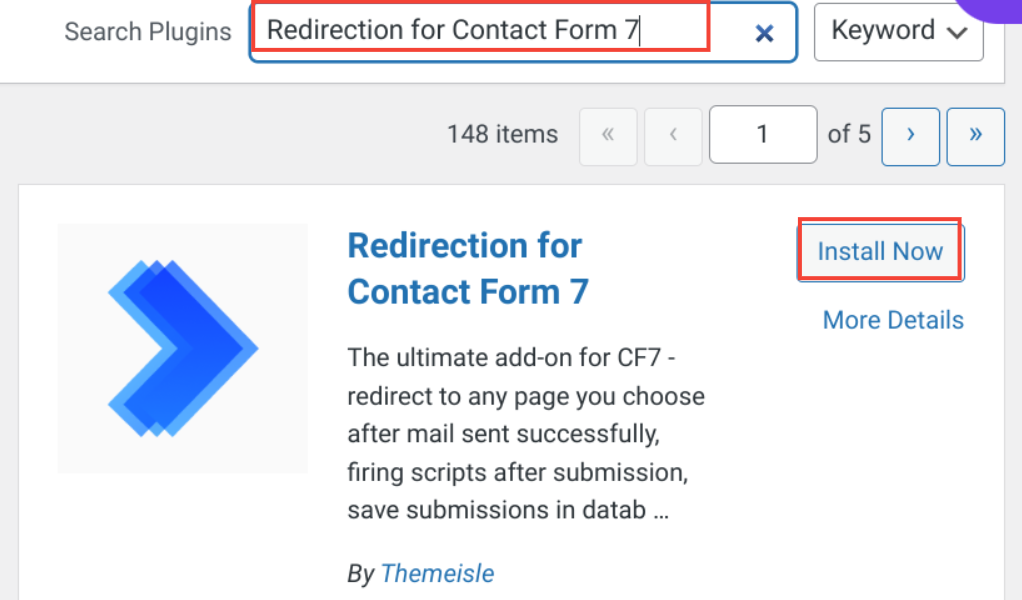
- Search for the “Redirection for Contact Form 7” plugin.
- Click on “Install Now” and then “Activate” the plugin.

2. Access the Actions Tab
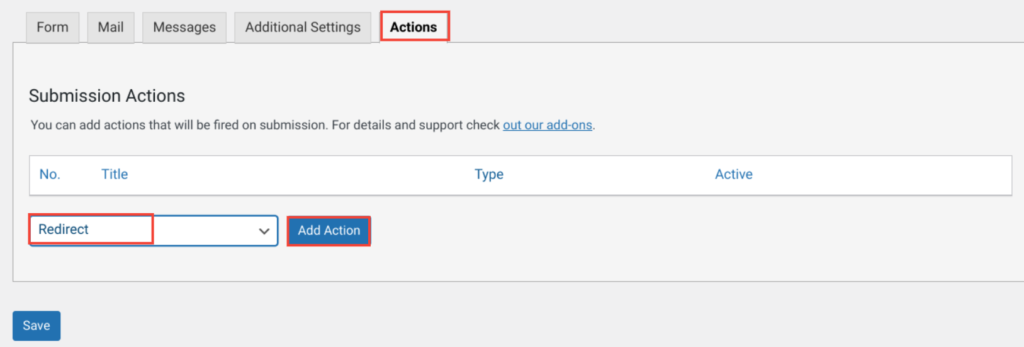
- After successful activation, you’ll see the “Action” tab in the edit screen of the contact form.

3. Create a Redirect Action
- In the “Actions” tab, select “Redirect” from the dropdown menu.
- Click on “Add Action” to create and assign the redirect action to your form.

4. Configure the Redirect
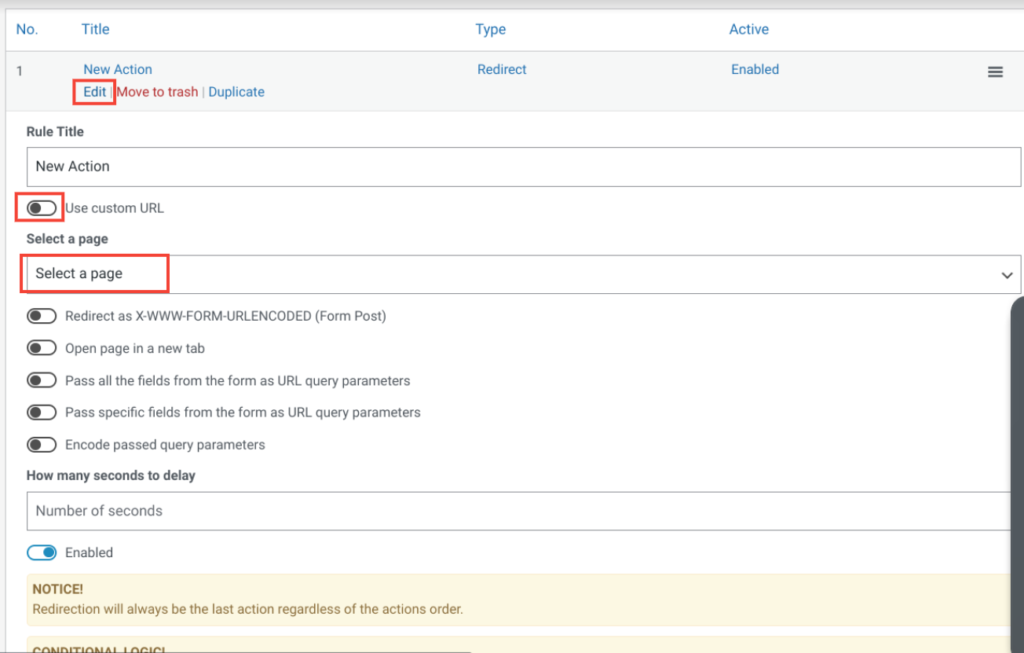
- Click on “Edit” next to the “New Action.”
- Choose the page you want to redirect to from the “Select a page” option.
- If you need to redirect to an external page, use the “Use custom URL” toggle option.

5. Save Your Changes
- Click “Save” to apply the redirect settings to your form.
In the following section, we will explain how to redirect Contact Form 7 without installing a plugin.
Method #2: Redirect Contact Form 7 Without a Plugin
You can also redirect Contact Form 7 to a thank you page without using a plugin. This method requires creating a JavaScript code that listens for the “wpcf7mailsent” event.
When this event occurs, the user will be redirected to a specific page after the form submission.
To do so, follow the steps below:
1. Add JavaScript to Your Site
You need to add JavaScript to your site to handle the redirect. You can place this script in your header.php or footer.php file. However, using a WordPress hook is a better practice.
2. Use the wp_footer Hook
We’ll use the wp_footer action hook to include our JavaScript in the footer. This method ensures your code doesn’t block the page from loading quickly.
add_action( 'wp_footer', 'wpm_redirect_cf7' );
function wpm_redirect_cf7() { ?>
    <script type="text/javascript">
    document.addEventListener('wpcf7mailsent', function(event) {
        location = 'http://example.com/thank-you/';
    }, false);
    </script>
<?php }
3. Replace the URL
Make sure to replace http://example.com/thank-you/ with the URL of your thank you page.
4. Customize for Different Pages
If you want different thank you pages for different forms or pages, you can tweak the code as follows:
add_action( 'wp_footer', 'wpm_redirect_cf7' );
function wpm_redirect_cf7() {
    if ( is_page( 7574 ) ) {
        $thank_you_page = 'http://example.com/thank-you1/';
    } else if ( is_page( 'contact-us' ) ) {
        $thank_you_page = 'http://example.com/thank-you2/';
    } else if ( is_page( 'Customer Support' ) ) {
        $thank_you_page = 'http://example.com/thank-you3/';
    } else {
        $thank_you_page = 'http://example.com/thank-you/';
    } ?>

    <script type="text/javascript">
    document.addEventListener('wpcf7mailsent', function(event) {
        location = '<?php echo $thank_you_page; ?>';
    }, false);
    </script>
<?php }
5. Redirect Based on Form ID
If you have multiple forms on the same page and want to redirect each form to a different page, use the following code:
add_action( 'wp_footer', 'wpm_redirect_cf7' );
function wpm_redirect_cf7() { ?>
    <script type="text/javascript">
    document.addEventListener('wpcf7mailsent', function(event) {
        if ('3255' == event.detail.contactFormId) {
            location = 'http://example.com/thank-you1/';
        } else if ('4433' == event.detail.contactFormId) {
            location = 'http://example.com/thank-you2/';
        } else {
            location = 'http://example.com/thank-you/';
        }
    }, false);
    </script>
<?php }
6. Adjust Form IDs
Replace 3255 and 4433 with your actual Contact Form 7 IDs. You can find the form ID in the shortcode provided by Contact Form 7.
The URL will always include your form or page ID. In addition, Contact Form 7 provides a shortcode that includes the form ID.
As you can see in the screenshot below, it is 5:

That’s it! You’ve now successfully redirected your Contact Form 7 form to the thank you page without a plugin.
📕 You might also like: How to Save Contact Form 7 Entries to WordPress Database
To Sum It Up
This article has shown you two easy ways to redirect Contact Form 7 to a thank you page. You can choose to do it manually with a bit of code or use a plugin to handle the task for you.
Redirecting Contact Form 7 to a thank you page has many advantages. It simplifies tracking conversions with Google Analytics and enhances the user experience by providing a personalized response.
Are you using Contact Form 7 to build contact forms? What add-ons do you use to redirect Contact Form 7 after submission? Share your experiences in the comments below.
If you’re facing any issues with Contact Form 7, such as email delivery problems, check out our blog on how to fix Contact Form 7 email not sending issue in 2 easy steps.

![How to Redirect Contact Form 7 to Thank You Page [2 Easy Ways] How to Redirect Contact Form 7 to Thank You Page](https://wpdesc.com/wp-content/uploads/2024/07/how-to-redirect-contact-form-7-to-thank-you-page-1024x512.png)
![How to Fix Formidable Forms Not Sending Email [3 Easy Steps] How to Fix Formidable Forms Not Sending Email [3 Easy Steps]](https://wpdesc.com/wp-content/uploads/2024/08/how-to-fix-formidable-forms-not-sending-email-1024x512.png)
![How to Fix Divi Contact Form Not Sending Email in [3 Easy Steps] How to Fix Divi Contact Form Not Sending Email in [3 Easy Steps]](https://wpdesc.com/wp-content/uploads/2024/08/how-to-fix-divi-contact-form-not-sending-email-1024x512.png)


Leave a Reply