Are you looking for an easy way to customize your Contact Form 7 forms in WordPress? If so, you’ve come to the right place!
Customizing your Contact Form 7 forms can significantly improve your website’s look and feel. While Contact Form 7 is a highly popular plugin for WordPress, the default forms often lack visual appeal. Also, plain-looking forms don’t match your site’s design and can fail to engage visitors.
Fortunately, you can customize Contact Form 7 by changing the font, background color, spacing, etc., to create a cohesive and attractive appearance.
In this article, we will show you how to customize Contact Form 7 forms effectively in WordPress. You’ll see that customization of Contact Form 7 is quite easier than you think.
Ready? Let’s get started!
Why Should You Customize Contact Form 7?
There is no question about it that customizing Contact Form 7 forms is a must for creating a cohesive and appealing website design. While Contact Form 7 is a popular and free plugin that allows you to add forms using shortcodes, it comes with limited styling options.
The default forms often look plain and lack the flexibility to match your website’s theme. Customizing the appearance of your forms can significantly enhance user experience and make your site look more professional.
Here are some key reasons to customize Contact Form 7 forms:
- Better Visual Appeal: Default Contact Form 7 forms can look bland. Customization lets you change fonts, colors, and layouts to make your forms more attractive and engaging.
- Brand Consistency: Customizing your forms to match your website’s theme helps maintain a consistent brand image. This includes aligning colors, fonts, and styles with your brand guidelines.
- Improved User Experience: Well-styled forms are easier to read and fill out. Adjusting spacing, font size, and other visual elements can make the forms more user-friendly.
- Greater Functionality: By applying custom CSS, you can add or adjust features that are not available out-of-the-box with Contact Form 7. This can include hover effects, animations, and other interactive elements.
- Higher Conversion Rates: Attractive and easy-to-use forms are more likely to be filled out by visitors. This can lead to higher conversion rates and better engagement with your audience.
Customizing Contact Form 7 forms can transform them from basic to beautiful so that they fit seamlessly into your overall website design.
Having said that, let’s take a look at how to customize Contact Form 7 in WordPress to make it look better.
2 Easy Ways to Customize Contact Form 7 Forms in WordPress
Most WordPress users prefer to use plugins for every new functionality, but some still don’t want to use plugins to redirect Contact Form 7. Luckily, we have a specific solution for both types of WordPRess users.
So, let’s check out each method in detail.
Method #1: Customize Contact Form 7 Forms With Custom CSS
Step #1: Install Contact Form 7 Plugin
If you haven’t set up your Contact Form, first, you need to install and set up the Contact Form 7 plugin on your WordPress website.
Follow these steps to get started:
Go to your WordPress dashboard, navigate to the “Plugins” menu, and click “Add New.” Search for “Contact Form 7,” then click “Install Now” and “Activate.”

Step #2: Create and Publish Your First Contact Form
After activation, go to the “Contact” menu in the WordPress dashboard and click “Add New.” Enter a title for your form to identify it easily.
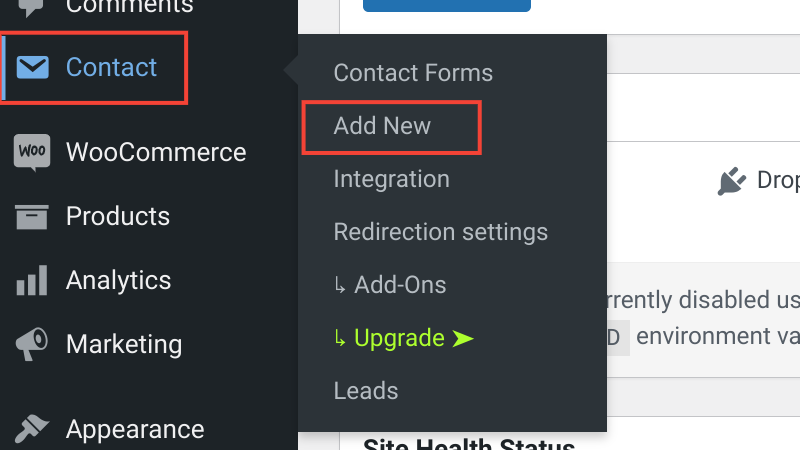
The plugin provides default fields like name, email, subject, and message. You can add more fields by dragging and dropping them into the form editor. Customize each field according to your requirements.
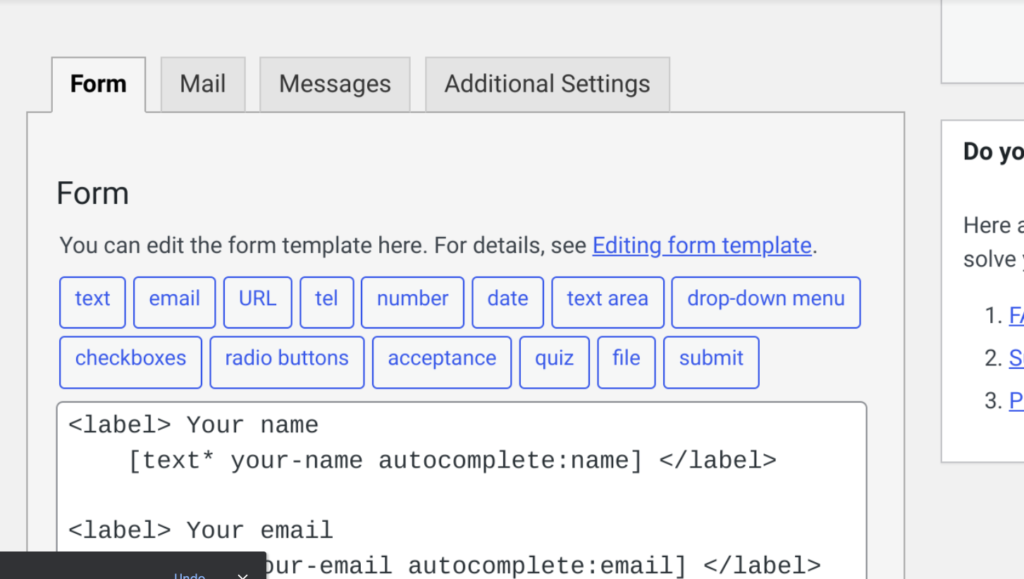
Once you have configured your form, click the “Save” button. Copy the shortcode provided by the plugin, which looks something like [contact-form-7 id=”40d8de4″ title=”Test Form”].

Now, you need to add this contact form to a WordPress page or post.
To do so, edit an existing post or page, or create a new one. Then, in the WordPress editor, click the “+” sign to add a block and choose “Shortcode.” Paste the copied shortcode into the shortcode block.
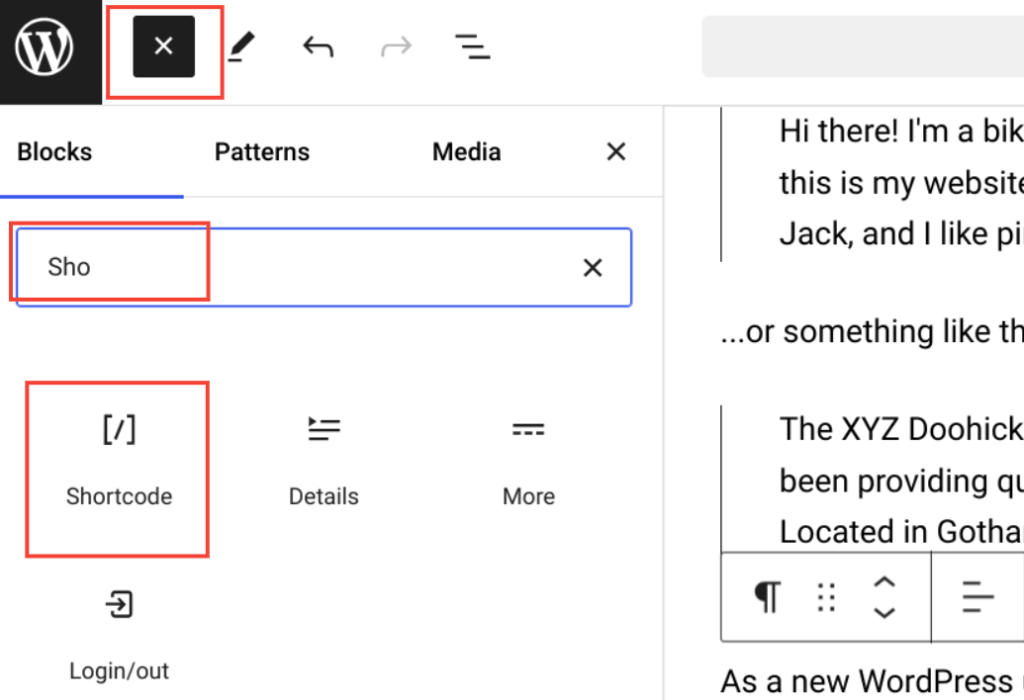
You can also add a Contact Form 7 block and select your form from the drop-down menu.

Now, you are ready to customize Contact Form 7.
Step #3: Apply the Custom CSS to Contact Form 7
To customize Contact Form 7 using custom CSS, follow these steps.
Since Contact Form 7 doesn’t include built-in styling options, you’ll need to manually add custom CSS to style your forms. The plugin generates standard-compliant code, which makes customization simple if you know CSS.
Here’s how to do it:
First, identify the form elements. Contact Form 7 uses the CSS class “.wpcf7” for its forms, which you can target to style your form elements. Each form element, such as text fields, email fields, and buttons, has specific CSS classes you can customize.
Next, add custom CSS to your theme. Go to your WordPress dashboard, navigate to “Appearance,” and click on “Editor.” Go to the page where you’ve added the contact form and click on the pencil icon to edit the page. In the customizer, click on the style icon at the top-left. Then click on the three-dot option and select “Additional CSS.”
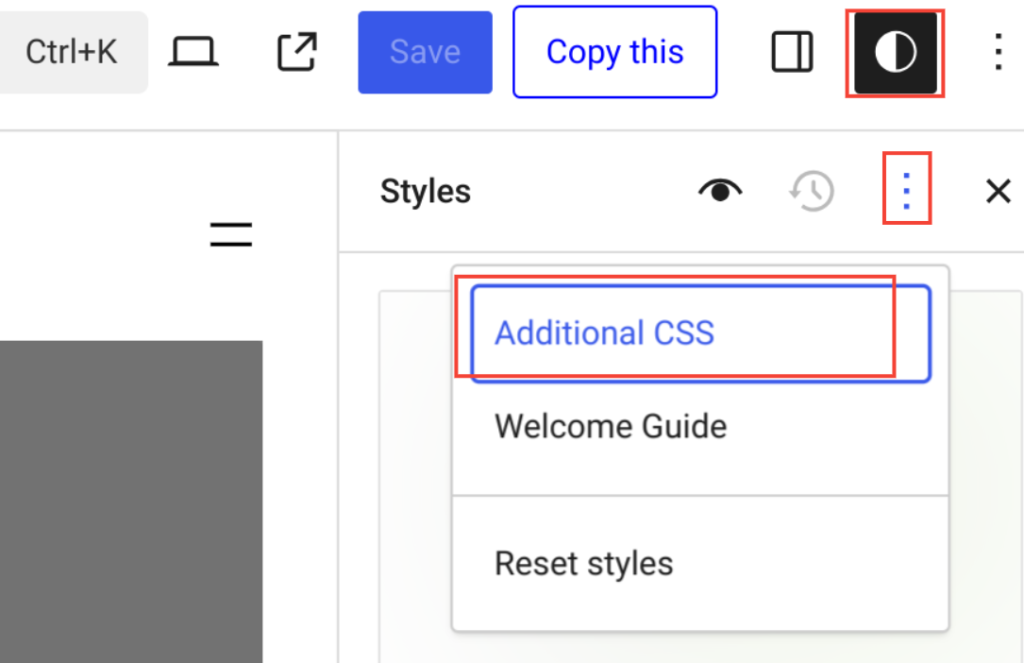
Add your custom CSS code here.
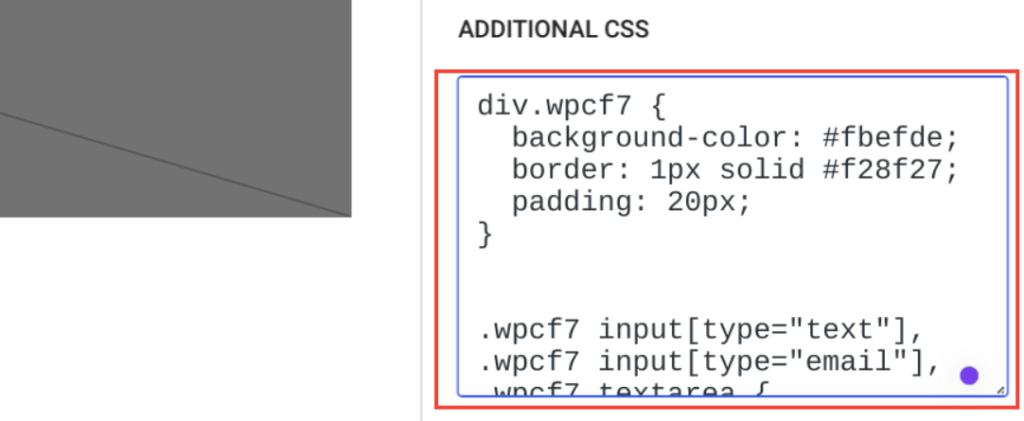
To style the form container, use the following CSS to change the background color and add padding:
div.wpcf7 {

  background-color: #fbefde;

  border: 1px solid #f28f27;

  padding: 20px;

}
To style the input fields and textareas, use this CSS to change the font, background color, and text color:
.wpcf7 input[type="text"],

.wpcf7 input[type="email"],

.wpcf7 textarea {

  background: #725f4c;

  color: #FFF;

  font-family: 'Lora', sans-serif;

  font-style: italic;

}
To customize the appearance of the submit and button elements, use the following CSS:
.wpcf7 input[type="submit"],

.wpcf7 input[type="button"] {

  background-color: #725f4c;

  width: 100%;

  text-align: center;

  text-transform: uppercase;

}
After adding the CSS, click “Publish” to save your changes. Visit your contact form page to see how the custom CSS has styled your form.
This example uses a custom font called “Lora” and changes the form’s background color. You can further customize the form by adjusting the CSS to match your website’s design.
Your Contact Form 7 form should now look more visually appealing and better integrated with your site’s design.
Method #2: Customize Contact Form 7 Forms Using Plugin
To easily customize Contact Form 7 forms, you can use the CSS Hero plugin. This plugin simplifies the customization process, allowing you to style your forms without writing any CSS code.
Please note that CSS Hero is a paid plugin, so visit their official website and purchase a plan that suits your needs.
First, install and activate CSS Hero.
Go to your WordPress dashboard, navigate to “Plugins,” and click “Add New Plugin.” Upload the “.zip” file you received via email, then click “Install Now” and “Activate” once the installation is complete.
Next, open the page where your Contact Form 7 form is located.
In the WordPress toolbar at the top, click on the “Customize with CSS Hero” option. This will load a user-friendly interface for customization.

Click on different elements of your form, such as fields, headings, or buttons. Use the options provided to adjust styles like background color, font type, borders, spacing, and more.
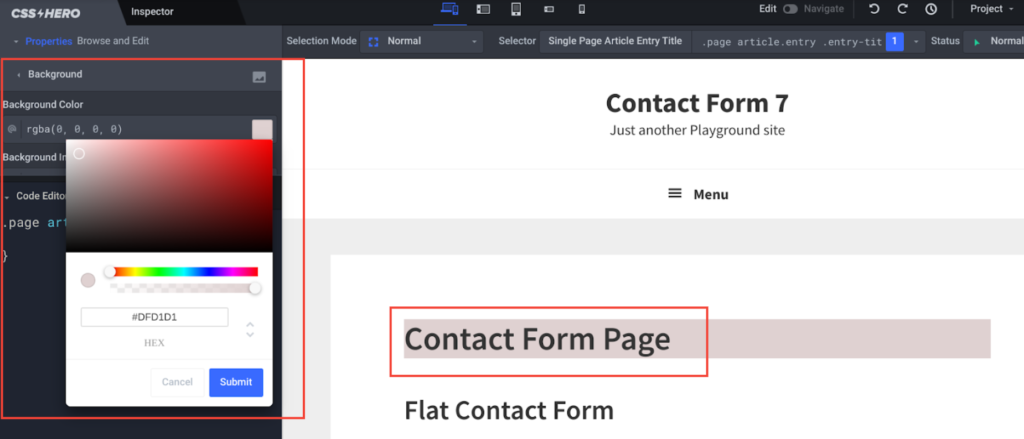
After making your desired changes, click the “Save & Publish” button. Your updated styles will now be applied to your Contact Form 7 form.
CSS Hero makes it simple to customize the appearance of your forms, ensuring they perfectly match your site’s design without any CSS coding required.
📕 You might also like: How to Add reCAPTCHA to Contact Form 7 [2 Easy Steps]
Always Place Function Over Style
While we have mentioned the importance of contact form appearance, it’s possible that you might overdo it. Beginners, in particular, mostly create forms that are difficult to read.
Being creative with colors can work well, but it can also lead to readability issues for some visitors.
For example, many people forget to consider color-blind users, who make up 5 to 10% of the US population. Using unique colors might seem clever, but they can be challenging for these individuals to read.
Even for the average person, overly complex forms can be hard to read. To avoid this, always have someone else review your forms before publishing them. This helps ensure they are accessible and easy to understand for all users.
Final Thoughts
Customizing Contact Form 7 forms can significantly enhance the visual appeal and functionality of your WordPress site. By tailoring your forms with custom CSS or using a powerful plugin like CSS Hero, you can create forms that seamlessly integrate with your site’s design.
Remember, while aesthetics are crucial, always prioritize readability and user experience. Avoid overly complex designs that may alienate some visitors. Testing your forms with different users ensures they are accessible to everyone, including those with color vision deficiencies.
So, what’s stopping you? Customize Contact Form 7 today and transform your forms into attractive, user-friendly elements that boost engagement and conversions on your website.
Also, which method would you like to use? Tell us in the comments below.

![How to Customize Contact Form 7 Forms in WordPress [2 Easy Ways] How to Customize Contact Form 7 Forms in WordPress](https://wpdesc.com/wp-content/uploads/2024/07/how-to-customize-contact-form-7-forms-in-wordpress-1024x512.png)
![How to Fix Formidable Forms Not Sending Email [3 Easy Steps] How to Fix Formidable Forms Not Sending Email [3 Easy Steps]](https://wpdesc.com/wp-content/uploads/2024/08/how-to-fix-formidable-forms-not-sending-email-1024x512.png)
![How to Fix Divi Contact Form Not Sending Email in [3 Easy Steps] How to Fix Divi Contact Form Not Sending Email in [3 Easy Steps]](https://wpdesc.com/wp-content/uploads/2024/08/how-to-fix-divi-contact-form-not-sending-email-1024x512.png)
Leave a Reply